
20.设计性能
第 20 章 设计性能
Chapter 20 Designing for Performance
Up until this point, the discussion of software design has focused on complexity; the goal has been to make software as simple and understandable as possible. But what if you are working on a system that needs to be fast? How should performance considerations affect the design process? This chapter discusses how to achieve high performance without sacrificing clean design. The most important idea is still simplicity: not only does simplicity improve a system’s design, but it usually makes systems faster.
到目前为止,关于软件设计的讨论都集中在复杂性上。目标是使软件尽可能简单易懂。但是,如果您在需要快速的系统上工作,该怎么办?性能方面的考虑应如何影响设计过程?本章讨论如何在不牺牲简洁设计的情况下实现高性能。最重要的想法仍然是简单性:简单性不仅可以改善系统的设计,而且通常可以使系统更快。
20.1 How to think about performance 如何考虑性能
The first question to address is “how much should you worry about performance during the normal development process?” If you try to optimize every statement for maximum speed, it will slow down development and create a lot of unnecessary complexity. Furthermore, many of the “optimizations” won’t actually help performance. On the other hand, if you completely ignore performance issues, it’s easy to end up with a large number of significant inefficiencies spread throughout the code; the resulting system can easily be 5–10x slower than it needs to be. In this “death by a thousand cuts” scenario it’s hard to come back later and improve the performance, because there is no single improvement that will have much impact.
要解决的第一个问题是“您在正常的开发过程中应该为性能多少担心?” 如果您尝试优化每条语句以获得最大速度,则它将减慢开发速度并产生许多不必要的复杂性。此外,许多“优化”实际上对性能没有帮助。另一方面,如果您完全忽略了性能问题,则很容易导致遍及整个代码的大量效率低下。结果系统很容易比所需的速度慢 5–10 倍。在这种“千刀砍死”的情况下,以后很难再回来提高性能了,因为没有单一的改进会产生很大的影响。
The best approach is something between these extremes, where you use basic knowledge of performance to choose design alternatives that are “naturally efficient” yet also clean and simple. The key is to develop an awareness of which operations are fundamentally expensive. Here are a few examples of operations that are relatively expensive today:
最好的方法是介于这两种极端之间,在这种极端情况下,您可以使用性能的基本知识来选择“自然高效”但又干净又简单的设计替代方案。关键是要了解哪些操作根本是昂贵的。以下是一些今天相对昂贵的操作示例:
- Network communication: even within a datacenter, a round-trip message exchange can take 10–50 µs, which is tens of thousands of instruction times. Wide-area round-trips can take 10–100 ms.
- I/O to secondary storage: disk I/O operations typically take 5–10 ms, which is millions of instruction times. Flash storage takes 10–100 µs. New emerging nonvolatile memories may be as fast as 1 µs, but this is still around 2000 instruction times.
- Dynamic memory allocation (malloc in C, new in C++ or Java) typically involves significant overhead for allocation, freeing, and garbage collection.
- Cache misses: fetching data from DRAM into an on-chip processor cache takes a few hundred instruction times; in many programs, overall performance is determined as much by cache misses as by computational costs.
- 网络通信:即使在数据中心内,往返消息交换也可能花费 10–50 µs,这是数以万计的指令时间。广域往返可能需要 10 到 100 毫秒。
- I/O 到辅助存储:磁盘 I/O 操作通常需要 5 到 10 毫秒,这是数百万条指令时间。闪存存储需要 10–100 µs。新出现的非易失性存储器的速度可能高达 1 µs,但这仍约为 2000 条指令时间。
- 动态内存分配(C 语言中的 malloc, C++ 或 Java 中的新增功能)通常涉及分配,释放和垃圾回收的大量开销。
- 高速缓存未命中:将数据从 DRAM 提取到片上处理器高速缓存中需要数百条指令时间;在许多程序中,整体性能取决于缓存未命中和计算成本。
The best way to learn which things are expensive is to run micro-benchmarks (small programs that measure the cost of a single operation in isolation). In the RAMCloud project, we created a simple program that provides a framework for microbenchmarks. It took a few days to create the framework, but the framework makes it possible to add new micro-benchmarks in five or ten minutes. This has allowed us to accumulate dozens of micro-benchmarks. We use these both to understand the performance of existing libraries used in RAMCloud, and also to measure the performance of new classes written for RAMCloud.
了解哪些东西最昂贵的最好方法是运行微基准测试(小型程序,这些程序单独测量单个操作的成本)。在 RAMCloud 项目中,我们创建了一个简单的程序,该程序提供了微基准测试的框架。创建该框架花了几天时间,但是该框架使在五到十分钟内添加新的微基准成为可能。这使我们积累了几十个微基准。我们既可以使用它们来了解 RAMCloud 中使用的现有库的性能,也可以衡量为 RAMCloud 编写的新类的性能。
Once you have a general sense for what is expensive and what is cheap, you can use that information to choose cheap operations whenever possible. In many cases, a more efficient approach will be just as simple as a slower approach. For example, when storing a large collection of objects that will be looked up using a key value, you could use either a hash table or an ordered map. Both are commonly available in library packages, and both are simple and clean to use. However, hash tables can easily be 5–10x faster. Thus, you should always use a hash table unless you need the ordering properties provided by the map.
一旦对什么是昂贵和什么便宜有了一般的认识,就可以使用该信息尽可能地选择便宜的业务。在许多情况下,更有效的方法将与较慢的方法一样简单。例如,当存储将使用键值查找的大量对象时,可以使用哈希表或有序映射。两者都通常在库包中提供,并且都简单易用。但是,哈希表可以轻松地快 5-10 倍。因此,除非需要映射提供的排序属性,否则应始终使用哈希表。
As another example, consider allocating an array of structures in a language such as C or C++. There are two ways you can do this. One way is for the array to hold pointers to structures, in which case you must first allocate space for the array, then allocate space for each individual structure. It is much more efficient to store the structures in the array itself, so you only allocate one large block for everything.
作为另一个示例,请考虑使用诸如 C 或 C++ 之类的语言分配结构数组。有两种方法可以执行此操作。一种方法是让数组保留指向结构的指针,在这种情况下,您必须首先为数组分配空间,然后为每个单独的结构分配空间。将结构存储在数组本身中效率要高得多,因此您只为所有内容分配一个大块。
If the only way to improve efficiency is by adding complexity, then the choice is more difficult. If the more efficient design adds only a small amount of complexity, and if the complexity is hidden, so it doesn’t affect any interfaces, then it may be worthwhile (but beware: complexity is incremental). If the faster design adds a lot of implementation complexity, or if it results in more complicated interfaces, then it may be better to start off with the simpler approach and optimize later if performance turns out to be a problem. However, if you have clear evidence that performance will be important in a particular situation, then you might as well implement the faster approach immediately.
如果提高效率的唯一方法是增加复杂性,那么选择就更加困难。如果更高效的设计仅增加了少量复杂性,并且复杂性是隐藏的,因此它不影响任何接口,那么它可能是值得的(但要注意:复杂性是递增的)。如果更快的设计增加了很多实现复杂性,或者导致更复杂的接口,那么最好是从更简单的方法开始,然后在性能出现问题时进行优化。但是,如果您有明确的证据表明性能在特定情况下很重要,那么您最好立即实施更快的方法。
In the RAMCloud project one of our overall goals was to provide the lowest possible latency for client machines accessing the storage system over a datacenter network. As a result, we decided to use special hardware for networking, which allowed RAMCloud to bypass the kernel and communicate directly with the network interface controller to send and receive packets. We made this decision even though it added complexity, because we knew from prior measurements that kernel-based networking would be too slow to meet our needs. In most of the rest of the RAMCloud system we were able to design for simplicity; getting this one big issue “right” made many other things easier.
在 RAMCloud 项目中,我们的总体目标之一是为客户端计算机通过数据中心网络访问存储系统提供尽可能低的延迟。结果,我们决定使用特殊的硬件进行联网,从而使 RAMCloud 绕过内核并直接与网络接口控制器进行通信以发送和接收数据包。即使增加了复杂性,我们还是做出了这个决定,因为我们从先前的测量中知道,基于内核的网络太慢了,无法满足我们的需求。在其余的 RAMCloud 系统中,我们能够进行简单设计。解决这个大问题“对”使其他事情变得更加容易。
In general, simpler code tends to run faster than complex code. If you have defined away special cases and exceptions, then no code is needed to check for those cases and the system runs faster. Deep classes are more efficient than shallow ones, because they get more work done for each method call. Shallow classes result in more layer crossings, and each layer crossing adds overhead.
通常,较简单的代码往往比复杂的代码运行更快。如果您定义了特殊情况和例外,则无需代码即可检查这些情况,并且系统运行速度更快。深层类比浅层类更有效,因为它们为每个方法调用完成了更多工作。浅类会导致更多的层交叉,并且每个层交叉都会增加开销。
20.2 Measure before modifying 修改前的度量
But suppose that your system is still too slow, even though you have designed it as described above. It’s tempting to rush off and start making performance tweaks, based on your intuitions about what is slow. Don’t do this! Programmers’ intuitions about performance are unreliable. This is true even for experienced developers. If you start making changes based on intuition, you’ll waste time on things that don’t actually improve performance, and you’ll probably make the system more complicated in the process.
但是,即使您如上所述进行设计,也请假设您的系统仍然太慢。根据您对慢速运动的直觉,急于着手开始进行性能调整。不要这样!程序员对性能的直觉是不可靠的。即使对于有经验的开发人员也是如此。如果您开始根据直觉进行更改,则会浪费时间在实际上无法提高性能的事情上,并且可能会使系统变得更加复杂。
Before making any changes, measure the system’s existing behavior. This serves two purposes. First, the measurements will identify the places where performance tuning will have the biggest impact. It isn’t sufficient just to measure the top-level system performance. This may tell you that the system is too slow, but it won’t tell you why. You’ll need to measure deeper to identify in detail the factors that contribute to overall performance; the goal is to identify a small number of very specific places where the system is currently spending a lot of time, and where you have ideas for improvement. The second purpose of the measurements is to provide a baseline, so that you can re-measure performance after making your changes to ensure that performance actually improved. If the changes didn’t make a measurable difference in performance, then back them out (unless they made the system simpler). There’s no point in retaining complexity unless it provides a significant speedup.
进行任何更改之前,请测量系统的现有行为。这有两个目的。首先,这些测量将确定性能调整将产生最大影响的地方。仅仅测量顶级系统性能是不够的。这可能会告诉您系统速度太慢,但不会告诉您原因。您需要进行更深入的衡量,以详细确定影响整体绩效的因素;目标是确定系统当前花费大量时间的少量非常具体的地方,以及您有改进想法的地方。测量的第二个目的是提供基线,以便您可以在进行更改后重新测量性能,以确保性能得到实际改善。如果这些更改并未在效果上带来可衡量的变化,然后将其退出(除非它们使系统更简单)。除非能够显着提高速度,否则保持复杂性毫无意义。
20.3 Design around the critical path 围绕关键路径进行设计
At this point, let’s assume that you have carefully analyzed performance and have identified a piece of code that is slow enough to affect the overall system performance. The best way to improve its performance is with a “fundamental” change, such as introducing a cache, or using a different algorithmic approach (balanced tree vs. list, for instance). Our decision to bypass the kernel for network communication in RAMCloud is an example of a fundamental fix. If you can identify a fundamental fix, then you can implement it using the design techniques discussed in previous chapters.
在这一点上,我们假设您已经仔细分析了性能,并确定了一段缓慢的代码来影响整个系统的性能。改善其性能的最佳方法是进行“根本”更改,例如引入缓存,或使用其他算法方法(例如,平衡树与列表)。我们决定绕过内核进行 RAMCloud 中的网络通信的决定是一个基本修补程序的示例。如果您可以确定基本修复程序,则可以使用前面各章中讨论的设计技术来实施它。
Unfortunately, situations will sometimes arise where there isn’t a fundamental fix. This brings us to the core issue for this chapter, which is how to redesign an existing piece of code so that it runs faster. This should be your last resort, and it shouldn’t happen often, but there are cases where it can make a big difference. The key idea is to design the code around the critical path.
不幸的是,有时会出现一些根本无法解决的情况。这将我们带到本章的核心问题,即如何重新设计现有代码,使其运行更快。这应该是您的不得已的方法,并且不应该经常发生,但是在某些情况下它可能会带来很大的不同。关键思想是围绕关键路径设计代码。
Start off by asking yourself what is the smallest amount of code that must be executed to carry out the desired task in the common case. Disregard any existing code structure. Imagine instead that you are writing a new method that implements just the critical path, which is the minimum amount of code that must be executed in the the most common case. The current code is probably cluttered with special cases; ignore them in this exercise. The current code might pass through several method calls on the critical path; imagine instead that you could put all the relevant code in a single method. The current code may also use a variety of variables and data structures; consider only the data needed for the critical path, and assume whatever data structure is most convenient for the critical path. For example, it may make sense to combine multiple variables into a single value. Assume that you could completely redesign the system in order to minimize the code that must be executed for the critical path. Let’s call this code “the ideal.”
首先,问自己在通常情况下执行所需任务必须执行的最少代码量是多少。忽略任何现有的代码结构。相反,想象一下您正在编写一个仅实现关键路径的新方法,这是在最常见的情况下必须执行的最少代码量。当前的代码可能充满特殊情况。在此练习中,请忽略它们。当前的代码可能会在关键路径上通过多个方法调用。想象一下,您可以将所有相关代码放在一个方法中。当前代码还可以使用各种变量和数据结构。仅考虑关键路径所需的数据,并假定最适合关键路径的任何数据结构。例如,将多个变量合并为一个值可能很有意义。假设您可以完全重新设计系统,以最大程度地减少必须为关键路径执行的代码。我们将此代码称为“理想”。
The ideal code probably clashes with your existing class structure, and it may not be practical, but it provides a good target: this represents the simplest and fastest that the code can ever be. The next step is to look for a new design that comes as close as possible to the ideal while still having a clean structure. You can apply all of the design ideas from previous chapters of this book, but with the additional constraint of keeping the ideal code (mostly) intact. You may have to add a bit of extra code to the ideal in order to allow clean abstractions; for example, if the code involves a hash table lookup, it’s OK to introduce an extra method call to a general-purpose hash table class. In my experience it’s almost always possible to find a design that is clean and simple, yet comes very close to the ideal.
理想的代码可能会与您现有的类结构冲突,并且可能不切实际,但它提供了一个很好的目标:这代表了代码可能是最简单,最快的。下一步是寻找一种新设计,使其尽可能接近理想状态,同时又要保持干净的结构。您可以应用本书前面各章中的所有设计思想,但要保持(最好)保持理想代码的附加约束。您可能需要在理想情况下添加一些额外的代码,以允许使用简洁的抽象。例如,如果代码涉及哈希表查找,则可以向通用哈希表类引入额外的方法调用。以我的经验,几乎总是可以找到干净简洁的设计,但非常接近理想。
One of the most important things that happens in this process is to remove special cases from the critical path. When code is slow, it’s often because it must handle a variety of situations, and the code gets structured to simplify the handling of all the different cases. Each special case adds a little bit of code to the critical path, in the form of extra conditional statements and/or method calls. Each of these additions makes the code a bit slower. When redesigning for performance, try to minimize the number of special cases you must check. Ideally, there will be a single if statement at the beginning, which detects all special cases with one test. In the normal case, only this one test will need to be made, after which the the critical path can be executed with no additional tests for special cases. If the initial test fails (which means a special case has occurred) the code can branch to a separate place off the critical path to handle it. Performance isn’t as important for special cases, so you can structure the special-case code for simplicity rather than performance.
在此过程中发生的最重要的事情之一是从关键路径中除去特殊情况。当代码运行缓慢时,通常是因为它必须处理各种情况,并且代码经过结构化以简化所有不同情况的处理。每个特殊情况都以额外的条件语句和/或方法调用的形式向关键路径添加了一些代码。这些添加中的每一个都会使代码变慢。重新设计性能时,请尝试减少必须检查的特殊情况的数量。理想情况下,开头应该有一个 if 语句,该语句可以通过一个测试检测所有特殊情况。在正常情况下,只需要进行一项测试,之后就可以执行关键路径,而对于特殊情况则无需进行其他测试。如果初始测试失败(这意味着发生了特殊情况),则代码可以分支到关键路径之外的单独位置以进行处理。对于特殊情况,性能并不是那么重要,因此您可以为简化而不是性能来构造特殊情况的代码。
20.4 An example: RAMCloud Buffers 示例:RAMCloud 缓冲区
Let’s consider an example, in which the Buffer class of the RAMCloud storage system was optimized to achieve a speedup of about 2x for the most common operations.
让我们考虑一个示例,其中 RAMCloud 存储系统的 Buffer 类经过优化,以使大多数常见操作的速度提高约 2 倍。
RAMCloud uses Buffer objects to manage variable-length arrays of memory, such as request and response messages for remote procedure calls. Buffers are designed to reduce overheads from memory copying and dynamic storage allocation. A Buffer stores what appears to be a linear array of bytes, but for efficiency it allows the underlying storage to be divided into multiple discontiguous chunks of memory, as shown in Figure 20.1. A Buffer is created by appending chunks of data. Each chunk is either external or internal. If a chunk is external, its storage is owned by the caller; the Buffer keeps a reference to this storage. External chunks are typically used for large chunks in order to avoid memory copies. If a chunk is internal, the Buffer owns the storage for the chunk; data supplied by the caller is copied into the Buffer’s internal storage. Each Buffer contains a small built-in allocation, which is a block of memory available for storing internal chunks. If this space is exhausted, then the Buffer creates additional allocations, which must be freed when the Buffer is destroyed. Internal chunks are convenient for small chunks where the memory copying costs are negligible. Figure 20.1 shows a Buffer with 5 chunks: the first chunk is internal, the next two are external, and the final two chunks are internal.
RAMCloud 使用 Buffer 对象管理可变长度的内存数组,例如远程过程调用的请求和响应消息。缓冲区旨在减少内存复制和动态存储分配的开销。缓冲区存储看似线性的字节数组,但是为了提高效率,它允许将底层存储划分为多个不连续的内存块,如图 20.1 所示。通过附加数据块来创建缓冲区。每个块都是外部的或内部的。如果块在外部,则其存储由调用方拥有;缓冲区保留对此存储的引用。外部块通常用于大型块,以避免内存复制。如果内部有块,则 Buffer 拥有该块的存储;调用者提供的数据将被复制到缓冲区的内部存储器中。每个缓冲区包含一个小的内置分配,这是一个内存块,可用于存储内部块。如果此空间已用完,则缓冲区将创建其他分配,销毁缓冲区时必须释放这些分配。内部块对于内存复制成本可忽略不计的小块很方便。图 20.1 显示了具有 5 个块的 Buffer:第一个块是内部的,接下来的两个块是外部的,最后两个块是内部的。
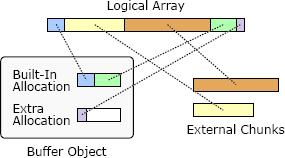
Figure 20.1: A Buffer object uses a collection of memory chunks to store what appears to be a linear array of bytes. Internal chunks are owned by the Buffer and freed when the Buffer is destroyed; external chunks are not owned by the Buffer.
图 20.1:Buffer 对象使用内存块的集合来存储看似线性字节数组。内部块由 Buffer 拥有,并在 Buffer 销毁时释放;外部块不属于缓冲区。
The Buffer class itself represents a “fundamental fix,” in that it eliminates expensive memory copies that would have been required without it. For example, when assembling a response message containing a short header and the contents of a large object in the RAMCloud storage system, RAMCloud uses a Buffer with two chunks. The first chunk is an internal one that contains the header; the second chunk is an external one that refers to the object contents in the RAMCloud storage system. The response can be collected in the Buffer without copying the large object.
Buffer 类本身代表“根本性的修补程序”,因为它消除了没有它就需要的昂贵的内存副本。例如,在 RAMCloud 存储系统中组装包含短标头和大对象内容的响应消息时,RAMCloud 使用带有两个块的 Buffer。第一个块是包含头的内部块;第二个块是一个外部块,它引用 RAMCloud 存储系统中的对象内容。可以在不复制大对象的情况下将响应收集到缓冲区中。
Aside from the fundamental approach of allowing discontiguous chunks, we did not attempt to optimize the code of the Buffer class in the original implementation. Over time, however, we noticed Buffers being used in more and more situations; for example, at least four Buffers are created during the execution of each remote procedure call. Eventually, it became clear that speeding up the implementation of Buffer could have a noticeable impact on overall system performance. We decided to see if we could improve the performance of the Buffer class.
除了允许不连续块的基本方法外,我们没有尝试在原始实现中优化 Buffer 类的代码。但是,随着时间的流逝,我们注意到缓冲区越来越多地被使用。例如,在每个远程过程调用的执行期间,至少创建四个缓冲区。最终,很明显,加速 Buffer 的实现可能会对整体系统性能产生显着影响。我们决定看看是否可以提高 Buffer 类的性能。
The most common operation for Buffer is to allocate space for a small amount of new data using an internal chunk. This happens, for example, when creating headers for request and response messages. We decided to use this operation as the critical path for optimization. In the simplest possible case, the space can be allocated by enlarging the last existing chunk in the Buffer. However, this is only possible if the last existing chunk is internal, and if there is enough space in its allocation to accommodate the new data. The ideal code would perform a single check to confirm that the simple approach is possible, then it would adjust the size of the existing chunk.
Buffer 最常见的操作是使用内部块为少量新数据分配空间。例如,在为请求和响应消息创建标题时,就会发生这种情况。我们决定将此操作用作优化的关键路径。在最简单的情况下,可以通过扩大 Buffer 中最后存在的块来分配空间。但是,只有在最后一个现有块位于内部,并且其分配中有足够的空间来容纳新数据时,才有可能这样做。理想的代码将执行一次检查以确认简单方法是否可行,然后将调整现有块的大小。
Figure 20.2 shows the original code for the critical path, which starts with the method Buffer::alloc. In the fastest possible case, Buffer::alloc calls Buffer:: allocateAppend, which calls Buffer::Allocation::allocateAppend. From a performance standpoint, this code has two problems. The first problem is that numerous special cases are checked individually:
图 20.2 显示了关键路径的原始代码,该代码以 Buffer :: alloc 方法开头。在最快的情况下,Buffer :: alloc 调用 Buffer :: allocateAppend,后者调用 Buffer :: Allocation :: allocateAppend。从性能的角度来看,此代码有两个问题。第一个问题是要单独检查许多特殊情况:
- Buffer::allocateAppend checks to see if the Buffer currently has any allocations.
- The code checks twice to see if the current allocation has enough room for the new data: once in Buffer::Allocation::allocateAppend, and again when its return value is tested by Buffer::allocateAppend.
- Buffer::alloc tests the return value from Buffer::allocAppend to confirm yet again that the allocation succeeded.
- Buffer::allocateAppend 检查缓冲区当前是否有任何分配。
- 代码检查两次以查看当前分配是否有足够的空间容纳新数据:一次在 Buffer::Allocation::allocateAppend 中,一次在其返回值由 Buffer::allocateAppend 测试时。
- Buffer::alloc 测试 Buffer::allocAppend 的返回值,以再次确认分配成功。
Furthermore, rather than trying to expand the last chunk directly, the code allocates new space without any consideration of the last chunk. Then Buffer::alloc checks to see if that space happens to be adjacent to the last chunk, in which case it merges the new space with the existing chunk. This results in additional checks. Overall, this code tests 6 distinct conditions in the critical path.
此外,该代码没有尝试直接扩展最后一个块,而是在不考虑最后一个块的情况下分配了新空间。然后,Buffer::alloc 检查该空间是否恰好与最后一块相邻,在这种情况下,它将新空间与现有块合并。这导致其他检查。总体而言,此代码测试关键路径中的 6 种不同条件。
The second problem with the original code is that it has too many layers, all of which are shallow. This is both a performance problem and a design problem. The critical path makes two additional method calls in addition to the original invocation of Buffer::alloc. Each method call takes additional time, and the result of each call must be checked by its caller, which results in more special cases to consider. Chapter 7 discussed how abstractions should normally change as you pass from one layer to another, but all three of the methods in Figure 20.2 have identical signatures and they provide essentially the same abstraction; this is a red flag. Buffer::allocateAppend is nearly a pass-though method; its only contribution is to create a new allocation if needed. The extra layers make the code both slower and more complicated.
原始代码的第二个问题是它具有太多的层,所有层都很浅。这既是性能问题,也是设计问题。关键路径除了对 Buffer::alloc 的原始调用之外,还进行了另外两个方法调用。每个方法调用花费额外的时间,并且每个调用的结果必须由其调用者检查,这导致需要考虑更多特殊情况。第 7 章讨论了当您从一层传递到另一层时,抽象通常应该如何变化,但是图 20.2 中的所有三种方法都具有相同的签名,并且它们提供了基本相同的抽象。这是一个危险信号。Buffer::allocateAppend 几乎是一个传递方法;它的唯一作用是在需要时创建新的分配。额外的层使代码既慢又复杂。
To fix these problems, we refactored the Buffer class so that its design is centered around the most performance-critical paths. We considered not just the allocation code above but several other commonly executed paths, such as retrieving the total number of bytes of data currently stored in a Buffer. For each of these critical paths, we tried to identify the smallest amount of code that must be executed in the common case. Then we designed the rest of the class around these critical paths. We also applied the design principles from this book to simplify the class in general. For example, we eliminated shallow layers and created deeper internal abstractions. The refactored class is 20% smaller than the original version (1476 lines of code, versus 1886 lines in the original).
为了解决这些问题,我们重构了 Buffer 类,使其设计围绕最关键性能的路径进行。我们不仅考虑了上面的分配代码,还考虑了其 他几种常用的执行路径,例如检索当前存储在 Buffer 中的数据的字节总数。对于这些关键路径中的每一个,我们试图确定在通常情况下必须执行的最少代码量。然后,我们围绕这些关键路径设计了课程的其余部分。我们还应用了本书中的设计原则来简化整个类。例如,我们消除了浅层并创建了更深的内部抽象。重构的类比原始版本小 20%(1476 行代码,而原始版本为 1886 行)。
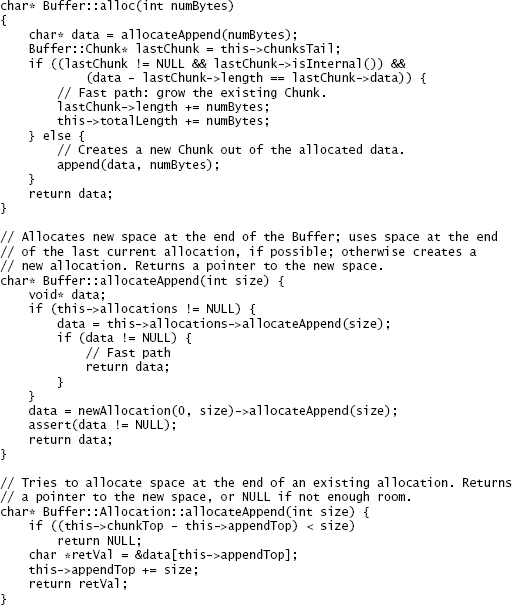
Figure 20.2: The original code for allocating new space at the end of a Buffer, using an internal chunk.
图 20.2:使用内部块在 Buffer 的末尾分配新空间的原始代码。
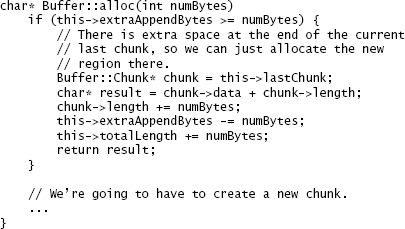
Figure 20.3: The new code for allocating new space in an internal chunk of a Buffer.
图 20.3:用于在 Buffer 的内部块中分配新空间的新代码。
Figure 20.3 shows the new critical path for allocating internal space in a Buffer. The new code is not only faster, but it is also easier to read, since it avoids shallow abstractions. The entire path is handled in a single method, and it uses a single test to rule out all of the special cases. The new code introduces a new instance variable, extraAppendBytes, in order to simplify the critical path. This variable keeps track of how much unused space is available immediately after the last chunk in the Buffer. If there is no space available, or if the last chunk in the Buffer isn’t an internal chunk, or if the Buffer contains no chunks at all, then extraAppendBytes is zero. The code in Figure 20.3 represents the least possible amount of code to handle this common case.
图 20.3 显示了用于在 Buffer 中分配内部空间的新关键路径。新代码不仅速度更快,而且更容易阅读,因为它避免了浅层抽象。整个路径使用单一方法处理,并且使用单一测试排除所有特殊情况。新代码引入了新的实例变量 extraAppendBytes,以简化关键路径。此变量跟踪缓冲区中最后一个块之后立即有多少未使用空间可用。如果没有可用空间,或者 Buffer 中的最后一个块不是内部块,或者 Buffer 根本不包含任何块,则 extraAppendBytes 为零。图 20.3 中的代码表示处理这种常见情况的最少代码量。
Note: the update to totalLength could have been eliminated by recomputing the total Buffer length from the individual chunks whenever it is needed. However, this approach would be expensive for a large Buffer with many chunks, and fetching the total Buffer length is another common operation. Thus, we chose to add a small amount of extra overhead to alloc in order to ensure that the Buffer length is always immediately available.
注意:只要需要,就可以通过重新计算各个块的总缓冲区长度来消除对 totalLength 的更新。但是,这种方法对于具有许多块的大型 Buffer 而言将是昂贵的,并且获取 Buffer 的总长度是另一种常见的操作。因此,我们选择添加少量额外的开销来分配,以确保 Buffer 长度始终立即可用。
The new code is about twice as fast as the old code: the total time to append a 1-byte string to a Buffer using internal storage dropped from 8.8 ns to 4.75 ns. Many other Buffer operations also speeded up because of the revisions. For example, the time to construct a new Buffer, append a small chunk in internal storage, and destroy the Buffer dropped from 24 ns to 12 ns.
新代码的速度约为旧代码的两倍:使用内部存储将 1 字节字符串附加到缓冲区的总时间从 8.8 ns 降低到 4.75 ns。由于修订,许多其他缓冲区操作也加快了速度。例如,构建新缓冲区,在内部存储中附加一小块并销毁缓冲区所需的时间从 24 ns 降至 12 ns。
20.5 Conclusion 结论
The most important overall lesson from this chapter is that clean design and high performance are compatible. The Buffer class rewrite improved its performance by a factor of 2 while simplifying its design and reducing code size by 20%. Complicated code tends to be slow because it does extraneous or redundant work. On the other hand, if you write clean, simple code, your system will probably be fast enough that you don’t have to worry much about performance in the first place. In the few cases where you do need to optimize performance, the key is simplicity again: find the critical paths that are most important for performance and make them as simple as possible.
本章最重要的总体教训是,干净的设计和高性能是兼容的。重写 Buffer 类可将其性能提高 2 倍,同时简化其设计并将代码大小减少 20%。复杂的代码通常会很慢,因为它会执行多余或多余的工作。另一方面,如果您编写干净,简单的代码,则系统可能会足够快,因此您一开始就不必担心性能。在少数需要优化性能的情况下,关键再次是简单性:找到对性能最重要的关键路径并使它们尽可能简单。