
2022-从用法到实现,一文带你拥抱 React 18
从用法到实现,一文带你拥抱 React 18
前言
React 团队在打造快速响应的用户界面上其实一直在探索,最终给出的答案就是整合了人机交互研究成果(后文会具体介绍)的 Concurrent Rendering。
然而因为这背后的复杂性、稳定性、兼容性等问题,从 16 版本的 Async Mode 开始就在不断打磨,耗时多年,经历了 17 版本过渡,最终伴随着 18 版本正式上线,这一版本中开发者可以完全平滑的开启并发特性。
今天希望通过这篇文章带大家一起深入了解一下 React 18 中的新特性、新能力。
Concurrent Rendering
Concurrency 是 React 18 的关键词,可以理解成是一种背后的机制,保证 React 能够同时准备多套 UI。具体到表现上区别于以往的最大的特点就是渲染是可中断的。这意味着当你的应用正在进行复杂更新的时候,仍然可以与页面进行交互,保证一个流畅的用户体验。 既然是一种背后的机制,实际上开发者并非需要先学习并发渲染才能使用 React18,但是能够掌握并发渲染对于新特性的理解有非常大的作用。
核心实现是通过组件作为一个基本的工作单元将一个大的更新任务进行拆分,然后以时间切片的方式,分布在不同的时间片来执行,每个时间片执行完成后都会主动释放控制权,使得浏览器能够处理其它用户事件。而具体时间片上执行哪个任务是由任务上的相关优先级决定的,当高优先级的更新到来时,会中断旧的更新,优先执行高优先级更新,待完成后继续执行低优先级更新,因此在一个时间段内,我们看 React 在并发的执行多个渲染任务。
Auto Batching
首先批处理是指 React 将多次状态更新合并成一次重渲染来提升性能,早在 16 的版本中其实就已经包含了批处理能力,如下面的例子:
function App() {
  const [count, setCount] = useState(0);

  const [flag, setFlag] = useState(false);

  function handleClick() {
    setCount((c) => c + 1); // Does not re-render yet

    setFlag((f) => !f); // Does not re-render yet

    // React will only re-render once at the end (that's batching!)
  }

  return (
    <div>
      <button onClick={handleClick}>Next</button>

      <h1 style={{ color: flag ? "blue" : "black" }}>{count}</h1>
    </div>
  );
}
然而如果更新发生在 timeouts, promises, native event handlers 等非 React events 事件中,React 18 之前的版本默认都不会进行合并:
function handleClick() {
  fetchSomething().then(() => {
    // React 17 and earlier does NOT batch these because

    // they run *after* the event in a callback, not *during* it

    setCount((c) => c + 1); // Causes a re-render

    setFlag((f) => !f); // Causes a re-render
  });
}
在 React 18 中,不会更新发生在哪里,都会自动合并。一般来说,这种自动合并是完全安全且无感知的,但是仍然有一些 bad case 需要特殊处理以保持向前兼容,比如下面的 case:
handleClick = () => {
  setTimeout(() => {
    this.setState(({ count }) => ({ count: count + 1 }));

    // { count: 1, flag: false } before 18

    // { count: 0, flag: false } in 18

    console.log(this.state);

    this.setState(({ flag }) => ({ flag: !flag }));
  });
};
在 18 之前,由于更新会同步执行,因此我们能够获得中间状态。然而在 18 中,即使是 setTimeout 中的更新也会自动合并,并在 next tick 中合并执行,打印的状态为初始化状态,从而前后不一致。
针对这种情况,我们可以使用 React 18 中提供的 ReactDOM.flushSync 来保持向前兼容。
handleClick = () => {
  setTimeout(() => {
    ReactDOM.flushSync(() => {
      this.setState(({ count }) => ({ count: count + 1 }));
    });

    // { count: 1, flag: false }

    console.log(this.state);

    this.setState(({ flag }) => ({ flag: !flag }));
  });
};
Deep dive
自动批处理实现的关键在于 React18 中更新是基于优先级的,我们结合下面源码看一下,该方法是 18 中每一次更新调度的必经之路,批处理的实现的核心在于当相同优先级的更新发生时,并不会生成新的任务,而是复用上一次的任务,从而实现合并。
function ensureRootIsScheduled(root: FiberRoot, currentTime: number) {
  // Determine the next lanes to work on, and their priority.

  const nextLanes = getNextLanes(root);

  // We use the highest priority lane to represent the priority of the callback.

  const newCallbackPriority = getHighestPriorityLane(nextLanes);

  // Check if there's an existing task. We may be able to reuse it.

  const existingCallbackPriority = root.callbackPriority;

  if (existingCallbackPriority === newCallbackPriority) {
    // The priority hasn't changed. We can reuse the existing task. Exit.

    return;
  }

  // Cancel the existing callback.

  cancelCallback(existingCallbackNode);

  // schedule a new one.

  if (newCallbackPriority === SyncLane) {
    scheduleSyncCallback(performSyncWorkOnRoot.bind(null, root));
  } else {
    newCallbackNode = scheduleCallback(
      schedulerPriorityLevel,

      performConcurrentWorkOnRoot.bind(null, root)
    );
  }
}
如果理解了这个,那个 FlushSync 的实现也就比较简单了,无非是将内部更新的优先级强制指定为 SyncLane,即指定为同步优先级,具体效果就是每一次更新时都会同步的执行渲染。
export function flushSync(fn) {
  try {
    // DiscreteEventPriority === SyncLane

    setCurrentUpdatePriority(DiscreteEventPriority);

    fn && fn();
  } finally {
    setCurrentUpdatePriority(previousPriority);
  }
}
Transition
transition 是 18 版本中新提出的概念,也是最能体现并发渲染优势的上层应用。先看一个例子,当滑块滑动时,下方的图表会一起更新,然而图表更新是一个 CPU 密集型操作,比较耗时。由于阻塞了渲染导致页面失去响应,用户能够非常明显的感受到卡顿。

实际上,当我们拖动滑块的时候,需要做两次更新:
// Urgent: Show what was typed
setSliderValue(input);

// Not urgent: Show the results
setGraphValue(input);
一个是比较紧急需要立刻反应在界面上,否则用户会觉得遇到了 bug。而另一个对于用户而言,查询结果的显示,即使存在一些延迟也是可接受的。这种接受程度正是人机研究的成果:
we know from research that interactions like hover and text input need to be handled within a very short period of time, while clicks and page transitions can wait a little longer without feeling laggy. —— Putting Research into Production
在 React 18 之前所有的更新都是一样的,缺乏一种机制,来声明这种不同紧急程度的更新,Transition 就用来解决这种问题。React 18 中提供了 startTransition 来让开发者显示的声明非紧急更新。transition 取名的含义是,React 中从开发者角度将状态更新分成了两类:
- 一类是用户输入、点击等紧急更新,另一类是将 UI 从一个视图转变成另外一个
- transition 中对应的更新类型为第二种。
startTransition
通过 starTransition 可以标记非紧急的更新,具体的执行时机会根据当前空闲程度动态决定。
import { startTransition } from "react";

// Urgent
setSliderValue(input);

// Mark any state updates inside as transitions
startTransition(() => {
  // Transition: Show the results

  setGraphValue(input);
});
useTransition
可以通过 useTransition 中的 pending 来确定当前更新的执行状态,并渲染一些 loading:
import { useTransition } from "react";

const [isPending, startTransition] = useTransition();

return isPending && <Spinner />;
然而即使我们根据 isPending 设置了 loading 界面,这个 loading 也并非一定会出现,根据人机交互的研究成果,过多的显示一些中间视图会让用户感觉得更慢,因此在性能比较好时,transition 中的更新很快执行,loading 界面将不会展示,也就是不会出现“闪一下”的情况,来提升用户体验:
research shows that displaying too many intermediate loading states when transitioning between screens makes a transition feel slower. —— Putting Research into Production
我们再来感受一下使用了 transition 之后的效果:

应该可以明显的感受到,虽然图表的更新还是会有些延迟,但是整体的用户体验相对之前是非常好的。
与以往解决方案的的区别
虽然在 18 版本之前 React 本身并没有提供声明更新优先级的方式,但是我们仍然可以通过 JS 来优化这一问题,比如通过 setTimeout / throttle / debounce
setSliderValue(input);

setTimeout(() => {
  setGraphValue(input);
}, 0);
与之相比,transition的区别主要表现在:
- 执行时机,
setTimout/throttle/debounce均为异步执行,而transition为同步执行,因此会比他们更早的触发更新调度,在性能较好时可能在同一帧完成更新,而这种情况在比如throttle中被强制拉大,比如 100ms - 交互体验,不管是延迟还是减频,当真正触发更新,如果渲染时间比较久,依然会发生界面卡顿,而通过
transition触发的更新并不会阻塞用户界面,能够一直保持响应 - 精确控制,需要额外实现 loading 控制,而且往往不够精确,现在
transition内部会为我们自动维护这个 loading 状态,并且足够精确
Deep dive
我们结合源码看一下 transition 是如何实现的,可以看到本身的实现并不复杂,在 startTransition 内部时会开启一个全局变量,其后执行的更新都会根据该开关默认开启 transition 优先级,而这个优先级要比一般的优先级更低一些,因此执行时间要比普通更新晚,同时即使更新发生时,也可以被高优先级的更新打断,从而不阻塞用户渲染。
function startTransition(setPending, callback, options) {
  // ...

  const prevTransition = ReactCurrentBatchConfig.transition;

  // Tag We are inside transition

  ReactCurrentBatchConfig.transition = {};

  callback();

  // Recovery

  ReactCurrentBatchConfig.transition = prevTransition;
}

// Request priority when fiber update

export function requestUpdateLane(fiber: Fiber) {
  // ...

  // requestCurrentTransition => ReactCurrentBatchConfig.transition

  const isTransition = requestCurrentTransition() !== null;

  if (isTransition) {
    return claimNextTransitionLane();
  }

  // ...
}
useTransition 的实现本质上就是通过 useState+startTransition,实现关键点在于两次 setPending,虽然是同步执行,但两者的区别在于第一次的 setPending 为普通优先级,而第二次因为全局开关打开,会被授予 transition 优先级,与 callback 中的更新自动合并,因此 pending 会首先被置成 true,在 transition 更新完成时,重置为 false:
function mountTransition() {
  const [isPending, setPending] = mountState(false);

  const start = (callback) => {
    setPending(true);

    const prevTransition = ReactCurrentBatchConfig.transition;

    // Tag We are inside transition

    ReactCurrentBatchConfig.transition = {};

    setPending(false);

    callback();

    // Recovery

    ReactCurrentBatchConfig.transition = prevTransition;
  };

  return [isPending, start];
}
可以思考一下,🤔 下面这两种方式有什么区别吗
startTransition(() => {
  setValue1(value);

  setValue2(value);
});

startTransition(() => {
  setValue1(value);
});

startTransition(() => {
  setValue2(value);
});
从执行的效果看,由于目前所有的 transition 中的更新会被标记成同样的优先级,同样的优先级意味着会在同一次调度中一起执行,所以这两种用法目前是完全一样的。
但是从合理性的角度,两个完全独立的 transition 应该是可以独立去执行的,也就是会被赋予更细粒度的优先级,这也是 transition 后续更新的方向。而如何认为完全独立,并不是仅仅使用了两个单独 startTransition,React 会从内部自动进行检测更新的状态是否有依赖,因为如果两个更新有重叠的话,实际上进行拆分会有浪费,比如一个下拉框,我切换了很多次之后,中间状态再展示并没有意义了,只需要渲染最终状态就可以了。
useDeferredValue
现在我们知道更新发生时,我们可以通过 startTransition 来标记低优先的更新:
import { startTransition } from "react";

const Comp = () => {
  const handleChange = () => {
    setSliderValue(input);

    startTransition(() => {
      setGraphValue(input);
    });
  };

  // ...
};
那如果更新触发的实际我们并不知道,比如从 parent compnent / other hooks / 多个 handler / URL 改变,这种情况下,React 提供了另一个 hook updateDeferredValue 来标记非紧急更新。
import { useDeferredValue } from "react";

const Comp = (input) => {
  const graphValue = useDeferredValue(input);

  // ...updating depends on graphValue
};
上方代码的具体效果是当 input 改变时,返回的 graphValue 并不会立即改变,会首先返回上一次的 input 值,不存在更紧急的更新时,才会变成最新的 input,因此可以通过 graphValue 是否改变来进行一些低优先级的更新,所以效果是基本上是和 transition 是一致的。
而实现上我们可以看到,其实就是封装了 useState + useEffect + startTransition,调度一个 Effect 发起一个 startTransition 来更新具体的 value
function updateDeferredValue(value) {
  const [prevValue, setValue] = updateState(value);

  updateEffect(() => {
    const prevTransition = ReactCurrentBatchConfig.transition;

    ReactCurrentBatchConfig.transition = {};

    setValue(value);

    ReactCurrentBatchConfig.transition = prevTransition;
  }, [value]);

  return prevValue;
}
但是上面的实现有一个问题,比如当接受的 value 并非一个 memorizedValue,即每次都是一个新的对象,startTransition 更新发生的时候会再次触发这个方法,又会发起一次新的调度,从而造成死循环。因此前不久,对这个这个 hook 的实现做了一版更新 PR,新的实现如下:
function updateDeferredValue(value) {
  const shouldDeferValue = !includesOnlyNonUrgentLanes(renderLanes);

  if (shouldDeferValue) {
    // This is an urgent update. If the value has changed, keep using the

    // previous value and spawn a deferred render to update it later.

    const prevValue = currentHook.memoizedState;

    if (!is(value, prevValue)) {
      // Mark an Transition Update

      const deferredLane = claimNextTransitionLane();

      currentlyRenderingFiber.lanes = mergeLanes(
        currentlyRenderingFiber.lanes,

        deferredLane
      );
    }

    return prevValue;
  }

  hook.memoizedState = value;

  return value;
}
可以看到新的实现不会依赖 effect,而是根据当前更新的优先级来,如果是一个紧急更新则直接返回 prevValue,并且在当前 fiber 中标记一个 transition 更新。当非紧急更新发生时,直接返回最新的值。
Upgrade
Upgrade Root API
同时还需要升级一下 root api 才能使用最新的并发特性。
- Legacy Root API
import ReactDOM from "react-dom";

import App from "App";

const container = document.getElementById("app");

// Initial render.

ReactDOM.render(<App />, container);
- New Root API
import * as ReactDOMClient from "react-dom/client";

import App from "App";

const container = document.getElementById("app");

// Create a root.

const root = ReactDOMClient.createRoot(container);

// Initial render: Render an element to the root.

root.render(<App />);
为了代码的平滑升级,两种方式都将会保留,不然效果会是,升级完 18 的包发现运行直接崩溃= =,但是使用旧的 render 无法使用新特性且会获得 warning,引导进行 root 升级
新旧 RootAPI 还有一点改动是,原先 render 会包含第三个参数,也就是一个回调,新的 api 移除了
import * as ReactDOM from 'react-dom';

import App from 'App';

const container = document.getElementById('app');

ReactDOM.render(container, <App tab="home" />, function() {

  // Called after inital render or any update.

  console.log('rendered').

});
但是可以通过其它方式来代替,比如:
- 通过 ref
import * as ReactDOMClient from "react-dom/client";

function App({ callback }) {
  // Callback will be called when the div is first created.

  return (
    <div ref={callback}>
      <h1>Hello World</h1>
    </div>
  );
}

const rootElement = document.getElementById("root");

const root = ReactDOMClient.createRoot(rootElement);

root.render(<App callback={() => console.log("renderered")} />);
- 通过 useEffect
import { useEffect } from "react";

import * as ReactDOMClient from "react-dom/client";

function App() {
  useEffect(() => {
    // Callback will be called when the div is first created.

    console.log("renderered");
  }, []);

  return (
    <div>
      <h1>Hello World</h1>
    </div>
  );
}

const rootElement = document.getElementById("root");

const root = ReactDOMClient.createRoot(rootElement);

root.render(<App />);
两者的区别在于
- Ref 会在应用添加到 dom 之后同步的执行
- Effects 由于本身的实现是异步的,会有一个小的延迟
使用哪种方式取决于你具体的业务场景
Fix Tearing & useSyncExternalStore
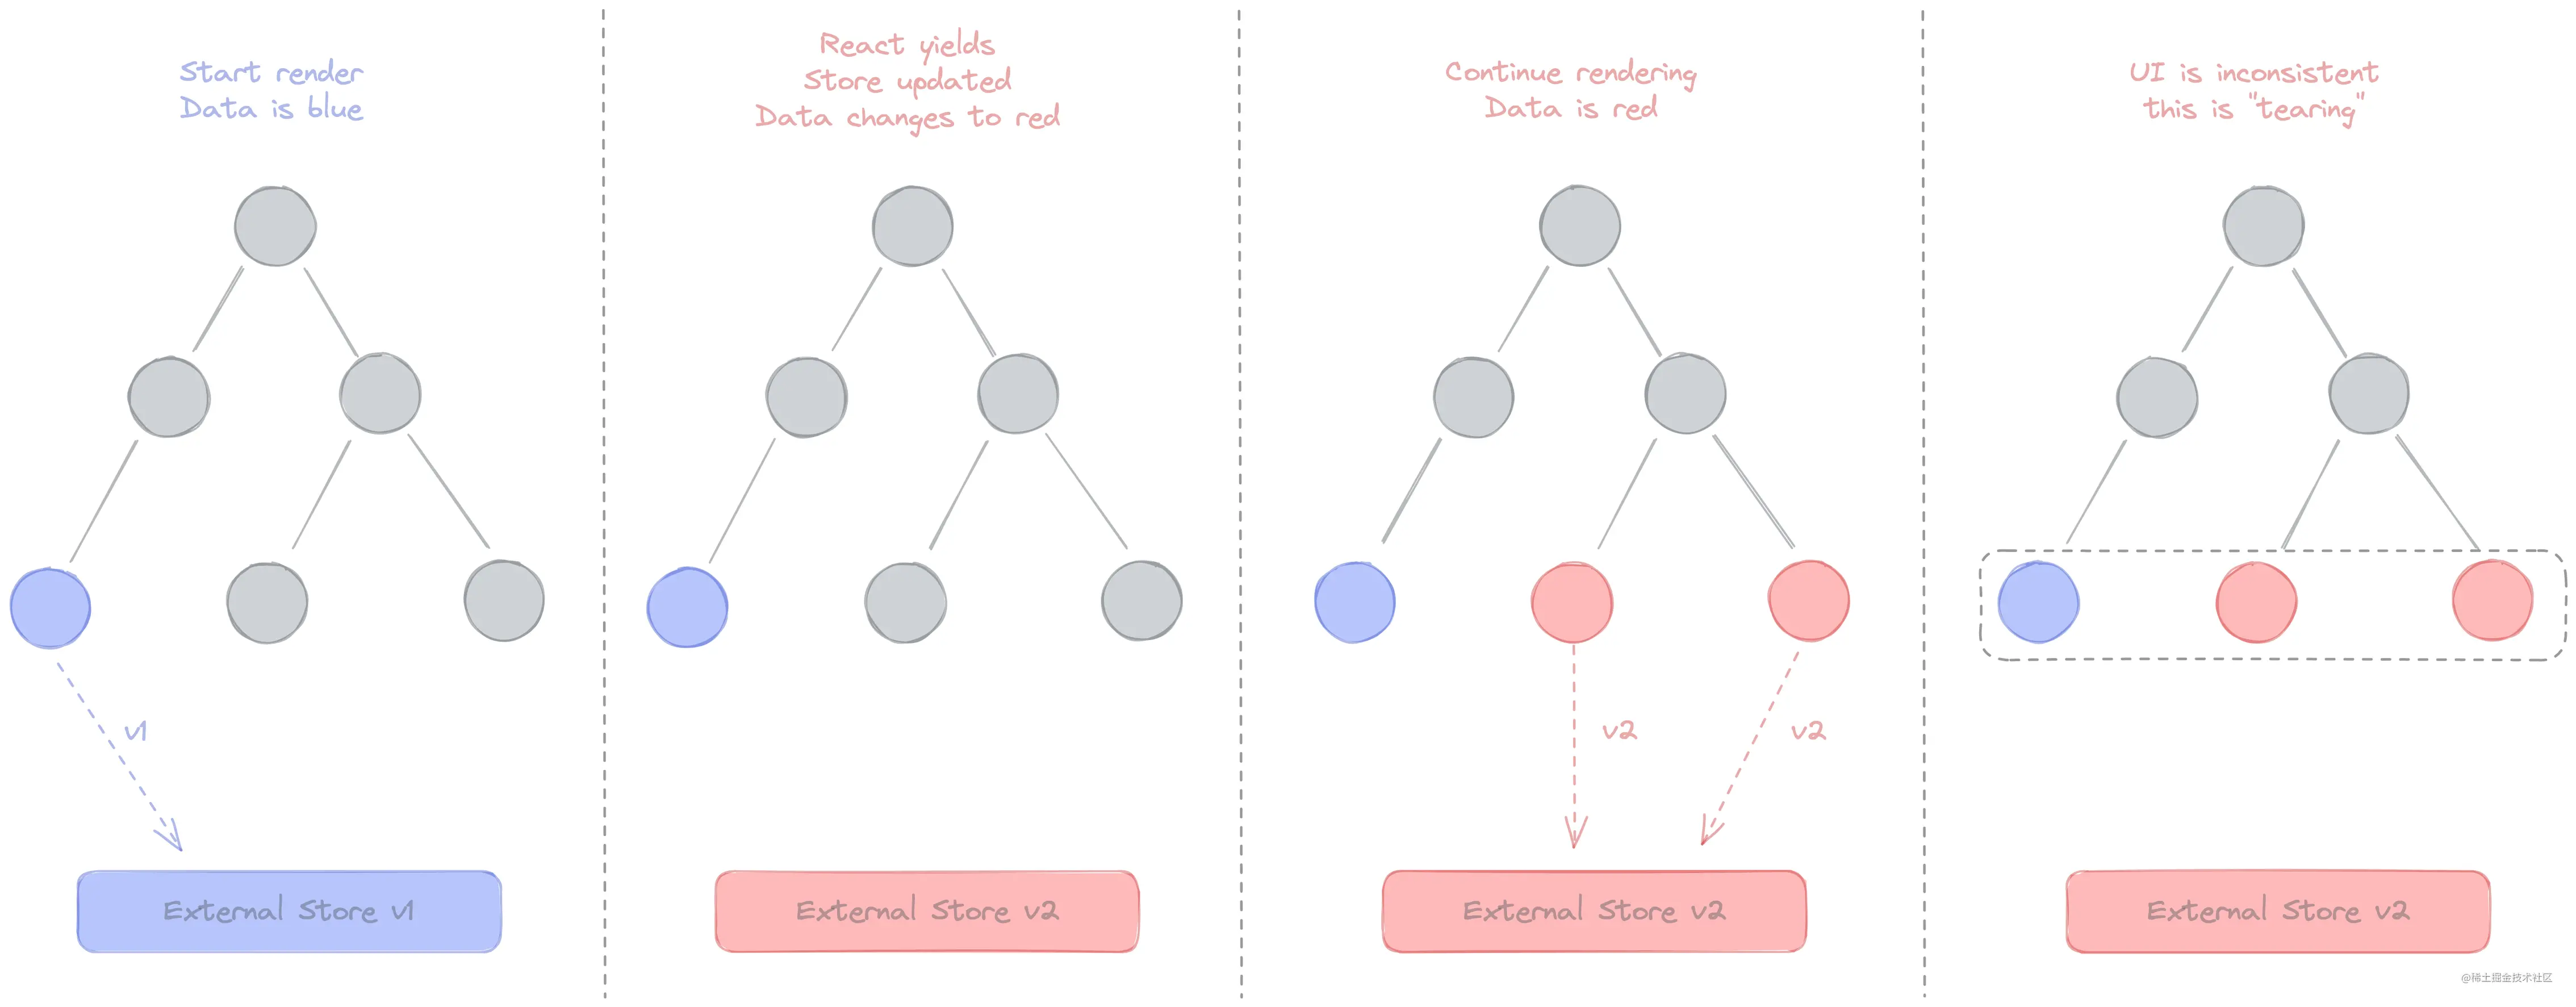
绝大多数类库不需要做任何改动就能够兼容 React 18,然而由于并发渲染的原因使用部分类库会引发 tearing 的问题,需要进行一些升级才能兼容。
Screen tearing is a visual artifact in video display where a display device shows information from multiple frames in a single screen draw - wiki
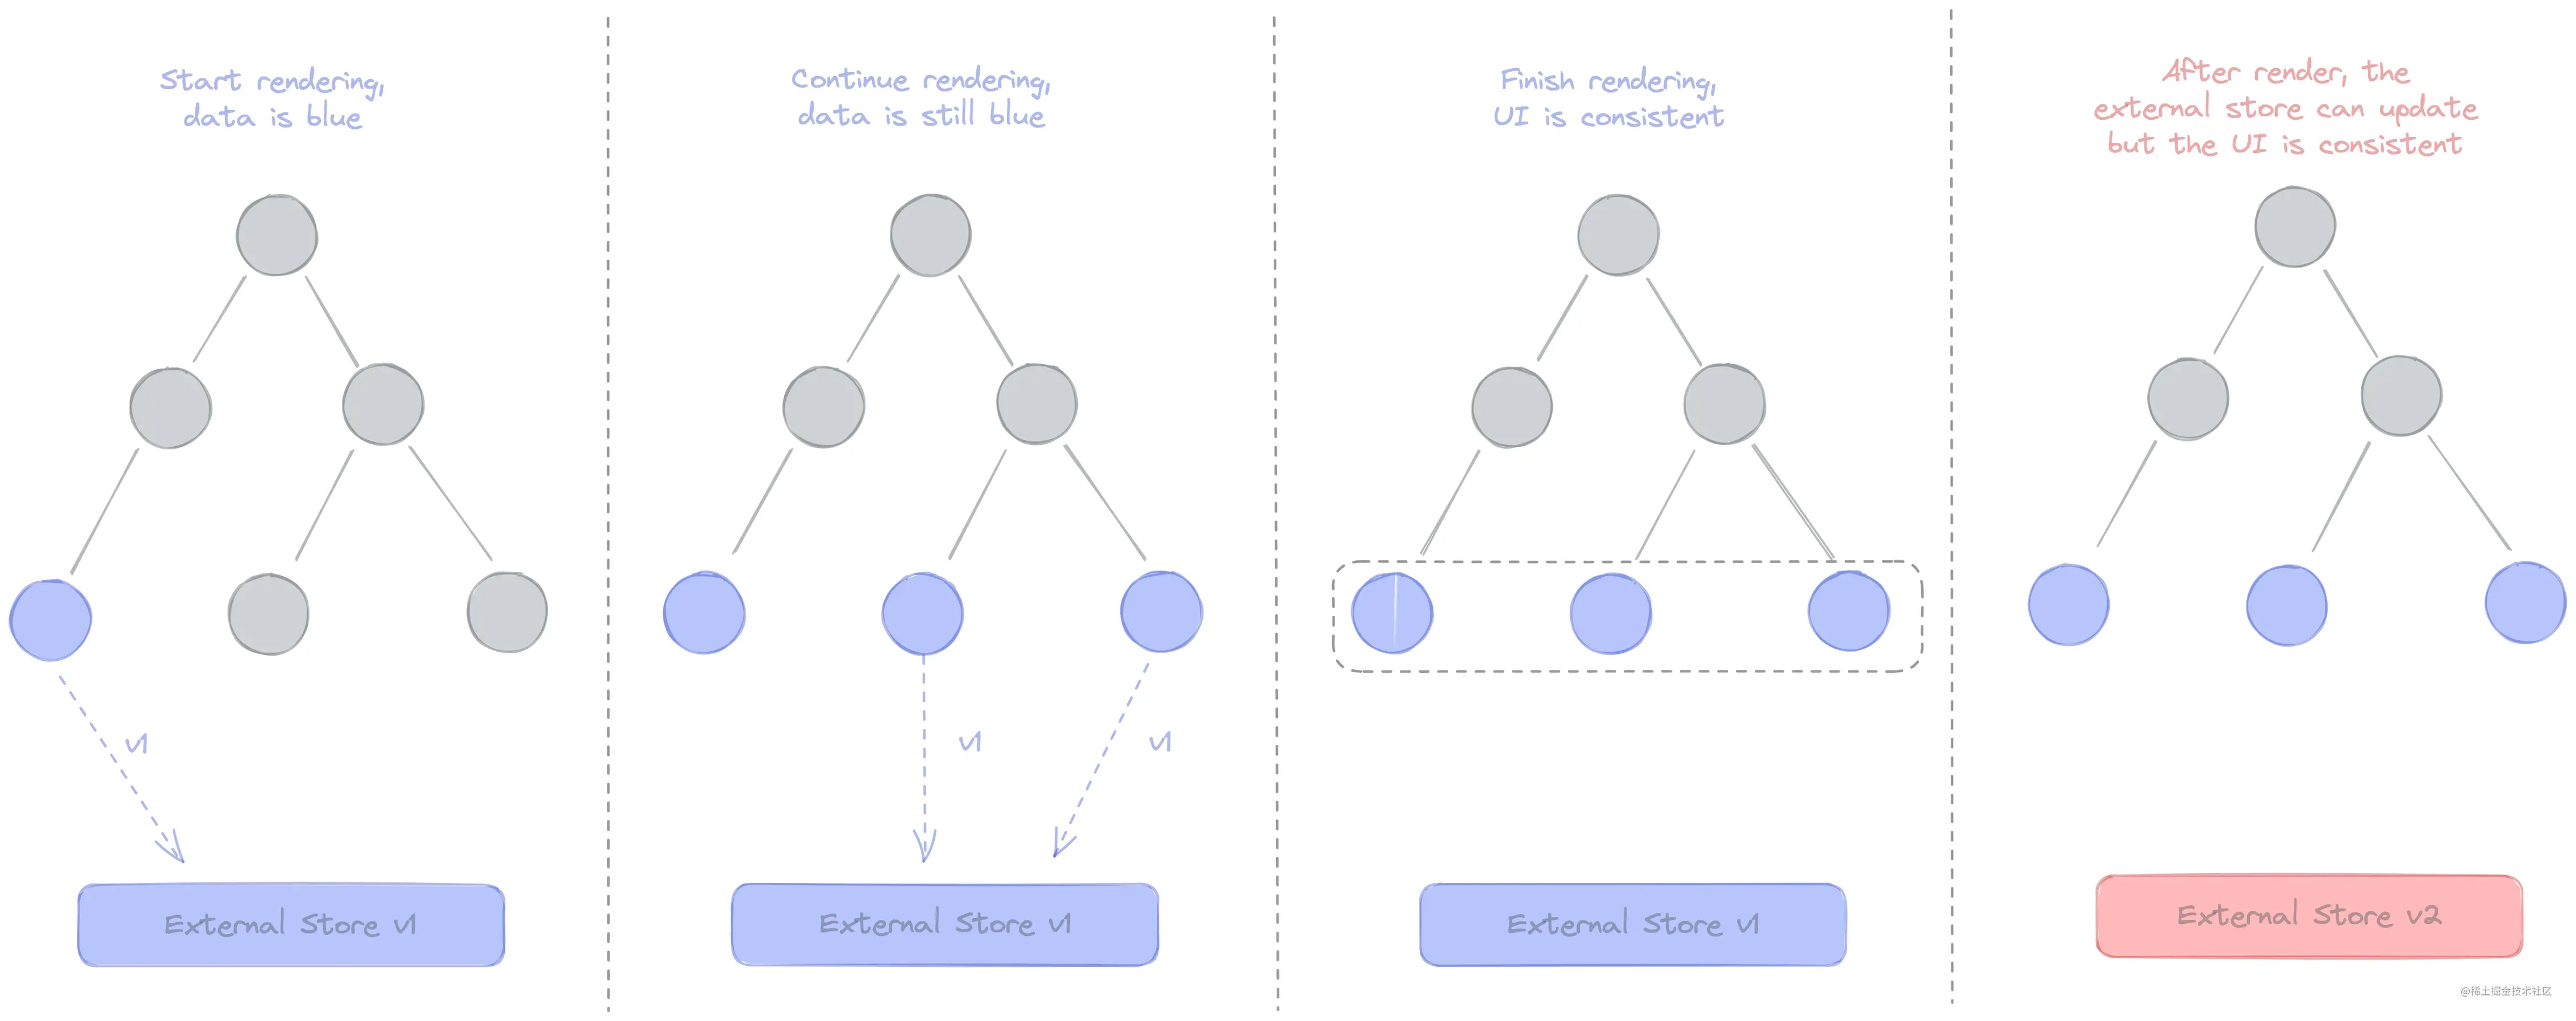
简单的说,就是在屏幕上看到了同一个物体的不同帧的影像,画面仿佛是“撕裂的”,对应的 react 中,指使用了过去版本的状态进行画面渲染引起的 UI 不一致或者崩溃。由于 JS 是单线程的,其实 web 开发中不会遇到这个问题,但是引入并发渲染后,渲染是可能被更高优先级的任务中断,这也使得 tearing 成为可能。 但 React 本身对于 state 的更新做了很多的工作来避免这个问题,但是如果我们的依赖了外部的状态,React 就无能为力了,因为它并不知道你什么时候更新了外部的状态,看下面的例子:
- 同步渲染
- 并发渲染
这里 externalStore 就是我们依赖的一些外部状态,比如常见的 redux,我们来看一使用 react-redux 7 的例子,可以直观的感受到 tearing 的存在。因此 18 中专门针对这部分类库提供相关的 API - useSyncExternalStore,比如 react-redux 8.0.0 实际上就已经集成进去了,大家可以把上面 demo 中的依赖改成这个版本再试一下。
具体用法的话,这边直接做了一个 demo,为了体现具体的改动,实现了一个 redux-like,重点关注两个 useSelector,看一下使用两个不同 selector 的效果。
相信大家应该可以感受到区别,不过我们看到虽然使用了 useSyncExternalStore 通过接入 useSyncExternalStore 可以达到 「✅ Make it right」的效果,但是也能感受到要比没有使用之前更卡了,并没有达到「🚀 Make it fast」的效果,其实原因跟这个方法本身的实现有关:
function updateSyncExternalStore<T>(
  subscribe: (() => void) => () => void,

  getSnapshot: () => T,

  getServerSnapshot?: () => T
): T {
  const nextSnapshot = getSnapshot();

  const prevSnapshot = hook.memoizedState;

  const snapshotChanged = !is(prevSnapshot, nextSnapshot);

  // store内值更新时,进行一致性检查

  updateEffect(subscribeToStore.bind(null, fiber, inst, subscribe), [
    subscribe,
  ]);

  // commit环境开始之前,进行一次一致性检查

  if (inst.getSnapshot !== getSnapshot || snapshotChanged) {
    pushEffect(
      HookHasEffect | HookPassive,

      updateStoreInstance.bind(null, fiber, inst, nextSnapshot, getSnapshot),

      undefined,

      null
    );
  }

  // render环节结束时,进行一次一致性检查

  if (!includesBlockingLane(root, renderLanes)) {
    pushStoreConsistencyCheck(fiber, getSnapshot, nextSnapshot);
  }
}

// ...

// 一致性检查方法内

if (checkIfSnapshotChanged(inst)) {
  // Force a sync re-render.

  scheduleUpdateOnFiber(fiber, SyncLane, NoTimestamp);
}

// ...
可以看到,实现的核心是加了三重保障来进行一致性检查,当出现不一致时就发起一个同步更新的调度,因此 transition 的效果就失灵了,所以会阻塞页面交互出现了卡顿。对于这个问题 React 团队还在研究和探索,仍然还有一段路要走。
另外对于类库开发者来说,在社区并发特性全面铺开前,不鼓励在类库中使用 Concurrent Features,因为这会使得依赖我们类库的上层应用默认开启了并发模式,而这可能不是他们所期望的。