
Hello World
Dapr Hello World
环境安装
Dapr 服务端的安装还是非常方便的,首先我们需要安装 Dapr 命令行:
# Linux
$ wget -q https://raw.githubusercontent.com/dapr/cli/master/install/install.sh -O - | /bin/bash

# Mac
$ curl -fsSL https://raw.githubusercontent.com/dapr/cli/master/install/install.sh | /bin/bash
然后运行 Daprd 服务程序:
$ dapr init
⌛  Making the jump to hyperspace...
Downloading binaries and setting up components
✅  Success! Dapr is up and running. To get started, go here: https://aka.ms/dapr-getting-started
接下来可以指定运行时:
# Install v0.1.0 runtime
$ dapr init --runtime-version 0.1.0

# Check the versions of cli and runtime
$ dapr --version
cli version: v0.1.0
runtime version: v0.1.0
应用运行
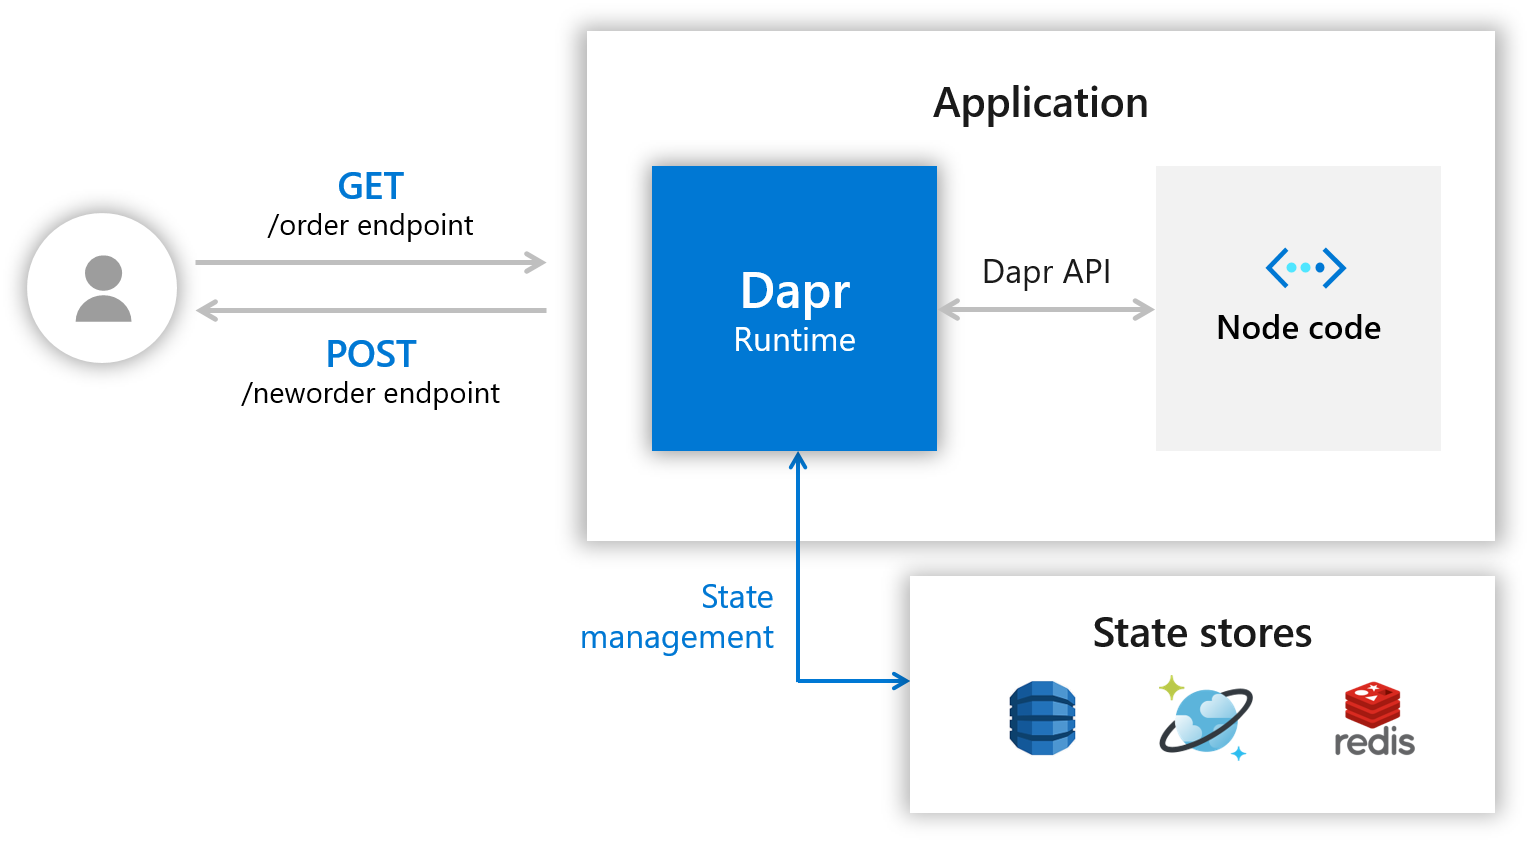
接下来将演示如何使 Dapr 在您的计算机上本地运行。您将部署一个 Node.js 应用,该应用订阅订购消息并保留它们。以下架构图说明了组成第一部分样本的组件:
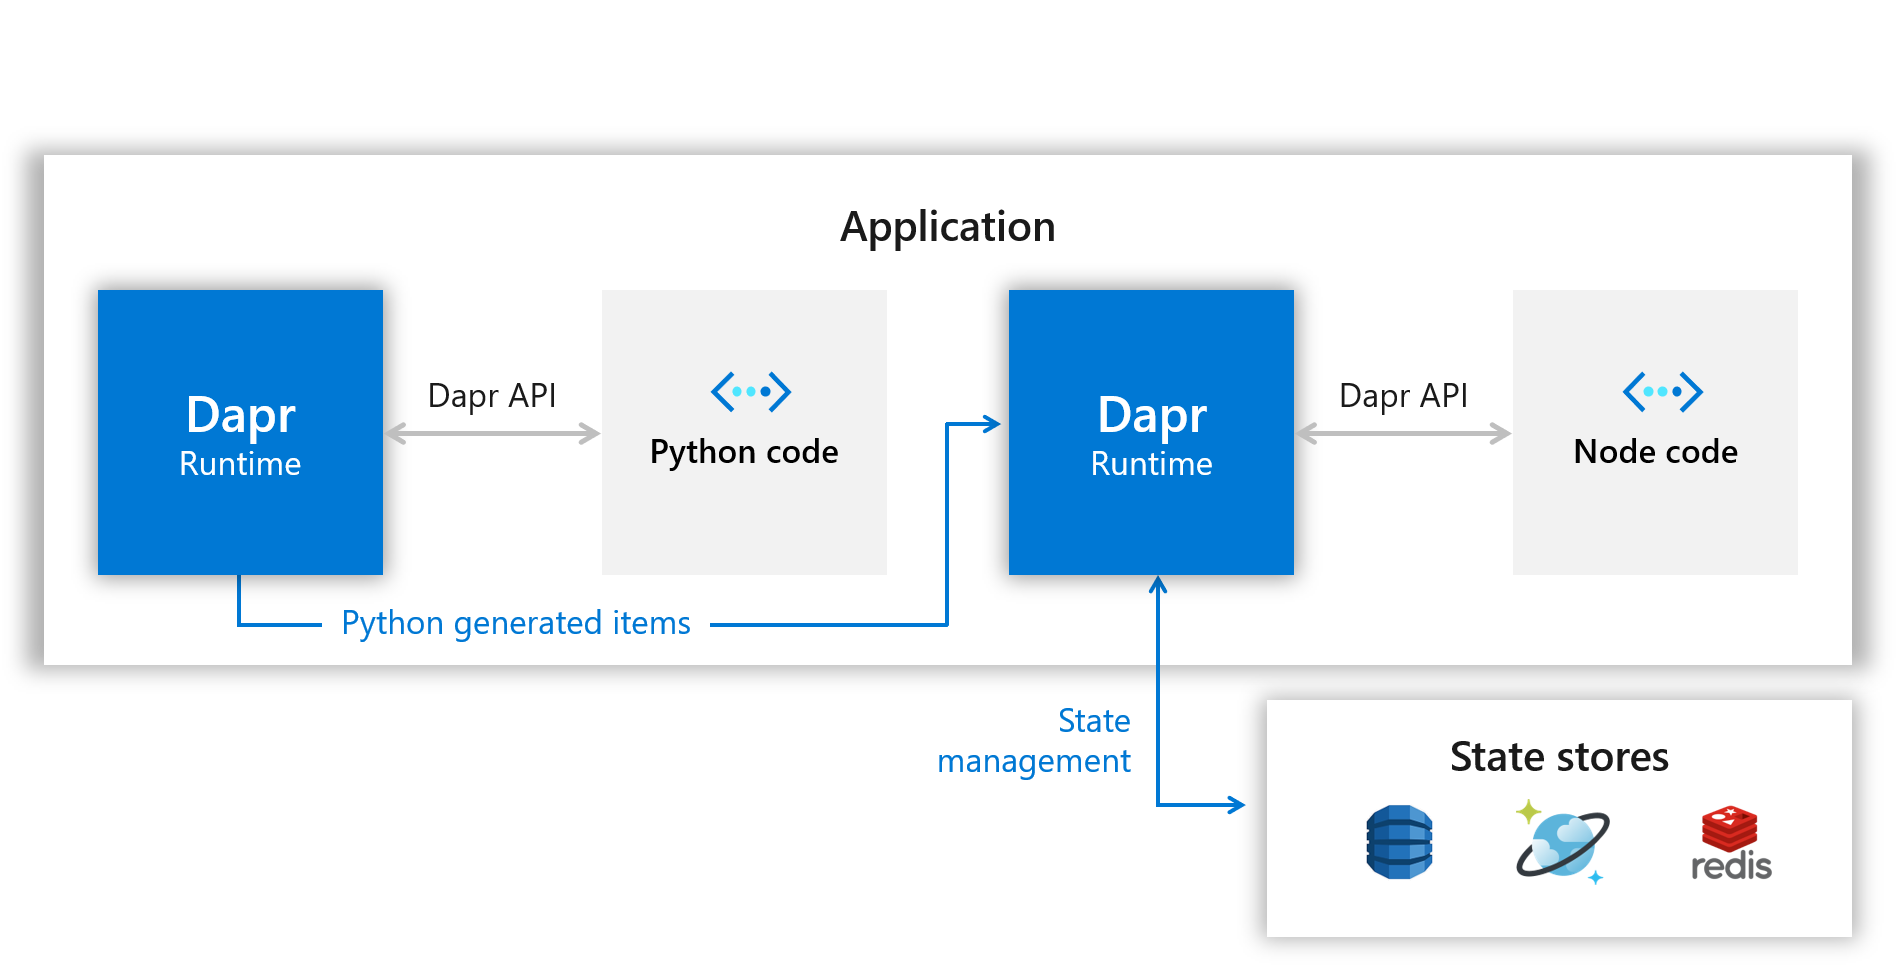
稍后,您将部署一个 Python 应用程序以充当发布者。下面的架构图显示了新组件的添加:
Node.js 代码
在 Node.js 中就是简单的 Express 应用:
const daprPort = process.env.DAPR_HTTP_PORT || 3500;
const stateStoreName = `statestore`;
const stateUrl = `http://localhost:${daprPort}/v1.0/state/${stateStoreName}`;
Dapr CLI 为 Dapr 端口创建一个环境变量,默认为 3500。向系统发送 POST 消息时,将在第 3 步中使用它。stateStoreName 是提供给状态存储的名称。稍后您将返回到该名称,以了解该名称的配置方式。
app.post("/neworder", (req, res) => {
  const data = req.body.data;
  const orderId = data.orderId;
  console.log("Got a new order! Order ID: " + orderId);

  const state = [
    {
      key: "order",
      value: data,
    },
  ];

  fetch(stateUrl, {
    method: "POST",
    body: JSON.stringify(state),
    headers: {
      "Content-Type": "application/json",
    },
  })
    .then((response) => {
      if (!response.ok) {
        throw "Failed to persist state.";
      }

      console.log("Successfully persisted state.");
      res.status(200).send();
    })
    .catch((error) => {
      console.log(error);
      res.status(500).send({ message: error });
    });
});
该应用程序在这里公开了将接收和处理新订单消息的终结点。它首先记录传入的消息,然后通过将状态数组发布到 /state/<state-store-name> 端点来将订单 ID 持久化到 Redis 或者,您可以通过简单地将其与响应对象一起返回来保持状态:
res.json({
  state: [
    {
      key: "order",
      value: order,
    },
  ],
});
然而,这种方法并不能让你验证消息是否成功持久化。该应用还暴露了一个 GET 端点,/order。
app.get("/order", (_req, res) => {
  fetch(`${stateUrl}/order`)
    .then((response) => {
      if (!response.ok) {
        throw "Could not get state.";
      }

      return response.text();
    })
    .then((orders) => {
      res.send(orders);
    })
    .catch((error) => {
      console.log(error);
      res.status(500).send({ message: error });
    });
});
这将调用 Redis 缓存来检索 “订单 “键的最新值,这有效地让 Node.js 应用成为无状态。然后运行该应用:
$ dapr run --app-id nodeapp --app-port 3000 --dapr-http-port 3500 node app.js
dapr 运行命令寻找默认的组件目录,在 Linux/MacOS 中是$HOME/.dapr/components,在 Windows 中是%USERPROFILE%/.dapr\components,它保存着 Dapr 将在运行时使用的组件的 yaml 定义文件。当在本地运行时,为本地开发环境提供默认定义的 yaml 文件被放置在这个默认组件目录下。查看组件目录下的 stattore.yaml 文件。
apiVersion: dapr.io/v1alpha1
kind: Component
metadata:
  name: statestore
spec:
  type: state.redis
  version: v1
你可以看到 yaml 文件将状态存储定义为 Redis,并将其命名为 statetore。这是在 app.js 中用来调用应用程序中的状态存储的名称。
const stateStoreName = `statestore`;
const stateUrl = `http://localhost:${daprPort}/v1.0/state/${stateStoreName}`;
然后通过以下调用可以触发该服务:
$ dapr invoke --app-id nodeapp --method neworder --data "{\"data\": { \"orderId\": \"42\" } }"
$ curl -XPOST -d @sample.json -H "Content-Type:application/json" http://localhost:3500/v1.0/invoke/nodeapp/method/neworder
在其他通过 Dapr 启动的服务中,我们可以通过如下方式互相调用:
dapr_port = os.getenv("DAPR_HTTP_PORT", 3500)
dapr_url = "http://localhost:{}/v1.0/invoke/nodeapp/method/neworder".format(dapr_port)

n = 0
while True:
    n += 1
    message = {"data": {"orderId": n}}

    try:
        response = requests.post(dapr_url, json=message)
    except Exception as e:
        print(e)

    time.sleep(1)
非 Docker 环境运行
Dapr CLI 提供了一个使用 slim init 初始化 Dapr 的选项,而不需要默认创建一个依赖 Docker 的开发环境。安装 Dapr CLI 后,使用以下命令用 slim init 初始化 Dapr。
$ dapr init --slim
在这种模式下,安装了两个不同的二进制文件 daprd 和 placement。placement 二进制文件是在 Dapr 自托管安装中启用 actors 所需要的。在这种模式下,没有安装任何默认的组件,如 Redis,用于状态管理或 pub/sub。这意味着,除了服务调用之外,安装时没有其他构件功能是开箱即用的。用户可以自由设置自己的环境和自定义组件。此外,如果配置了状态存储,那么基于 actor 的服务调用也是可能的。
$ git clone https://github.com/dapr/samples.git
$ cd samples/hello-dapr-slim
在 app.js 中,你会发现一个简单的 express 应用,它暴露了一个单一的路由和处理程序。看一下 neworder 处理程序:
app.post("/neworder", bodyParser.json(), (req, res) => {
  const data = req.body.data;
  const orderId = data.orderId;
  console.log("Got a new order! Order ID: " + orderId);
  res.status(200).send("Got a new order! Order ID: " + orderId);
});
这里的端点 neworder,将接收和处理消息。处理程序会记录接收到的消息,并以同样的日志进行回复。然后使用 Dapr 运行该 Node 应用:
$ dapr run --app-id nodeapp --app-port 3000 --dapr-http-port 3500 node app.js

Starting Dapr with id nodeapp. HTTP Port: 3500. gRPC Port: 9165
You're up and running! Both Dapr and your app logs will appear here.
...
然后可以通过 Dapr 或者其他方式调用该应用:
$ dapr invoke --verb POST --app-id nodeapp --method neworder --data "{\"data\": { \"orderId\": \"41\" } }"
$ dapr invoke --verb POST --app-id nodeapp --method neworder --data '{"data": { "orderId": "41" } }'
$ curl -XPOST -d @sample.json -H "Content-Type:application/json" http://localhost:3500/v1.0/invoke/nodeapp/method/neworder