
2020-heibaiying-Java 并发编程基础
Java 并发编程基础
一、线程
1.1 创建线程
创建线程通常有以下三种方式:
- 实现 Runnable 接口,并重写其 run 方法:
public class J1_Method01 {
    public static void main(String[] args) {
        System.out.println("Main线程的ID为:" + Thread.currentThread().getId());
        Thread thread = new Thread(new CustomRunner());
        thread.start();
    }
}

class CustomRunner implements Runnable {
    @Override
    public void run() {
        System.out.println("CustomRunner线程的ID为:" + Thread.currentThread().getId());
    }
}
- 继承自 Thread 类,并重写其 run 方法:
public class J2_Method02 {
    public static void main(String[] args) {
        System.out.println("Main线程的ID为:" + Thread.currentThread().getId());
        CustomThread customThread = new CustomThread();
        customThread.start();
    }
}

class CustomThread extends Thread {
    @Override
    public void run() {
        System.out.println("CustomThread线程的ID为:" + Thread.currentThread().getId());
    }
}
- 以上两种方式都无法获取线程的返回值,如果想要获取线程的返回值,需要实现 Callable 接口:
public class J3_Method03 {
    public static void main(String[] args) throws ExecutionException, InterruptedException {
        Task task = new Task();
        FutureTask<Integer> futureTask = new FutureTask<>(task);
        new Thread(futureTask).start();
        System.out.println("获得线程返回值:" + futureTask.get());
    }
}

class Task implements Callable<Integer> {
    @Override
    public Integer call() {
        return 100;
    }
}
// 输出:
获得线程返回值:100
1.2 线程属性
-
编号 (ID) :用于标识线程的唯一编号,只读属性。
-
名称 (Name):用于定义线程名称,可读可写。
-
线程类别 (Daemon):通过线程的
setDaemon(boolean on)方法进行设置,为 true 表示设置为守护线程,否则为用户线程。用户线程会阻止 Java 虚拟机正常停止,守护线程则不会。通常可以把一些不重要的线程设置为守护线程,比如监控其他线程状态的监控线程,当其他工作线程停止后,虚拟机就可以正常退出。 -
优先级 (Priority):Java 线程支持 1 到 10 十个优先级,默认值为 5 。Java 线程的优先级本质上只是给线程调度器一个提示信息,它并不能保证线程一定按照优先级的高低顺序运行,所以它是不可靠的,需要谨慎使用。在 Java 平台中,子线程的优先级默认与其父线程相同。
1.3 线程状态
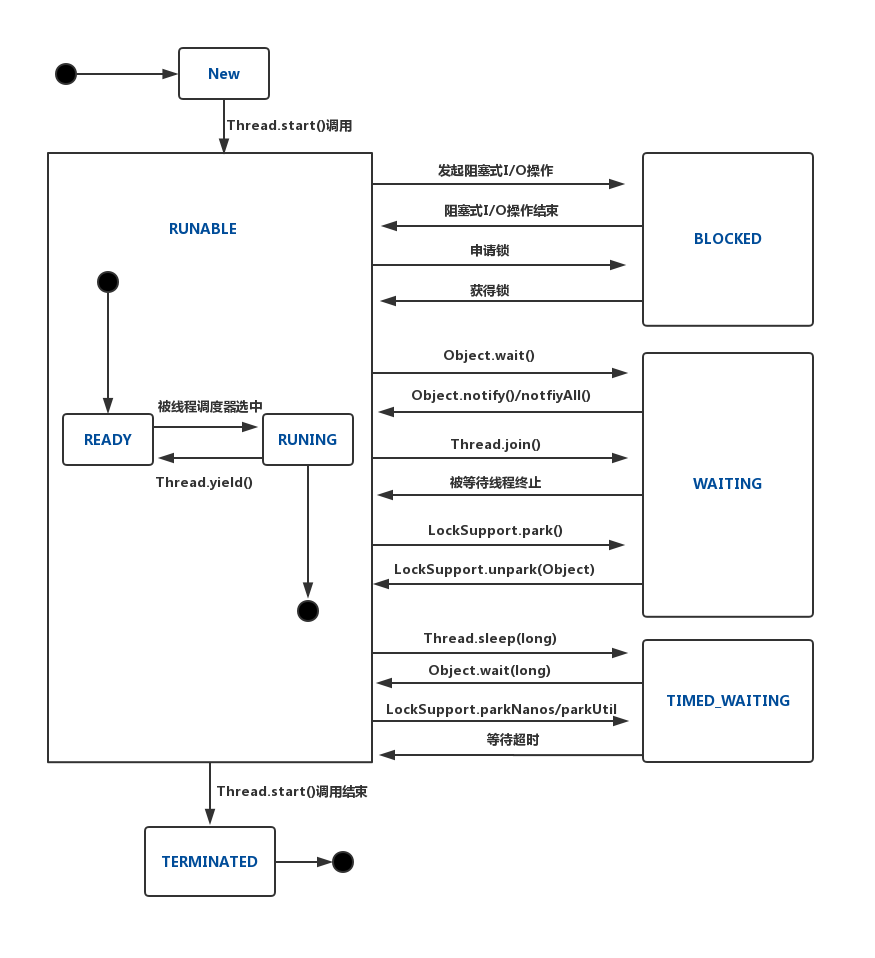
Java 线程的生命周期分为以下五类状态:
-
RUNABLE:该状态包括两个子状态:READY 和 RUNING 。处于 READY 状态的线程被称为活跃线程,被线程调度器选中后才开始运行,转化为 RUNING 状态。
-
BLOCKED:一个线程发起一个阻塞式 IO 操作后(如文件读写或者阻塞式 Socket 读写),或者申请一个由其他线程持有的独占资源(比如锁)时,相应的线程就会处于该状态。
-
WAITING:线程处于无时间限制的等待状态。
-
TIMED_WAITING:有时间限制的等待状态,如果在指定时间内并没有执行的特定的操作,则该线程自动转换为 RUNABLE。
-
TERMINATED:
Thread.run()正常返回或者由于抛出异常而提前终止,则对应的线程都会处于该终止状态。
各个状态之间的转换关系如下图:
1.4 线程终止
通常线程会随着代码的运行完成而终止,但如果你在线程中进行了死循环操作,此时就需要考虑如何安全地停止线程?虽然 Thread 类提供了 stop() 方法,但其已经被标识为废弃,因为 stop() 只是暴力的停止线程, 但此时线程中的操作仍可能处于中间状态,此时暴力地停止就可能会产生非预期的结果。想要安全的停止线程,可以通过改变终止标志位的方式来实现:
public class ThreadStop {

    private static volatile boolean stopFlag = true;

    public static void main(String[] args) throws InterruptedException {
        Thread thread = new Thread(() -> {
            while (stopFlag) {
                try {
                    Thread.sleep(100);
                    System.out.println("持续输出");
                } catch (InterruptedException e) {
                    e.printStackTrace();
                }
            }
        });
        thread.start();
        Thread.sleep(3 * 1000);
        stopFlag = false;
        System.out.println("线程终止");
    }
}
1.5 线程中断
除了终止线程外,JDK 中提供了以下方法用于实现线程中断:
Thread.interrupt():用于给目标线程设置中断标志位,但实际上并不能中断线程;Thread.isInterrupted():通过检查中断标志位,判断当前线程是否被中断;Thread.interrupted():用来判断当前线程的中断状态,同时会清除当前线程的中断标志位。
线程中断与线程终止的区别在于:线程中断只是告诉目标线程,我希望你停止运行,即设置标志位,而线程是否真的停止则是由其自行决定。示例如下:
/**
 * interrupt() 只是设置中断标志位,并不能中断线程,所以子线程会持续打印
 */
public class J1_Interrupt {
    public static void main(String[] args) throws InterruptedException {
        Thread thread = new Thread(() -> {
            while (true) {
                System.out.println("子线程打印");
            }
        });
        thread.start();
        Thread.sleep(10);
        thread.interrupt();
    }
}


/**
 * isInterrupted() 用于检查当前线程是否存在中断标志位,配合interrupt()使用可以中断线程
 */
public class J2_IsInterrupted {
    public static void main(String[] args) throws InterruptedException {
        Thread thread = new Thread(() -> {
            while (!Thread.currentThread().isInterrupted()) {
                System.out.println("子线程打印");
            }
        });
        thread.start();
        Thread.sleep(10);
        thread.interrupt();
    }
}

/**
 * interrupted() 用于判断当前线程的中断状态,并清除当前线程的中断标志位
 */
public class J3_Interrupted {

    public static void main(String[] args) throws InterruptedException {
        Thread thread = new Thread(() -> {
            // 此时由于标志位被清除,此时子线程依然会持续打印
            while (!Thread.interrupted() || !Thread.currentThread().isInterrupted()) {
                System.out.println("子线程打印");
            }
        });
        thread.start();
        Thread.sleep(10);
        thread.interrupt();
    }
}
二、基本概念
2.1 变量分类
状态变量 (State Variable) :即类的实例变量,非共享的静态变量。
共享变量 (Shared Variable) : 即可以被多个线程共同访问的变量。
2.2 竞态
如果多个线程并发的操作共享变量,并且这些操作不全是只读操作,那么它们彼此之间就会存在竞争,这种状态就称为竞态。由于竞态的存在,此时可能存在一个类在单线程的环境下能够正常运转,但在多线程的环境下却运行出错,此时就称这个类是线程不安全的。
public class J1_ThreadUnsafe {

    private static int i = 0;

    public static void main(String[] args) throws InterruptedException {
        IncreaseTask task = new IncreaseTask();
        Thread thread1 = new Thread(task);
        Thread thread2 = new Thread(task);
        thread1.start();
        thread2.start();
        // 等待线程结束再打印返回值
        thread1.join();
        thread2.join();
        System.out.println(i); // 线程不安全,输出总是小于:200000
    }

    static class IncreaseTask implements Runnable {
        @Override
        public void run() {
            for (int j = 0; j < 100000; j++) {
                inc();
            }
        }

        private void inc() {
            i++;
        }
    }
}
三、原子性
3.1 定义
对于涉及共享变量的操作,若该操作从其执行线程以外的任意线程来看都是不可分割的,那么我们就说该操作具有原子性。它包含以下两层含义:
- 访问(读、写)某个共享变量的操作从其执行线程以外的其他任何线程来看,该操作要么已经执行结束要么尚未发生,即其他线程不会看到该操作的中间部分的结果。
- 访问同一组共享变量的原子操作不能被交错执行。
3.2 非原子性协定
在 Java 语言中,除了 long 类型 和 double 类型以外的任何类型的变量的写操作都是具有原子性的,但对于没有使用 volatile 关键字修饰的 64 位的 long 类型和 double 类型,允许将其的读写操作划分为两次 32 位的操作来进行,这就是 long 和 double 类型的非原子性协定 ( Nonatomic Treatment of double and long Variables ) 。
3.3 保证原子性
通过 Java 虚拟机规范和非原子性协定, Java 语言可以保证对基本数据类型的访问具有原子性,如果想要保证更大范围内的原子性(如多行操作的原子性),此时可以使用字节码指令 monitorenter 和 monitorexit 来隐式执行 lock 和 unlock 操作,从而将串行变成并行来保证原子性;monitorenter 和 monitorexit 这两个字节码指令反映到 Java 代码中就是 synchronized 关键字。
四、可见性
4.1 定义
如果一个线程对某个共享变量进行更新之后,后续访问该变量的其他线程可以读取到这个更新结果,那么我们就称该更新对其他线程可见,反之则是不可见,这种特性就是可见性。出现可见性问题,往往意味着线程读取到了旧数据,这会导致更新丢失,从而导致运行结果与预期结果存在差异。可见性问题与计算机的存储结构和 Java 的内存模型都有着密切的关系。
4.2 高速缓存
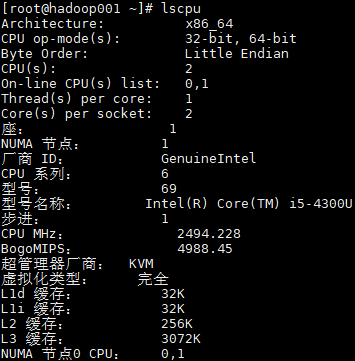
由于现代处理器对数据的处理能力远高于主内存(DRAM)的访问速率,为了弥补它们之间在处理能力上的鸿沟,通常在处理器和主内存之间都会存在高速缓存(Cache)。高速缓存相当于一个由硬件实现的容量极小的散列表(Hash Table),其键是一个内存地址,其值是内存数据的副本或者准备写入内存的数据。
现代处理器一般具有多个层次的高速缓存,如:一级缓存(L1 Cache)、二级缓存(L2 Cache)、三级缓存(L3 Cache)等。其中一级缓存通常包含两部分,其中一部分用于存储指令(L1i),另外一部分用于存储数据(L1d)。距离处理器越近的高速缓存,其存储速率越快,制造成本越高,因此其容量也越小。在 Linux 系统中,可以使用 lscpu 命令查看其高速缓存的情况:
4.3 缓存一致性协议
在多线程环境下,每个线程运行在不同的处理器上,当多个线程并发访问同一个共享变量时,这些线程的执行处理器都会在自己的高速缓存中保留一个该共享变量的副本,这种情况下如何让一个处理器对数据的更改能被其他处理器感知到?为了解决这个问题,需要引入一种新的通讯机制,这就是缓存一致性协议。
缓存一致性协议有着多种不同的实现,这里以广泛使用的 MESI (Modified-Exclusive-Shared-Invalid) 协议为例,和其名字一样,它将高速缓存中的缓存条目分为以下四种状态:
- Invalid:该状态表示相应的缓存行中不包含任何内存地址对应的有效副本数据。
- Shared:该状态表示相应的缓存行中包含相应内存地址所对应的副本数据,并且其他处理器的高速缓存中也可能存在该相同内存地址所对应的副本数据。
- Exclusive:该状态表示相应的缓存行中包含相应内存地址所对应的副本数据,但其他处理器的高速缓存中不应存在该相同内存地址所对应的副本数据,即独占的。
- Modified:该状态表示相应的缓存行中包含对相应内存地址所做的更新的结果。MESI 协议限制任意一个时刻只能有一个处理器能对同一内存地址上的数据进行更新,因此同一内存地址在任意一个时刻只能有一个缓存条目处于该状态。
根据以上状态,当某个处理器对共享变量进行读写操作时,其具体的行为如下:
- 读取共享变量:处理器首先在高速缓存上进行查找,如果对应缓存条目的状态为 M,E 或者 S,此时则直接读取;如果缓存条目为无效状态 I,此时需要向总线发送 Read 消息,其他处理器或主内存则需要回复 Read Response 来提供相应的数据,处理器在获取到数据后,将其存储到相应的缓存条目,并将状态更新为 S 。
- 写入共享变量:此时处理器首先需要判断是否拥有对该数据的所有权,如果对应缓存条目的状态为 E 或者 M,代表此时均处于独占状态,此时可以直接写入,并将其状态变更为 M 。如果不为 E 或 M,此时处理器需要往总线上发送 Invalidate 消息来通知其他处理器将对应的缓存条目失效,之后在收到其他处理器的 Invalidate Acknowledge 响应后再进行更改,并将其状态变更为 M。
在只有高速缓存的情况下,通过缓存一致性协议能够保证一个线程对共享变量的更新对于其他线程是可见的。如果只是这样,多线程编程就不会存在可见性问题了,但实际上缓存一致性协议并不能保证最终的可见性,这是由于写缓冲器和无效化队列导致的。
4.4 写缓冲器与无效化队列
在上面的缓存一致性协议中,处理器必须等待其他处理器的应答(Read Response \ Invalidate Acknowledge)后才去执行后续的操作,这会带来一定的时间开销,为了解决这个问题,现代计算机架构又引入了写缓冲器和无效化队列:
- 写缓冲器:当处理器发现缓存条目的状态不为 E 或 M 时,此时不再等待其他处理器返回 Invalidate Acknowledge 消息,而是直接将变更写入到写缓冲器就认为操作完成。当收到对应的 Invalidate Acknowledge 消息,再将变更写入到对应的缓存条目中,此时写操作对于其他处理器而言,才算完成。
- 无效化队列:当其他处理器接收到 Invalidate 消息后,不再等待删除指定缓存条目中的副本数据后再回复 Invalidate Acknowledge ,而是将消息存入到无效化队列中后就直接回复,之后处理器再根据无效化队列中的消息来重置缓存行的状态到 Invalid 。
写缓冲器是处理器的私有部件,一个处理器的写缓冲器所存储的内容是不能被其他处理器所读取的,这就会导致一个更新即便已经发生并写入到写缓冲器,但是其他处理器上的线程读取到的还是旧值,从而导致可见性问题。除了写缓冲器外,无效化队列也会导致可见性问题,当某个写入发生后,其他处理器上的对应缓存条目应该都立即失效,但是由于无效化队列的存在,Invalidate 操作不会立即执行,导致其他处理器仍然读取到的仍然是未失效的旧值。
4.5 内存屏障
想要解决写缓存器和无效化队列带来的问题,需要引入一个新的机制 —— 内存屏障:
- Store Barrier:存储屏障,可以使执行该指令的处理器冲刷其写缓冲器。
- Load Barrier:加载屏障,将无效化队列中所指定的缓存条目的状态都标志位 I ,并清空无效化队列,从而保证处理器在读取共享变量时必须发送 Read 消息去获取更新后的值。
冲刷写缓冲器和清空无效化队列都是存在时间消耗的,所以只有在必须要保证可见性的场景下,才应该去使用内存屏障。何种场景下必须要保证可见性,这是由用户来决定的,这也是多线程编程所需要考虑的问题。
4.6 保证可见性
在 Java 语言中,保证可见性的典型实现是 volatile 关键字,它在 Java 语言中一共有三种作用:
- 保证可见性:Java 虚拟机(JIT 编译器)会在 volatile 变量写操作之后插入一个通用的 StoreLoad 屏障,它可以充当存储屏障来清空执行处理器的写缓冲器;同时 JIT 编译器还会在变量的读操作前插入一个加载屏障来清空无效化队列。
- 禁止指令重排序:通过内存屏障, Java 虚拟机可以保证 volatile 变量之前的任何读写操作都先于这个 volatile 写操作之前被提交,而 volatile 变量的读操作先于之后任何变量的读写操作被提交。
- 除了以上两类语义外,Java 虚拟机规范还特别规定了对于使用 volatile 修饰的 64 的 long 类型和 double 类型的变量的读写操作具有原子性。
除了 volatile 外,synchronized 和 final 关键字都能保证可见性:
- synchronized :synchronized 关键字规定了对其所修饰的变量执行 unlock 操作前,必须先把此变量同步回主内存中。
- final :被 final 修饰的字段在构造器中一旦初始化完成,并且构造器没有把
this的引用逃逸到外部,那么其他线程中就能看到 final 字段的值,即可见性得到保证。
4.7 Java 内存模型
以上主要介绍计算机的内存模型对可见性的影响,但是不同架构的处理器在内存模型和支持的指令集上都存在略微的差异。 Java 作为一种跨平台的语言,必须尽量屏蔽这种差异,而且还要尽量利用硬件的各种特性(如寄存器,高速缓存和指令集中的某些特有指令)来获取更好的执行速度,这就是 Java 的内存模型:
- Main Memory:主内存,Java 内存模型规定了所有的变量都存储在主内存中,主内存可以类比为计算机的主内存,但其只是虚拟机内存的一部分,并不能代表整个计算机内存。
- Work Memory:工作内存,Java 内存模型规定了每条线程都有自己的工作内存,工作内存可以类比为计算机的高速缓存。工作内存中保存了被该线程使用到的变量的拷贝副本。
线程对变量的所有操作都必须在工作内存中进行,而不能直接读写主内存中的变量;不同的线程之间也无法直接访问对方工作内存中的变量,线程间变量值的传递需要通过主内存来完成。

五、有序性
5.1 顺序语义
Java 语言中的顺序语义可以分为以下四类:
- 源代码顺序:程序员编写的代码的执行顺序;
- 程序顺序:编译后的代码的执行顺序;
- 执行顺序:给定代码在处理器上的实际执行顺;
- 感知顺序:处理器感知到的其他处理器上代码的执行顺序。
5.2 重排序类型
编译器和处理器出于性能考虑,通常会改变代码的实际执行顺序,这种情况就称为重排序,具体分为以下两类:
| 重排序类型 | 重排序表现 | 重排序主体(原因) |
|---|---|---|
| 指令重排序 | 程序顺序和源代码顺序不一致 | 编译器 |
| 执行顺序和程序顺序不一致 | JIT 编译器、处理器 | |
| 存储子系统重排序 (内存重排序) |
源代码顺序、程序顺序和执行顺序这三者保持一致, 但是感知顺序与执行顺序不一致 |
高速缓存、写缓冲器 |
5.3 貌似串行语义
尽管编译器和处理器都能够进行指令重排序,但它们都必须遵循 貌似串行语义(As-if-serial Semantics),即重排序不能影响程序在单线程上执行结果的正确性。按照 As-if-serial 原则,只有不存在数据依赖关系的语句才会被重排序,存在数据依赖关系的语句不会被重排序,示例如下。此时第 1,2 行语句彼此之间可以进行重排序,但是第 3 行语句不能被重排序到 1 和 2 行语句之前:
int a = 1;
int b = 2;
int c = a + b;
同时为了保证单线下执行的正确性,处理器会将重排序指令的执行结果先写入到重排序缓冲器(ROB,Recorder Buffer)中,之后再按照这些指令被处理器读取的顺序提交到寄存器或者主内存中,因此虽然指令是乱序执行的,但结果却是顺序提交的,从而能够保证在单线程下的正确性。
5.4 内存重排序
由于写缓冲器和高速缓存的存在,并且写缓冲器是不能被其他处理器所访问的,因此其他处理器感知到的顺序可能仍然与执行顺序不同,这种情况就叫做内存重排序。但需要说明的是:指令重排序是一种实实在在的重排序,它改变了指令的执行顺序;但内存重排序只是一种现象,只是其他处理器的错觉。
5.5 保证顺序性
在 Java 语言中,volatile 和 synchronized 都能够保证有序性:
- volatile:通过内存屏障来禁止指令重排序,通过加载屏障和存储屏障来冲刷写缓冲器和清空无效化队列,从而可以避免内存重排序的现象;
- synchronized :使用 synchronized 修饰的变量在同一时刻只允许一个线程对其进行 lock 操作,这种限制决定了持有同一个锁的两个同步块只能串行执行,也就避免了乱序问题。
六、锁机制
6.1 内部锁
Java 平台中的任何一个对象都有着唯一一个与之相关联的锁,这种锁被称为监视器或内部锁,内部锁是一种非公平的排它锁,它能够保障原子性、可见性和有序性。内部锁通过 synchronized 关键字来实现,可以用于修饰方法以及代码块, 被修饰的方法称为同步方法,被修饰的代码块称为同步代码块。示例如下:
线程不安全的示例:
public class J1_ThreadUnsafe {

    private static int i = 0;

    public static void main(String[] args) throws InterruptedException {
        IncreaseTask task = new IncreaseTask();
        Thread thread1 = new Thread(task);
        Thread thread2 = new Thread(task);
        thread1.start();
        thread2.start();
        // 等待线程结束再打印返回值
        thread1.join();
        thread2.join();
        System.out.println(i);
    }

    static class IncreaseTask implements Runnable {
        @Override
        public void run() {
            for (int j = 0; j < 100000; j++) {
                inc();
            }
        }

        private void inc() {
            i++;
        }
    }
}
使用 synchronized 修饰 inr() 方法来保证线程安全:
public class J2_SynchronizedSafe {

    private static int i = 0;

    public static void main(String[] args) throws InterruptedException {
        // 两个线程调用的是同一个IncreaseTask实例,此时是线程安全的
        IncreaseTask task = new IncreaseTask();
        Thread thread1 = new Thread(task);
        Thread thread2 = new Thread(task);
        thread1.start();
        thread2.start();
        //等待结束后 才打印返回值
        thread1.join();
        thread2.join();
        //并打印返回值
        System.out.println(i);
    }

    static class IncreaseTask implements Runnable {
        @Override
        public void run() {
            for (int j = 0; j < 100000; j++) {
                inc();
            }
        }

        private synchronized void inc() {
            i++;
        }
    }
}
通常我们把被修饰的方法体和代码块称为临界区,需要注意的是必须保证多线程锁住的是同一个临界区,否则依然是线程不安全的。如果将上面创建线程的方法修改为如下所示,此时 synchronized 锁住的是不同 IncreaseTask 对象的 inc() 方法,所以仍然是线程不安全的:
Thread thread1 = new Thread(new IncreaseTask());
Thread thread2 = new Thread(new IncreaseTask());
synchronized 除了可以修饰方法外,还可以用于修饰代码块,此时可以使用 this 关键字作为句柄,但仍然需要保证两个线程调用的是同一个 IncreaseTask 实例,示例如下:
public class J3_SynchronizedSafe {

    private static int i = 0;

    static class IncreaseTask implements Runnable {
        @Override
        public void run() {
            for (int j = 0; j < 100000; j++) {
                // 锁住的是同一个对象,此时也是线程安全的
                synchronized (this) {
                    i++;
                }
            }
        }
    }

    public static void main(String[] args) throws InterruptedException {
        IncreaseTask task = new IncreaseTask();
        Thread thread1 = new Thread(task);
        Thread thread2 = new Thread(task);
        thread1.start();
        thread2.start();
        thread1.join();
        thread2.join();
        System.out.println(i);
    }
}
如果想要调用不同的 IncreaseTask() 实例,又想保证线程安全,此时可以使用同一个对象作为 synchronized 关键字的句柄。为避免竞态,作为句柄的对象通常使用 private final 关键字进行修饰,示例如下:
public class J4_SynchronizedSafe {

    private static final String s = "";

    private static int i = 0;

    static class IncreaseTask implements Runnable {
        @Override
        public void run() {
            for (int j = 0; j < 100000; j++) {
                // 虽然调用的是不同的 IncreaseTask() 实例,但锁住的仍然是同一个对象,此时也是线程安全的
                synchronized (s) {
                    i++;
                }
            }
        }
    }

    public static void main(String[] args) throws InterruptedException {
        Thread thread1 = new Thread(new IncreaseTask());
        Thread thread2 = new Thread(new IncreaseTask());
        thread1.start();
        thread2.start();
        thread1.join();
        thread2.join();
        System.out.println(i);
    }
}
6.2 显示锁
显示锁是 java.util.concurrent.locks.Lock 接口的实例,该接口对显示锁进行了抽象,定义了如下方法:
- lock():获取锁;
- lockInterruptibly():如果当前线程未被中断,则获取锁;
- tryLock():仅在调用时锁为空闲状态才获取该锁;
- tryLock(long time, TimeUnit unit):如果锁在给定的等待时间内存在空闲,并且当前线程未被中断,则获取锁;
- unlock():释放锁;
- newCondition():返回绑定到此 Lock 实例的新的 Condition 实例。
java.util.concurrent.locks.ReentrantLock 类是 Lock 接口的默认实现,它是一种可重入锁,示例如下:
/**
 * 利用ReentrantLock实现线程安全
 */
public class J1_ThreadSafe {

    private static ReentrantLock reentrantLock = new ReentrantLock();
    private static Integer i = 0;

    static class IncreaseTask implements Runnable {
        @Override
        public void run() {
            for (int j = 0; j < 100000; j++) {
                try {
                    reentrantLock.lock();
                    i++;
                } catch (Exception e) {
                    e.printStackTrace();
                } finally {
                    reentrantLock.unlock();
                }
            }
        }

        public static void main(String[] args) throws InterruptedException {
            Thread thread1 = new Thread(new IncreaseTask());
            Thread thread2 = new Thread(new IncreaseTask());
            thread1.start();
            thread2.start();
            thread1.join();
            thread2.join();
            System.out.println(i);
        }
    }
}
ReentrantLock 是一种可重入的锁, 它能够对共享资源进行重复加锁,即持有该锁的线程再次获取该锁时不会被阻塞,但解锁次数与加锁次数必须要保持一致,此时才能完全解锁:
try {
    reentrantLock.lock();
    reentrantLock.lock();
    reentrantLock.lock();
    i++;
} catch (Exception e) {
    e.printStackTrace();
} finally {
    reentrantLock.unlock();
    reentrantLock.unlock();
    reentrantLock.unlock();
}
ReentrantLock 即支持公平锁也支持非公平锁,公平锁在调度时候往往需要频繁切换上下文来保证在等待时间上的公平性,所以默认的 ReentrantLock 锁是非公平的,如果想要使用公平锁,可以在创建时进行指定:
// 参数为true,代表使用公平锁
private static ReentrantLock fairLock = new ReentrantLock(true);
显示锁相比于内部锁提供了更高的灵活性,但容易存在锁泄露(某个线程持有锁后因为异常而导致锁无法被释放)等问题。而内部锁虽然灵活性不足,但不会存在锁泄露,并且虚拟机也会在编译时对内部锁进行适当的锁优化。
6.3 读写锁
由于锁的排它性,导致多个线程无法以安全的方式并发地读取共享变量,这不利于提高系统的并发能力,因此产生了读写锁:
- 读锁:读锁是共享的,可以被多个线程所持有,即一个线程持有读锁时并不妨碍其他线程获得相应锁的读锁;
- 写锁:写锁是独占的,一个线程持有写锁时,其他线程无法获取相应锁的写锁或读锁。
基于读写锁的特性,其非常适合于读多写少的场景,示例如下:
public class ReadWriteLock {

    // 可重入锁
    private static ReentrantLock reentrantLock = new ReentrantLock();
    // 读写锁
    private static ReentrantReadWriteLock readWriteLock = new ReentrantReadWriteLock();
    // 读锁
    private static ReentrantReadWriteLock.ReadLock readLock = readWriteLock.readLock();
    // 写锁
    private static ReentrantReadWriteLock.WriteLock writeLock = readWriteLock.writeLock();

    // 待赋值的变量
    private static String i = "";

    //写方法
    static class Write implements Runnable {

        private Lock lock;
        private String value;

        Write(Lock lock, String value) {
            this.lock = lock;
            this.value = value;
        }

        @Override
        public void run() {
            try {
                lock.lock();
                Thread.sleep(1000);
                i = value;
                System.out.println(Thread.currentThread().getName() + "写入值" + i);
            } catch (InterruptedException e) {
                e.printStackTrace();
            } finally {
                lock.unlock();
            }
        }
    }

    //读方法
    static class Read implements Runnable {

        private Lock lock;

        Read(Lock lock) {
            this.lock = lock;
        }

        @Override
        public void run() {
            try {
                lock.lock();
                Thread.sleep(1000);
                System.out.println(Thread.currentThread().getName() + "读取到值" + i);
            } catch (InterruptedException e) {
                e.printStackTrace();
            } finally {
                lock.unlock();
            }
        }
    }


    public static void main(String[] args) throws InterruptedException {

        // 写锁是排它的,但读锁是共享的,耗时3秒左右
        for (int j = 0; j < 2; j++) {
            Thread thread = new Thread(new Write(writeLock, String.valueOf(j)));
            thread.start();
        }
        for (int j = 0; j < 18; j++) {
            Thread thread = new Thread(new Read(readLock));
            thread.start();
        }


        // 使用重入锁时耗时20秒左右
        for (int j = 0; j < 2; j++) {
            Thread thread = new Thread(new Write(reentrantLock, String.valueOf(j)));
            thread.start();
        }
        for (int j = 0; j < 18; j++) {
            Thread thread = new Thread(new Read(reentrantLock));
            thread.start();
        }
    }
}
6.4 锁优化
1. 锁消除
锁消除(Lock Elision)是 JIT 编译器对内部锁所做的一种优化。在编译时,JIT 编译器会通过逃逸分析(Escape Analysis)来判断同步块所使用的锁对象是否只能被一个线程访问而没有逃逸到其他线程,如果是,则编译器在编译这个同步块时就不生成 synchronized 锁所对应的机器码,这种编译器优化就被称为锁消除。示例如下:
public class LockElision {

    private String toJson(Employee employee) {
        StringBuffer buffer = new StringBuffer();
        buffer.append("name:").append(employee.getName());
        buffer.append("age:").append(employee.getAge());
        buffer.append("birthday:").append(employee.getBirthday());
        return buffer.toString();
    }
}
此时的 StringBuffer 实例对象只是一个局部变量,并且该对象并没有被发布到其他线程,因此其对应的内部锁会被消除。
2. 锁粗化
对于相邻的几个同步块,如果这些同步块锁使用的是同一个锁的实例,那么 JIT 编译器就会将这些同步块合并为一个大同步块,从而避免一个线程反复申请、释放同一个锁而导致的开销。
3. 偏向锁
Java 虚拟机在实现 monitorenter 字节码(申请锁)和 monitorexit 字节码(释放锁)时需要借助一个原子操作(CAS 操作),这个操作是比较昂贵的,因此内部锁在每次被线程获取时,它都会将对应的线程记录为偏好线程(Biased Thread),之后此线程无论是再次申请该锁还是获取该锁,都无须借助原先昂贵的原子操作,从而减少了锁的申请与释放的开销。
因为锁在每次都获取时,都需要刷新偏好线程的值,这个过程也是需要额外开销的,所以偏向锁只适用于系统中大部分锁争用较少的情况,如果系统中大部分锁的竞争都比较激烈,此时可以考虑在 Java 程序的启动命令行中增加 -XX:-UseBiasedLocking 参数来关闭偏向锁。
4. 适应性锁
如果一个线程在申请锁时,该锁恰好被其他线程所持有,那么该线程就需要等待持有锁的线程释放该锁,此时常用的方案有两种:
- 暂停该线程进行等待,但暂停操作会导致上下文切换,这会导致额外的开销;
- 持续执行空循环,进行忙等(Busy Wait)。这不会导致上下文的切换,但是会持续消耗处理器的资源。
暂停策略适用于等待时间较长的场景,此时可以抵消上下文切换带来的开销;忙等策略适用于等待时间较短的场景,此时可以避免持续消耗处理器的资源。Java 虚拟机会根据运行过程中收集到的信息来判断这个锁被线程持有的时间,从而选取最优的策略来进行等待,这就是适应性锁。
七、无锁并行
7.1 CAS
锁是一种悲观的策略,它假设每一次临界区内的访问都会存在冲突,因此它在同一时刻只允许一个线程进入临界区,而无锁则是一种乐观的策略,它假设临界区内资源的访问很少存在冲突,并采用 CAS 方案来避免这种偶发冲突而导致的线程不安全。CAS 的全称是 Compare And Swap (比较交换),其核心思想如下:
boolean compareAndSwap (Variable V, Object A, Object B){
    if(A == V.get()){  // 检查变量值是否被其他线程修改过
        V.set(B); // 更新变量值
        return true; // 更新成功
    }
    return false; //变量值已被其他线程修改,更新失败
}
如果变量 V 的当前值和调用 CAS 时所提供的变量值 A (即变量的旧值) 一致,那么就说明其他线程并没有修改过变量 V 的值,此时就可以进行更新操作,否则操作失败,整个 CAS 操作的原子性由处理器来进行保证。由于 CAS 操作并不需要频繁的线程调度,因此其通常有着更好的性能表现,为了充分利用 CAS 的特性,JDK 提供了原子包来满足各种场景下的使用需求:
| 分组 | 类 |
|---|---|
| 基础数据型 | AtomicBoolean、AtomicInteger、AtomicLong |
| 引用型 | AtomicReference、AtomicStampedReference、AtomicMarkableReference |
| 数组型 | AtomicIntegerArray、AtomicLongArray、AtomicReferenceArray |
| 字段更新型 | AtomicIntegerFieldUpdater、AtomicLongFieldUpdater、AtomicReferenceFieldUpdater |
7.2 引用型
除了使用原子包中提供的 AtomicBoolean、AtomicInteger、AtomicLong 来保证基本数据类型操作的原子性外,还可以使用 AtomicReference<V> 来保证任意类型操作原子性,示例如下:
public class J1_SimpleType {

    private static int i = 0;
    private static AtomicInteger j = new AtomicInteger(0);
    /*使用AtomicReference对普通对象进行封装*/
    private static AtomicReference<Integer> k = new AtomicReference<>(0);

    static class Task implements Runnable {

        private CountDownLatch latch;

        Task(CountDownLatch latch) {
            this.latch = latch;
        }

        @Override
        public void run() {
            i++;
            j.incrementAndGet();
            k.getAndUpdate(x -> x + 1);
            latch.countDown();
        }
    }

    public static void main(String[] args) throws InterruptedException {
        int number = 10000;
        CountDownLatch latch = new CountDownLatch(number);
        Semaphore semaphore = new Semaphore(10);
        ExecutorService executorService = Executors.newFixedThreadPool(10);
        Task task = new Task(latch);
        for (int i = 0; i < number; i++) {
            semaphore.acquire();
            executorService.execute(task);
            semaphore.release();
        }
        latch.await();
        System.out.println("输出i的值" + i);
        System.out.println("输出j的值" + j.get());
        System.out.println("输出K的值" + k.get());
        executorService.shutdown();
    }
}
在使用 CAS 的过程中,一个比较常见的隐患是 A-B-A 问题:如果其他线程在将共享变量的值修改为 B 后,又立即修改回原值,此时这次变更对于其他线程而言可能无法感知到。这对于计数等场景而言,是没有问题的,但在一些特别的场景下,就会导致错误。想要解决这个问题,可以在比较时候除了比较变量的值外,还应进行时间戳的比较,AtomicStampedReference 就是这种比较思路的一种实现。其更新值的方法定义如下:
compareAndSet(V expectedReference, V newReference, int expectedStamp, int newStamp)
7.3 数组型
数组型可以保证对数据内元素的操作是线程安全的,示例如下:
public class J3_ArrayElementThreadUnsafe {

    private static int capacity = 10;
    // 保证对集合内元素的操作具有原子性
    private static AtomicIntegerArray atomicIntegerArray = new AtomicIntegerArray(capacity);
    // 对集合内元素的操作线程不安全
    private static Vector<Integer> vector = new Vector<>(capacity);
    // 对集合内元素的操作线程不安全
    private static ArrayList<Integer> arrayList = new ArrayList<>(capacity);

    static {
        for (int i = 0; i < capacity; i++) {
            arrayList.add(0);
            vector.add(0);
        }
    }

    static class Task implements Runnable {

        private CountDownLatch latch;

        Task(CountDownLatch latch) {
            this.latch = latch;
        }

        @Override
        public void run() {
            for (int i = 0; i < 1000; i++) {
                int num = i % capacity;
                atomicIntegerArray.getAndIncrement(num);
                vector.set(num, vector.get(num) + 1);
                arrayList.set(num, arrayList.get(num) + 1);
            }
            latch.countDown();
        }
    }

    public static void main(String[] args) throws InterruptedException {
        int number = 1000;
        CountDownLatch latch = new CountDownLatch(number);
        ExecutorService executorService = Executors.newFixedThreadPool(10);
        for (int i = 0; i < number; i++) {
            executorService.execute(new Task(latch));
        }
        latch.await();
        System.out.println("集合内元素的线程安全:");
        System.out.println("atomicIntegerArray size : " + atomicIntegerArray);
        System.out.println("vector size : " + vector);
        System.out.println("arrayList size : " + arrayList);
        executorService.shutdown();
    }
}

// 输出如下:
集合内元素的线程安全:
atomicIntegerArray size : [100000, 100000, 100000, 100000, 100000, 100000, 100000, 100000, 100000, 100000]
vector size : [69966, 81954, 78605, 79144, 66532, 75082, 77324, 78723, 78022, 76294]
arrayList size : [99045, 99173, 99251, 98609, 99248, 99191, 98848, 99181, 99212, 99083]
7.4 字段更新型
如果某个类的基本类型的字段在某一环境中存在线程安全,但该字段在多个环境中都有引用,此时直接修改该字段可能会导致多个环境都需要重新验证,在这种情况下可以使用字段更新型来保证其在特定环境下的线程安全:
public class J5_AtomicIntegerFieldUpdater {

    static class Task implements Runnable {

        private Candidate candidate;
        private CountDownLatch latch;
        private AtomicIntegerFieldUpdater fieldUpdater;

        Task(CountDownLatch latch, Candidate candidate, AtomicIntegerFieldUpdater fieldUpdater) {
            this.candidate = candidate;
            this.latch = latch;
            this.fieldUpdater = fieldUpdater;
        }

        @Override
        public void run() {
            fieldUpdater.incrementAndGet(candidate);
            latch.countDown();
        }
    }

    public static void main(String[] args) throws InterruptedException {
        int number = 100000;
        CountDownLatch latch = new CountDownLatch(number);
        ExecutorService executorService = Executors.newFixedThreadPool(10);
        Candidate candidate = new Candidate("候选人", 0);
        // 使用字段更新型来保证其线程安全
        AtomicIntegerFieldUpdater<Candidate> fieldUpdater = AtomicIntegerFieldUpdater.newUpdater(Candidate.class, "score");
        for (int i = 0; i < number; i++) {
            executorService.execute(new Task(latch, candidate, fieldUpdater));
        }
        latch.await();
        System.out.println(candidate.getName() + "获得票数:" + candidate.getScore());
        executorService.shutdown();
    }

    private static class Candidate {

        private String name;

        // 1. 不能声明为private  2. 必须用volatile关键字修饰
        public volatile int score;
        .....
    }
}
需要注意的是由于 CAS 只能保证可见性,不能保证原子性,所以该变量必须使用 volatile 关键字修饰,并且由于 FieldUpdater 是采用反射机制来获取该变量的值,所以其也不能声明为 private 。另外 FieldUpdater 也不能用于 static 类型的变量。
八、线程间的协作
8.1 等待与通知
为了支持多线程之间的协作,JDK 中提供了两个非常重要的方法:wait() 和 notify() ,这两个方法定义在 Object 类中,这意味着任何 Java 对象都可以调用者两个方法。如果一个线程调用了 object.wait() 方法,那么它就会进入该对象的等待队列中,这个队列中可能包含了多个线程,此时代表多个线程都在等待同一个对象;当 object.notify() 方法被调用时,它就会从这个等待队列中随机唤醒一个线程。
需要特别注意的是在调用这两个方法时,它们都必须位于对应对象的 synchronzied 语句中,因为这两个方法在调用前都需要获得对应对象的监视器(内部锁),过程如下:

使用示例如下:
public class J3_WaitAndNotify {

    private static final Object object = new Object();

    public static void main(String[] args) {
        new Thread(() -> {
            synchronized (object) {
                try {
                    System.out.println("对象object等待");
                    object.wait();
                    System.out.println("线程1后续操作");
                } catch (InterruptedException e) {
                    e.printStackTrace();
                }
            }
        }).start();
        new Thread(() -> {
            synchronized (object) {
                System.out.println("线程2开始操作");
                System.out.println("对象object唤醒");
                object.notify();
            }
        }).start();
    }
}

// 输出
对象object等待
线程2开始操作
对象object唤醒
线程1后续操作
notify() 表示随机唤醒任意一个等待线程,如果想要唤醒所有等待线程,则可以使用 notifyAll() 方法:
public class J5_NotifyAll {

    private static final Object object = new Object();

    public static void main(String[] args) {
        new Thread(() -> {
            synchronized (object) {
                try {
                    System.out.println("对象object在线程1等待");
                    object.wait();
                    System.out.println("线程1后续操作");
                } catch (InterruptedException e) {
                    e.printStackTrace();
                }
            }
        }).start();
        new Thread(() -> {
            synchronized (object) {
                try {
                    System.out.println("对象object在线程2等待");
                    object.wait();
                    System.out.println("线程2后续操作");
                } catch (InterruptedException e) {
                    e.printStackTrace();
                }
            }
        }).start();
        new Thread(() -> {
            synchronized (object) {
                System.out.println("线程3开始操作");
                System.out.println("对象object唤醒");
                object.notifyAll();
            }
        }).start();
    }
}

// 输出
对象object在线程1等待
对象object在线程2等待
线程3开始操作
对象object唤醒
线程2后续操作
线程1后续操作
在上面的示例中,由于有两个线程处于等待状态,所以 notifyAll() 的效果等价于调用 notify() 两次:
object.notify();
object.notify();
8.2 条件变量
综上所述可以使用 wait() 和 notify() 配合内部锁 synchronized 可以实现线程间的等待与唤醒,如果你使用的是显示锁而不是内部锁,此时可以使用 Condition 来实现同样的效果。Condition 接口中定义了如下方法:
- await():使得当前线程进入等待状态,类似于
object.wait(); - awaitUninterruptibly():与
await()类似,但它不会在等待过程中响应中断; - awaitNanos(long nanosTimeout) & await(long time, TimeUnit unit) & awaitUntil(Date deadline):有时间限制的等待;
- signal():用于随机唤醒一个等待;
- signalAll():用于唤醒所有等待。
和 object 的 wait()\notify()\notifyAll() 一样,在使用 condition 的 await()\signal()\signalAll() 前,也要求线程必须持有相关的重入锁, 示例如下:
public class AwaitAndSignal {

    private static ReentrantLock lock = new ReentrantLock();
    private static Condition condition = lock.newCondition();

    static class IncreaseTask implements Runnable {
        @Override
        public void run() {
            try {
                lock.lock();
                String threadName = Thread.currentThread().getName();
                System.out.println(threadName + "线程等待通知...");
                condition.await();
                System.out.println(threadName + "线程后续操作");
            } catch (InterruptedException e) {
                e.printStackTrace();
            } finally {
                lock.unlock();
            }
        }
    }

    public static void main(String[] args) throws InterruptedException {
        Thread thread1 = new Thread(new IncreaseTask());
        thread1.start();
        Thread.sleep(1000);
        System.out.println("主线程开始操作");
        lock.lock();
        System.out.println("主线程唤醒");
        condition.signal();
        lock.unlock();
    }
}

// 输出:
Thread-0线程等待通知...
主线程开始操作
主线程唤醒
Thread-0线程后续操作
8.3 Join
Thread.join() 可以让当前线程等待目标线程结束后再开始运行,示例如下:
public class J1_Normal {
    private static int j = 0;
    public static void main(String[] args)  {
        Thread thread = new Thread(() -> {
            for (int i = 0; i < 100000; i++) {
                j++;
            }
        });
        thread.start();
        System.out.println(j);
    }
}
// 此时主线程不等待子线程运行完成,通常输出结果为:0

public class J2_Join {
    private static int j = 0;
    public static void main(String[] args) throws InterruptedException {
        Thread thread = new Thread(() -> {
            for (int i = 0; i < 100000; i++) {
                j++;
            }
        });
        thread.start();
        thread.join();
        System.out.println(j);
    }
}
// 此时主线程需要等待子线程运行完成,输出结果为:100000
8.4 CountDownLatch
Thread.join() 可以让当前线程等待目标线程结束后再开始运行,但大多数时候,你只需要等待目标线程完成特定的操作,而不必等待其完全终止。此时可以使用条件变量 Condition 来实现,也可以使用更为简单的工具类 CountDownLatch 。CountDownLatch 会在内部维护一个计数器,每次完成一个任务,则计数器减 1,当计数器为 0 时,则唤醒所有的等待线程,示例如下:
public class j1_Normal {
    private static AtomicInteger integer = new AtomicInteger(0);
    static class IncreaseTask implements Runnable {
        @Override
        public void run() {
            try {
                // 假设这是一个耗时的任务
                Thread.sleep(3000);
                integer.incrementAndGet();
            } catch (InterruptedException e) {
                e.printStackTrace();
            }
        }
    }

    public static void main(String[] args) {
        IncreaseTask task = new IncreaseTask();
        ExecutorService executorService = Executors.newFixedThreadPool(100);
        for (int i = 0; i < 100; i++) {
            executorService.submit(task);
        }
        System.out.println("integer:" + integer);
        executorService.shutdown();
    }
}

// 不使用CountDownLatch 时,主线程不会子线程等待计算完成,此时输出通常为: 0


public class J2_CountDown {
    private static int number = 100;
    // 指定计数器的初始值
    private static CountDownLatch latch = new CountDownLatch(number);
    private static AtomicInteger integer = new AtomicInteger(0);
    static class IncreaseTask implements Runnable {
        @Override
        public void run() {
            try {
                // 假设这是一个耗时的任务
                Thread.sleep(3000);
                integer.incrementAndGet();
                // 计数器减1
                latch.countDown();
            } catch (InterruptedException e) {
                e.printStackTrace();
            }
        }
    }

    public static void main(String[] args) throws InterruptedException {
        IncreaseTask task = new IncreaseTask();
        ExecutorService executorService = Executors.newFixedThreadPool(100);
        for (int i = 0; i < number; i++) {
            executorService.submit(task);
        }
        // 等待计数器为0时唤醒所有等待的线程
        latch.await();
        System.out.println("integer:" + integer);
        executorService.shutdown();
    }
}

// 使用CountDownLatch 时,主线程需要等待所有的子线程计算完成后再输出,计算结果为:100
8.5 CyclicBarrier
CyclicBarrier 和 CountDownLatch 类似,都是用于等待一个或者多个线程完成特定的任务后再执行某项操作,但不同的是它可以循环使用,示例如下:
/**
 * 每五个人完成任务后,则算一个小组已完成
 */
public class J1_CyclicBarrier {

    private static CyclicBarrier cyclicBarrier = new CyclicBarrier(5, () -> System.out.println("五人小组任务执行完成"));

    static class Task implements Runnable {
        @Override
        public void run() {
            try {
                long l = new Double(Math.random() * 5000).longValue();
                Thread.sleep(l);
                System.out.println("任务" + Thread.currentThread().getId() + "执行完成");
                cyclicBarrier.await();
            } catch (InterruptedException | BrokenBarrierException e) {
                e.printStackTrace();
            }
        }
    }

    public static void main(String[] args) {
        ExecutorService executorService = Executors.newFixedThreadPool(20);
        for (int j = 0; j < 10; j++) {
            executorService.submit(new Task());
        }
        executorService.shutdown();
    }
}

// 输出如下:
任务21执行完成
任务20执行完成
任务15执行完成
任务14执行完成
任务22执行完成
五人小组任务执行完成
任务17执行完成
任务13执行完成
任务19执行完成
任务18执行完成
任务16执行完成
五人小组任务执行完成
基于 CyclicBarrier 的特性,通常可以用于在测试环境来模仿高并发,如每次等待一万个线程启动后再让其并发执行某项压力测试。
8.6 Semaphore
信号量(Semaphore)可以看做是锁的扩展,由于锁的排它性,所以一次只允许一个线程来访问某个特定的资源, 而 Semaphore 则允许多个线程并发的访问某个特定的资源,并且可以通过配置许可证的数量来限制并发访问的线程数,因此其可以用于流量控制等场景中:
public class J1_Semaphore {

    // 限制并发访问的线程的数量为5
    private static Semaphore semaphore = new Semaphore(5);

    static class IncreaseTask implements Runnable {
        @Override
        public void run() {
            try {
                semaphore.acquire();
                System.out.println(Thread.currentThread().getId() + "获得锁!");
                Thread.sleep(5000);
                semaphore.release();
            } catch (InterruptedException e) {
                e.printStackTrace();
            }
        }
    }

    public static void main(String[] args) {
        IncreaseTask task = new IncreaseTask();
        for (int i = 0; i < 20; i++) {
            new Thread(task).start();
        }
    }
}

// 输出如下,至多只能有五个线程并发获得锁
13获得锁!
15获得锁!
16获得锁!
18获得锁!
17获得锁!
....
19获得锁!
20获得锁!
21获得锁!
22获得锁!
23获得锁!
....
8.7 LockSupport
LockSupport 可以在线程内的任意位置实现阻塞。它采用和 Semaphore 类似的信号量机制:它为每个线程准备一个许可,如果许可可用,则 park() 方法会立即返回,并且消费掉这个许可,让许可不可用;此时因为许可不可用,相应的线程就会被阻塞。而 unpark() 则会使得一个许可从不可用变为可用。但和 Semaphore 不同的是:它的许可不能累加,你不可能拥有超过一个许可,它永远只有一个:
public class J1_LockSupport {

    static class Task implements Runnable {
        @Override
        public void run() {
            long id = Thread.currentThread().getId();
            System.out.println("线程" + id + "开始阻塞");
            LockSupport.park();
            System.out.println("线程" + id + "解除阻塞");
        }
    }

    public static void main(String[] args) throws InterruptedException {
        Thread thread01 = new Thread(new Task());
        Thread thread02 = new Thread(new Task());
        thread01.start();
        thread02.start();
        Thread.sleep(3000);
        System.out.println("主线程干预");
        LockSupport.unpark(thread01);
        LockSupport.unpark(thread02);
    }
}

// 输出:
线程13开始阻塞
线程14开始阻塞
主线程干预
线程13解除阻塞
线程14解除阻塞
九、线程池
9.1 线程池分类
为了避免重复创建和销毁线程而导致额外的性能开销,JDK 提供了线程池功能来实现线程的复用,具体分为以下几类:
- newFixedThreadPool():该方法返回一个固定线程数量的线程池。该线程池中的线程数量始终不变。当有一个新任务提交时,如果线程池中存在空闲的线程,则立即执行;如果没有,则新任务会被暂时存在一个任务队列中,待有线程空闲时再进行处理。
- newSingleThreadExecutor(): 该方法返回一个只有一个线程的线程池。若多个任务被提交到该线程池,则多余的任务会被保存在一个任务队列中,待线程空闲,按照先入先出的顺序被执行。
- newCachedThreadPool():根据实际情况动态调整线程数量。当新任务提交时,会优先复用空闲的线程;如果所有线程均处于工作状态,则会创建新的线程来进行处理。
- newSingleThreadScheduledExecutor():该方法返回一个 ScheduledExecutorService 对象,线程池大小为 1 。SeheduledExectorService 在继承 ExecutorService 的基础上还额外支持定时任务的执行。
- newScheduledThreadPool():与 newSingleThreadScheduledExecutor 方法类似,但可以指定线程池中线程的数量。
线程池的基本使用如下:
public class J1_ThreadPool {

    static class Task implements Runnable {
        @Override
        public void run() {
            try {
                Thread.sleep(100);
                System.out.println(Thread.currentThread().getName() + "正在执行");
            } catch (InterruptedException e) {
                e.printStackTrace();
            }
        }
    }

    public static void main(String[] args) {
        // 创建线程池
        ExecutorService executorService = Executors.newFixedThreadPool(10);
        for (int i = 0; i < 100; i++) {
            // 提交任务到线程池
            executorService.submit(new Task());
        }
        // 关闭线程池,此时不再接受新任务,但仍会等待原有的任务执行完成,如果想要立即关闭,则可以使用shutdownNow()
        executorService.shutdown();
    }
}
9.2 定时任务
上面线程池分类中的 newSingleThreadScheduledExecutor() 和 newScheduledThreadPool() 都可以用于创建支持定时任务的线程池,它们返回的都是 ScheduledExecutorService 接口的实例。ScheduledExecutorService 接口中定义了如下三类定时方法:
/*在给定的时间,对任务进行一次性调度*/
public ScheduledFuture<?> schedule(Runnable command, long delay, TimeUnit unit);
public <V> ScheduledFuture<V> schedule(Callable<V> callable,long delay, TimeUnit unit);

/**
 * 以上一个任务开始执行时间为起点,等待period时间后开始调度下一次任务,
 * 如果任务耗时大于period,则上一次任务结束后立即执行下一次任务
 */
public ScheduledFuture<?> scheduleAtFixedRate(Runnable command,long initialDelay,long period,
                                              TimeUnit unit);
/**
 * 以上一个任务开始执行时间为起点再经过delay时间后开始调度下一次任务,
 * 不论任务耗时如何,上一次任务结束后都需要等待delay时间之后才可以执行下一次任务
 */
public ScheduledFuture<?> scheduleWithFixedDelay(Runnable command, long initialDelay,long delay,
                                                 TimeUnit unit);
使用示例如下:
public class J2_ScheduledTask {

    private static long cacheTime = System.currentTimeMillis();

    static class Task implements Runnable {

        private String type;

        Task(String type) {
            this.type = type;
        }

        @Override
        public void run() {
            try {
                Thread.sleep(5000);
                long nowTime = System.currentTimeMillis();
                System.out.println(type + Thread.currentThread().getId() + "执行耗时" + (nowTime - cacheTime) + "毫秒");
                cacheTime = nowTime;
            } catch (InterruptedException e) {
                e.printStackTrace();
            }
        }
    }

    public static void main(String[] args) {
        // 为避免相互间的影响,以下各种场景最好分别测试:
        ScheduledExecutorService pool = Executors.newScheduledThreadPool(10);
        // 任务只会被执行一次
        pool.schedule(new Task("schedule"), 2, TimeUnit.SECONDS);
        // 指定2秒为固定周期执行,因为项目执行耗时5秒,此时项目结束会立马执行下一次任务,所以输出的时间间隔为5秒
        pool.scheduleAtFixedRate(new Task("FixedRate"), 0, 2, TimeUnit.SECONDS);
        // 总是在上一次项目结束后间隔指定周期执行,因为项目耗时5秒,还需要间隔2秒执行,所以输出的时间间隔为7秒
        pool.scheduleWithFixedDelay(new Task("WithFixedDelay"), 0, 2, TimeUnit.SECONDS);
        // pool.shutdown();
    }

}
9.3 线程池内部实现
不管是使用 newFixedThreadPool() 还是使用 newCachedThreadPool() 来创建线程池,其最终调用的都是 ThreadPoolExecutor 的构造器,定义如下:
public ThreadPoolExecutor(int corePoolSize,                      //核心线程数量
                          int maximumPoolSize,                   //最大线程数量
                          long keepAliveTime,                    //超过核心线程数的线程的存活时间
                          TimeUnit unit,                       //存活时间的单位
                          BlockingQueue<Runnable> workQueue,     //任务队列
                          ThreadFactory threadFactory,           //线程工厂
                          RejectedExecutionHandler handler)      //拒绝策略
1. 线程工厂
ThreadFactory 用于指定线程的创建方式,示例如下:
new ThreadFactory() {
    @Override
    public Thread newThread(Runnable r) {
        Thread thread = new Thread(r);
        // 将所有线程都设置为守护线程
        thread.setDaemon(true);
        System.out.println("create" + thread.getName());
        return thread;
    }
}
2. 拒绝策略
当线程池中可用线程的数量为 0,并且等待队列已满的情况下,线程池需要按照 RejectedExecutionHandler 指定的拒绝策略来决定如何处理后续提交任务,JDK 中默认提供了以下四种拒绝策略:
- ThreadPoolExecutor.AbortPolicy:直接拒绝新提交的任务,并抛出异常;
- ThreadPoolExecutor.DiscardPolicy:静默拒绝新提交的任务,并不抛出异常;
- ThreadPoolExecutor.DiscardOldestPolicy:丢弃等待时间最长的任务,然后再尝试执行新提交的任务;
- ThreadPoolExecutor.CallerRunsPolicy:直接在调用 execute 方法的线程中运行新提交的任务。
9.4 线程池扩展
ThreadPoolExecutor 除了提供丰富的参数来满足多样化的需求外,还支持重载其生命周期方法来进行更加灵活的扩展:
ExecutorService executorService = new ThreadPoolExecutor(10, 20, 0L, TimeUnit.MILLISECONDS,
                                                         new LinkedBlockingQueue<>()) {
    @Override
    protected void beforeExecute(Thread t, Runnable r) {
        System.out.println("线程" + t.getName() + "准备执行");
    }

    @Override
    protected void afterExecute(Runnable r, Throwable t) {
        System.out.println("线程" + r + "执行结束");
    }

    @Override
    protected void terminated() {
        System.out.println("线程池退出");
    }
};
9.5 线程池大小
线程池的大小可以通过以下公式进行估算:
十、Future
10.1 Future
如果你在创建线程时,使用的是 Runnable 接口,那么此时你是无法获取线程执行结果的,如果想要获取线程的执行结果,需要实现 Callable 接口,示例如下:
public class J0_Callable {

    static class Task implements Callable<Integer> {

        @Override
        public Integer call() throws InterruptedException {
            Thread.sleep(3000);
            return 100;
        }
    }

    public static void main(String[] args) throws ExecutionException, InterruptedException {
        ExecutorService executors = Executors.newSingleThreadExecutor();
        Future<Integer> submit = executors.submit(new Task());
        System.out.println("计算结果为:" + submit.get());
        executors.shutdown();
    }
}
此时通过 ExecutorService.submit() 进行提交,得到的是一个 Future 对象,它包含了线程的执行结果,当你调用其 get() 方法时,它会阻塞直至获取到线程的返回结果。
10.2 FutureTask
使用 Callable 接口的限制是:其只能使用线程池提交,而不能使用单独的线程进行提交。如果想要使用单独的线程提交,可以使用 FutureTask 对其进行包装,FutureTask 是 Runnable 接口的实现类,可以用于任何场景下的提交,示例如下:
static class Task implements Callable<Integer> {
    @Override
    public Integer call() throws InterruptedException {
        Thread.sleep(3000);
        return 100;
    }
}

public static void main(String[] args) throws ExecutionException, InterruptedException {
    FutureTask<Integer> futureTask01 = new FutureTask<>(new Task());
    FutureTask<Integer> futureTask02 = new FutureTask<>(new Task());
    // 使用独立的线程执行
    new Thread(futureTask01).start();
    ExecutorService executorService = Executors.newSingleThreadExecutor();
    // 使用线程池提交
    executorService.submit(futureTask02);
    System.out.println("futureTask01 计算结果为:" + futureTask01.get());
    System.out.println("futureTask02 计算结果为:" + futureTask01.get());
    executorService.shutdown();
}
10.3 CompletableFuture
CompletableFuture 是 JDK 8 提供的增强后 Future ,它支持流式调用,等待唤醒等一系列新的功能:
1. 等待唤醒
public class J2_CompletableFuture {

    static class Compute implements Runnable {

        private CompletableFuture<Integer> future;

        Compute(CompletableFuture<Integer> future) {
            this.future = future;
        }

        @Override
        public void run() {
            try {
                System.out.println("子线程等待主线程运算完成····");
                Integer integer = future.get();
                System.out.println("子线程完成后续运算:" + integer * integer);
            } catch (InterruptedException | ExecutionException e) {
                e.printStackTrace();
            }
        }
    }

    public static void main(String[] args) throws InterruptedException {
        int intermediateResult;
        CompletableFuture<Integer> future = new CompletableFuture<>();
        // 启动子线程
        new Thread(new Compute(future)).start();
        System.out.println("启动主线程");
        Thread.sleep(2000);
        System.out.println("主线程计算完成");
        // 假设主线程计算结果为 100
        intermediateResult = 100;
        // 传递主线程的计算结果给子线程
        future.complete(intermediateResult);
    }
}

// 输出
启动主线程
    子线程等待主线程运算完成····
    主线程计算完成
    子线程完成后续运算:10000
2. supplyAsync
CompletableFuture 的 supplyAsync 可以将一个正常的方法以异步的方式来执行:
public class J3_SupplyAsync {

    private static Integer compute() {
        try {
            Thread.sleep(2000);
        } catch (InterruptedException e) {
            e.printStackTrace();
        }
        System.out.println("子线程计算完成");
        return 100;
    }

    public static void main(String[] args) throws ExecutionException, InterruptedException {
        CompletableFuture<Integer> supplyAsync = CompletableFuture.supplyAsync(J3_SupplyAsync::compute);
        System.out.println("主线程等待子线程计算完成");
        Integer integer = supplyAsync.get();
        System.out.println("主线程计算完成:" + integer * integer);
    }
}
3. 流式调用
CompletableFuture 支持大部分流式处理的特性,示例如下:
public class J4_StreamingCall {

    private static Integer compute() {
        System.out.println("compute所在线程:" + Thread.currentThread().getId());
        try {
            Thread.sleep(1000);
        } catch (InterruptedException e) {
            e.printStackTrace();
        }
        return 100;
    }

    private static Integer multi(Integer integer) {
        try {
            System.out.println("multi所在线程:" + Thread.currentThread().getId());
            Thread.sleep(1000);
        } catch (InterruptedException e) {
            e.printStackTrace();
        }
        return integer * integer;
    }

    private static void accept(Integer integer) {
        System.out.println("accept所在线程:" + Thread.currentThread().getId());
        System.out.println("accept方法消费掉计算结果:" + integer);
    }

    public static void main(String[] args) throws ExecutionException, InterruptedException {
        CompletableFuture<Void> future = CompletableFuture.supplyAsync(J4_StreamingCall::compute)
            .thenApply(J4_StreamingCall::multi)
            .thenAccept(J4_StreamingCall::accept)   //值在这一步被消费掉了
            .thenAccept(x -> System.out.println("运算结果:" + x));
        future.get(); //类似于流式计算的惰性求值,如果缺少这一步,不会有任何输出
    }
}
4. 组合多个 CompletableFuture
除了使用单个的 CompletableFuture,还可以通过 thenCompose 或 thenCombineAsync 来组合多个 CompletableFuture:
public class J6_Combination {

    private static Integer compute() {
        System.out.println("compute 所在线程:" + Thread.currentThread().getId());
        return 100;
    }

    private static Integer multi(Integer integer) {
        System.out.println("epr 所在线程:" + Thread.currentThread().getId());
        return integer * integer;
    }


    public static void main(String[] args) throws ExecutionException, InterruptedException {
        // 组合实现方式1 thenCompose 一个计算的输入依赖另外一个计算的结果
        CompletableFuture<Void> future01 = CompletableFuture.supplyAsync(J6_Combination::compute)
            .thenCompose(x -> CompletableFuture.supplyAsync(() -> multi(x)))
            .thenAccept(x -> System.out.println("运算结果:" + x));    // 运算结果:10000
        future01.get();

        System.out.println();

        // 组合实现方式2 thenCombineAsync 两个计算之间不依赖
        CompletableFuture<Integer> future02 = CompletableFuture.supplyAsync(J6_Combination::compute);
        CompletableFuture<Integer> future03 = CompletableFuture.supplyAsync(() -> J6_Combination.multi(100));
        CompletableFuture<Integer> futureAll = future02.thenCombineAsync(future03, (x, y) -> x + y);
        System.out.println("运算结果:" + futureAll.get()); // 运算结果:10100

    }
}
十一、ThreadLocal
ThreadLocal 是以增加资源的方式来避免竞态,它会为每一个线程创建一份私有的资源,从而避免对公共资源的竞争。实例如下:
/**
 * 线程不安全的SimpleDateFormat
 */
public class J1_ThreadUnsafe {

    private static final SimpleDateFormat sdf = new SimpleDateFormat("yyyy-MM-dd HH:mm:ss");
    private static int sum = 1000;
    private static CountDownLatch countDownLatch = new CountDownLatch(sum);
    private static AtomicInteger atomicInteger = new AtomicInteger(0);

    static class Task implements Runnable {

        @Override
        public void run() {
            try {
                Date parse = sdf.parse("2018-08-08 08:08:08");
                System.out.println(parse);
                atomicInteger.incrementAndGet();
            } catch (ParseException e) {
                e.printStackTrace();
            } finally {
                countDownLatch.countDown();
            }
        }
    }

    public static void main(String[] args) throws InterruptedException {
        ExecutorService executorService = Executors.newFixedThreadPool(10);
        for (int i = 0; i < sum; i++) {
            executorService.execute(new Task());
        }
        countDownLatch.await();
        System.out.println("格式化成功次数为:" + atomicInteger.get());
    }
}
因为 SimpleDateFormat 是线程不安全的,因此其格式化成功的次数总是小于 100 次,此时可以使用 ThreadLocal 进行改写,让每个线程都持有自己独立的格式化器,具体如下:
public class J2_ThreadSafe {

    private static ThreadLocal<SimpleDateFormat> threadLocal = new ThreadLocal<>();
    private static int sum = 1000;
    private static CountDownLatch countDownLatch = new CountDownLatch(sum);
    private static AtomicInteger atomicInteger = new AtomicInteger(0);

    static class Task implements Runnable {

        @Override
        public void run() {
            try {
                // 如果当前线程中不存在该值,则创建一个
                if (threadLocal.get() == null) {
                    threadLocal.set(new SimpleDateFormat("yyyy-MM-dd HH:mm:ss"));
                }
                // 使用线程私有的SimpleDateFormat
                Date parse = threadLocal.get().parse("2018-08-08 08:08:08");
                System.out.println(parse);
                atomicInteger.incrementAndGet();
            } catch (ParseException e) {
                e.printStackTrace();
            } finally {
                countDownLatch.countDown();
            }
        }
    }

    public static void main(String[] args) throws InterruptedException {
        ExecutorService executorService = Executors.newFixedThreadPool(10);
        for (int i = 0; i < sum; i++) {
            executorService.execute(new Task());
        }
        countDownLatch.await();
        System.out.println("格式化成功次数为:" + atomicInteger.get());
        executorService.shutdown();
    }
}
参考资料
- 黄文海 . Java 多线程编程实战指南(核心篇). 电子工业出版社 . 2017-04
- 葛一鸣 . 实战 Java 高并发程序设计(第 2 版). 电子工业出版社 . 2018-10
- 周志明 . 深入理解 Java 虚拟机(第 2 版). 机械工业出版社 . 2013-09-01
- 汪文君 . Java 高并发编程详解 . 机械工业出版社 . 2018-06