Hello Cube
Hello Cube
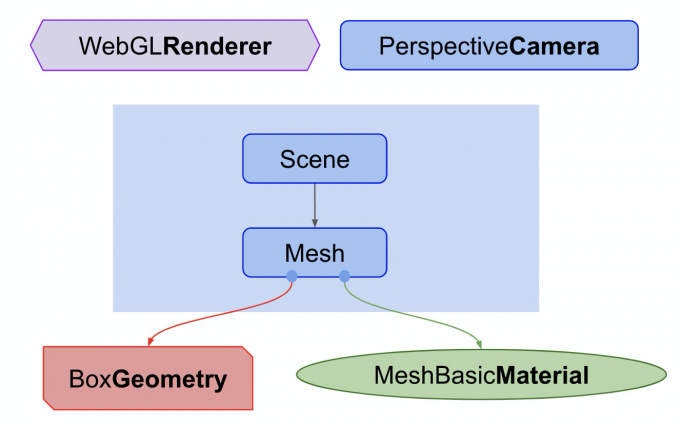
在 Three.js 中,一个场景想要显示任何东西需要三种类型的组件:
- 相机:决定哪些东西将要在屏幕上渲染。
- 光源:它们会对材质如何显示,以及生成阴影时材质如何使用产生影响。
- 物体:它们是在相机透视图里的渲染对象:方块、球体等。

// Online Demo: https://codepen.io/pen/?&editable=true&editors=101=https%3A%2F%2Fthreejsfundamentals.org%2F
import * as THREE from "https://threejsfundamentals.org/threejs/resources/threejs/r119/build/three.module.js";

function main() {
  const canvas = document.querySelector("#c");
  const renderer = new THREE.WebGLRenderer({ canvas });

  const fov = 75;
  const aspect = 2; // the canvas default
  const near = 0.1;
  const far = 5;
  const camera = new THREE.PerspectiveCamera(fov, aspect, near, far);
  camera.position.z = 2;

  const scene = new THREE.Scene();

  {
    const color = 0xffffff;
    const intensity = 1;
    const light = new THREE.DirectionalLight(color, intensity);
    light.position.set(-1, 2, 4);
    scene.add(light);
  }

  const boxWidth = 1;
  const boxHeight = 1;
  const boxDepth = 1;
  const geometry = new THREE.BoxGeometry(boxWidth, boxHeight, boxDepth);

  const material = new THREE.MeshPhongMaterial({ color: 0x44aa88 }); // greenish blue

  const cube = new THREE.Mesh(geometry, material);
  scene.add(cube);

  function render(time) {
    time *= 0.001; // convert time to seconds

    cube.rotation.x = time;
    cube.rotation.y = time;

    renderer.render(scene, camera);

    requestAnimationFrame(render);
  }
  requestAnimationFrame(render);
}

main();
相机
这里对于相机的位置进行简要分析:
- fov 是 field of view 的缩写。当前的情况是垂直方向为 75 度。注意 three.js 中大多数的角用弧度表示,但是因为某些原因透视摄像机使用角度表示。
- aspect 指 canvas 的显示比例。但是在默认情况下 canvas 是 300x150 像素,所以 aspect 为 300/150 或者说 2.。
- near 和 far 代表摄像机前方将要被渲染的空间。任何在这个范围前面或者后面的物体都将被裁剪(不绘制)。
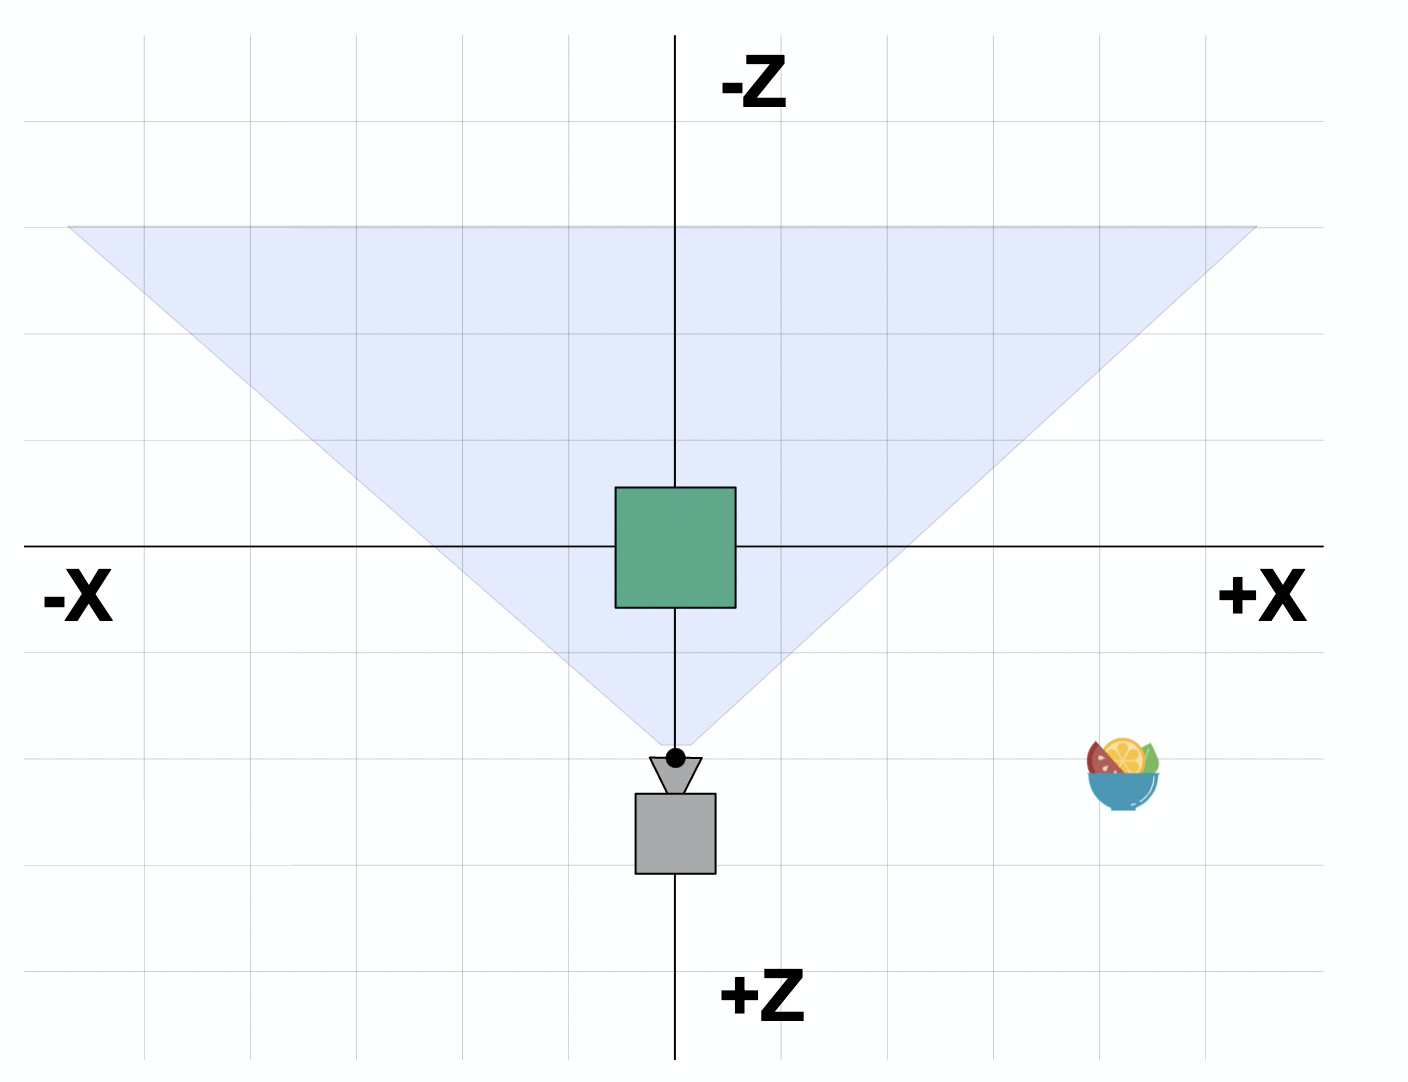
这四个参数定义了一个 “frustum”(译者注:视椎体)。frustum 是指一个像被削去顶部 的金字塔形状。换句话说,可以把"frustum"想象成其他形状比如球体、立方体、棱柱体、截椎体。近平面和远平面的高度由 fov 决定。两个平面的宽度由 fov 和 aspect 决定。截椎体内部的物体将被绘制,截椎体外的东西将不会被绘制。
摄像机默认指向 Z 轴负方向,上方向朝向 Y 轴正方向。我们将会把立方体 放置在坐标原点,所以我们需要往后移动摄像机才能看到物体。

上面的示意图中我们能看到摄像机的位置在 z = 2。它朝向 Z 轴负方向。我们的截椎体从摄像机前方的 0.1 到 5。因为这张图是俯视图,fov 会受到 aspect 的影响。canvas 的宽度是高度的两倍,所以水平视角会比我们设置的垂直视角 75 度要大。
动画
我们来让立方体旋转起来,希望 能看出是三维的。为了让它动起来我们需要在渲染循环函数中使用 requestAnimationFrame.
function render(time) {
  time *= 0.001; // convert time to seconds

  cube.rotation.x = time;
  cube.rotation.y = time;

  renderer.render(scene, camera);

  requestAnimationFrame(render);
}
requestAnimationFrame(render);
requestAnimationFrame 会告诉浏览器你有那些东西想要做动画。传入一个函数作为回调函数。我们这里的函数是 render。浏览器 会调用你的函数然后如果你更新了跟页面显示有关的东西,浏览器就会重新渲染页面。我们这里是调用 three.js 的 renderer.render 函数来绘制我们的场景。
requestAnimationFrame 会传入从页面加载到 我们函数的时间. 传入的时间是毫秒数。我发现 用秒会更简单所以我们把它转换成秒。
灯光
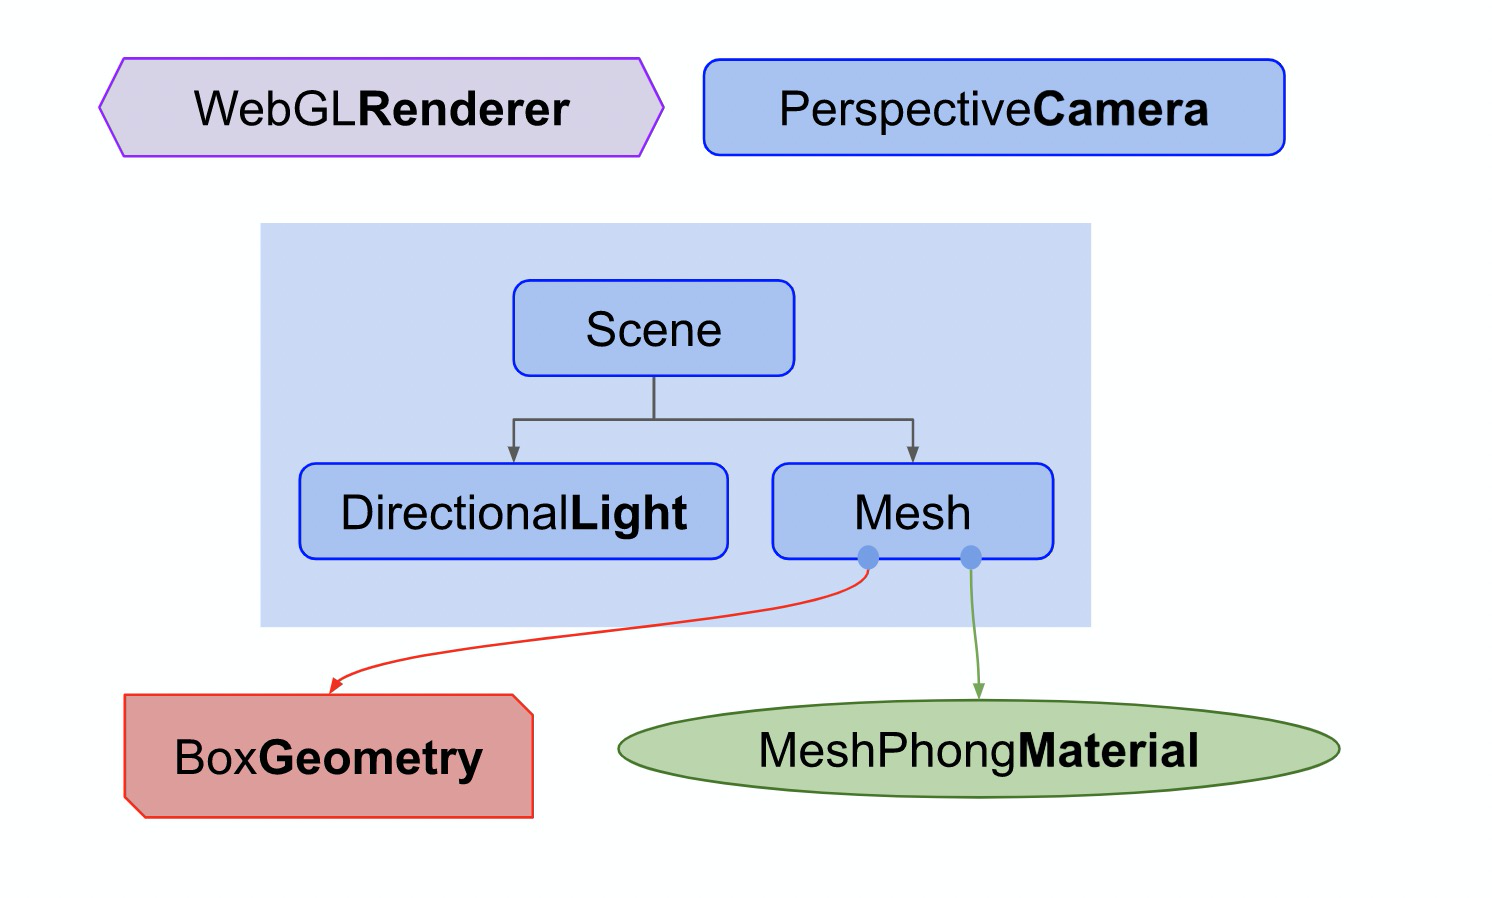
效果好了一些但还是很难看出是三维的。添加灯光会有帮助,所以我们来添加一盏灯光。three.js 中有很多种类型的灯光,现在我们先创建一盏平行光。
{
  const color = 0xffffff;
  const intensity = 1;
  const light = new THREE.DirectionalLight(color, intensity);
  light.position.set(-1, 2, 4);
  scene.add(light);
}
平行光有一个位置和目标点。默认值都为 0, 0, 0。我们这里 设置灯光的位置为 -1, 2, 4 所以它位于摄像机前面的 稍微左上方一点。目标点还是 0, 0, 0 所以它朝向 坐标原点。我们还需要改变材质。MeshBasicMaterial 材质不会受到灯光的 影响。我们将他改成会受灯光影响的 MeshPhongMaterial 材质。
- const material = new THREE.MeshBasicMaterial({color: 0x44aa88});  // greenish blue
+ const material = new THREE.MeshPhongMaterial({color: 0x44aa88});  // greenish blue

多个立方体
为了更有乐趣我们再添加两个立方体。每个立方体将会使用同一个几何体但是不同的材质,这样每个立方体将会是不同的颜色。首先我们创建一个根据指定的颜色生成新材质的函数。然后函数会根据指定的几何体生成一个 mesh,最后将他添加进场景并设置 X 轴的位置。
function makeInstance(geometry, color, x) {
  const material = new THREE.MeshPhongMaterial({ color });

  const cube = new THREE.Mesh(geometry, material);
  scene.add(cube);

  cube.position.x = x;

  return cube;
}
然后我们将使用三种不同的颜色和 X 轴位置调用三次函数,将生成的网格实例存在一个数组中。
const cubes = [
  makeInstance(geometry, 0x44aa88, 0),
  makeInstance(geometry, 0x8844aa, -2),
  makeInstance(geometry, 0xaa8844, 2),
];
最后我们将在渲染函数中旋转三个立方体。我们 给每个立方体设置了稍微不同的旋转角度。
function render(time) {
  time *= 0.001;  // convert time to seconds

  cubes.forEach((cube, ndx) => {
    const speed = 1 + ndx * .1;
    const rot = time * speed;
    cube.rotation.x = rot;
    cube.rotation.y = rot;
  });

  ...
