
DOM-CheatSheet
DOM CheatSheet | DOM 语法速览与实践清单
const bodyRect = document.body.getBoundingClientRect(),
  elemRect = element.getBoundingClientRect(),
  offset = elemRect.top - bodyRect.top;

console.log("Element is " + offset + " vertical pixels from <body>");
// 获取 StyleSheet 对象
var sheets = document.styleSheets; // returns an Array-like StyleSheet List
var sheet = document.styleSheets[0];

// 添加样式规则
sheet.insertRule("header { float: left; opacity: 0.8; }", 1);
界面事件
事件监听
function ready(callback) {
  ...
  var state = document.readyState;
  if (state === 'complete' || state === 'interactive') {
    return setTimeout(callback, 0);
  }

  document.addEventListener('DOMContentLoaded', function onLoad() {
    callback();
  });
}
The DOM of the referenced element is not part of the DOM of the referencing HTML page. It has isolated style sheets.
在拖拽等场景中我们还需要处理 mousedown 与 touchstart 等事件,iPhone 中有著名的 300ms 延迟;即当用户触碰到屏幕时,会立刻触发 touchstart 事件,但是在等待 300ms 之后,才会触发 click 事件,来保证多次 Tap 或者伸缩事件。
事件传播与委托
DOM Events 标准中规定了事件传播的三个阶段,分别为:
- Capturing Phase | 捕获阶段:自顶向下传递到目标元素
- Target Phase | 目标阶段:事件达到目标元素
- Bubbling Phase | 冒泡阶段:事件自底向上传递
下图以 table 中的某个 <td> 元素为例,指明了事件传播的顺序:
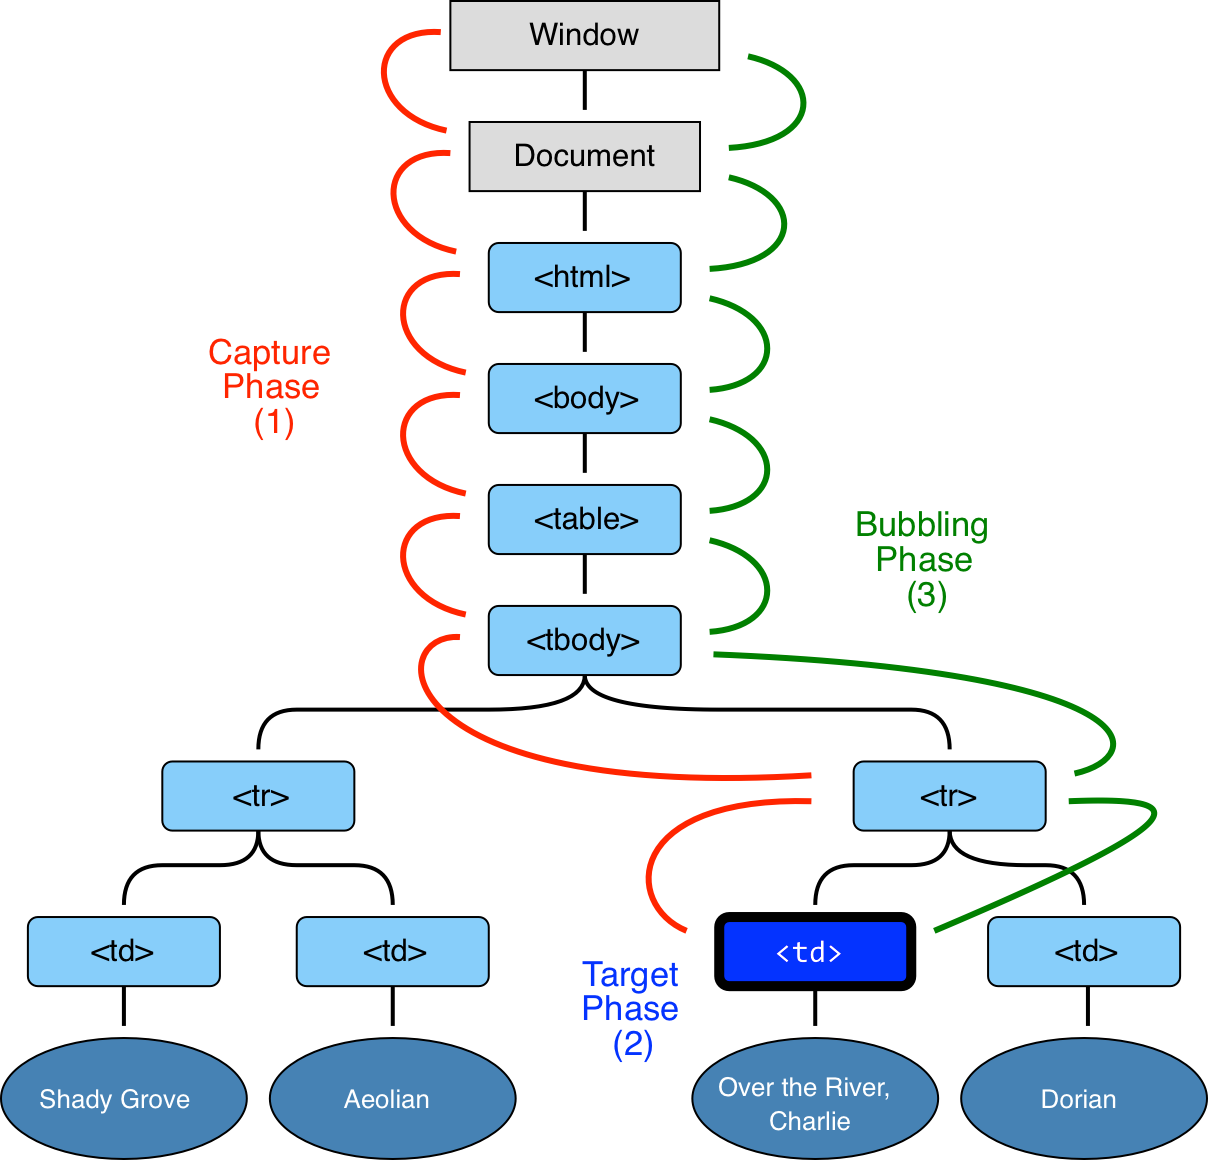
鉴于捕获阶段很少被提及,我们主要会讨论冒泡阶段;对于常见的 addEventListener 设置监听器函数而言,如果其第三个参数设置为 true,则会工作在捕获阶段;否则默认工作在冒泡阶段。
DOM 事件委托即指一种以单一通用父节点上绑定响应函数而不是在每个子元素上绑定响应函数的机制,它主要是依赖于上文提及的事件冒泡(Bubbling)机制。当某个元素上触发了某个事件之后,所有注册到该 Target 上的监听器都会被触发。并且该事件会按照 DOM 树的层级逐步冒泡传递到绑定在父层节点的监听器上,每个监听器都会检查是否是关联的 EventTarget,这一步骤会重复进行直到到达 Document 根节点。
// document.addEventListener("click", delegate(buttonsFilter, buttonHandler));
function delegate(criteria, listener) {
  return function (e) {
    var el = e.target;
    do {
      if (!criteria(el)) {
        continue;
      }
      e.delegateTarget = el;
      listener.call(this, e);
      return;
    } while ((el = el.parentNode));
  };
}
滚动事件
在 Web 开发中,scroll 事件是一个很重要的事件。通过 scroll 事件,我们可以通过一些方式获知视口在页面的位置。知道这个信息可以帮助我们判断很多东西,如用户即将浏览到页面底部,是不是该调用 API 加载一些新的内容等等。
如果 scroll 的目标元素是一个元素的话,比如说是一个 div 元素。那么此时事件只有从 document 到 div 的捕获阶段以及 div 的冒泡阶段。如果尝试在父级监视 scroll 的冒泡阶段监视这一事件是无效的。如果 scroll 是由 document.defaultView(目前 document 关联的 window 对象)产生的有冒泡阶段。但是由于其本身就是 DOM 树里最顶级的对象,因此只能在 window 里监视 scroll 的捕获阶段以及冒泡阶段。
针对这个特性,我们往往在 window 上监听 scroll 的捕获阶段,即 window.addEventListener('scroll', handler, true) 以避免所谓的滚动失效。
自定义事件
const event = new Event("build");

// Listen for the event.
elem.addEventListener(
  "build",
  function (e) {
    /* ... */
  },
  false
);

// Dispatch the event.
elem.dispatchEvent(event);
路由
const stateObj = { foo: "bar" };

// 将当前 URL 替换为 http://mozilla.org/bar.html
history.pushState(stateObj, "page 2", "bar.html");
浏览器也为我们提供了 onhashchange 函数来监听 Hash 的变化:
if ("onhashchange" in window) {
  //no alert
  console.log("The browser supports the hashchange event!");
}

function locationHashChanged() {
  if (location.hash === "#somecoolfeature") {
    somecoolfeature();
  }
}

window.onhashchange = locationHashChanged;
网络通信
XMLHTTPRequest
var xhr = new XMLHttpRequest();
xhr.open("GET", url);
xhr.responseType = "json";

xhr.onload = function () {
  console.log(xhr.response);
};

xhr.onerror = function () {
  console.log("Booo");
};

xhr.send();
Fetch
XMLHttpRequest (XHR) 是经典的浏览器中网络请求框架,jQuery 则为我们封装了 jQuery.ajax(), jQuery.get(), jQuery.post() 等辅助方法。而 Fetch API 正逐步成为跨平台的基于 Promise 的异步网络请求标准,其基本用法如下:
fetch("./file.json")
  .then((response) => {
    response.json().then((data) => {
      console.log(data);
    });
  })
  // 使用 catch 方法容错
  .catch((err) => {
    console.error(err);
  });
Request
fetch 函数允许传入 Request 对象,我们可以在封装 Request 对象的时候传入自定义配置:
// Headers 对象用于设置请求头
const headers = new Headers();
headers.append("Content-Type", "application/json");

const request = new Request("./file.json", {
  headers: new Headers({ "Content-Type": "application/json" }),
});

fetch(request);
简单的 POST 请求构造方式如下:
const options = {
  method: "post",
  headers: {
    "Content-type": "application/x-www-form-urlencoded; charset=UTF-8",
  },
  body: "foo=bar&test=1",
};
fetch(url, options).catch((err) => {
  console.error("Request failed", err);
});
发起 Fetch 请求后获得的响应体中会包含 response.type 属性,其有 basic,cors 以及 opaque 三种类型,用于标识响应结果的来源以及处理方式。当我们发起同域请求时,结果类型会被标识为 basic,并且不会对响应的读取有任何限制。当发起的是跨域请求,并且响应头中包含了 CORS 相关设置,那么响应类型会被标识为 cors。cors 与 basic 还是非常相似的,除了 cors 响应限制了仅可以读取 Cache-Control, Content-Language, Content-Type, Expires, Last-Modified, 以及 Pragma 这些响应头字段。最后,opaque 则是针对那些进行跨域访问但是并未返回 CORS 头的请求;标识为该类型的响应并不可以读取其中内容,也无法判断其是否请求成功。
针对响应类型的不同,我们也可以在请求体中预设不同的请求模式,以加以过滤:
-
same-origin: 仅针对同域请求有效,拒绝其他域的请求。
-
cors: 允许针对同域或者其他访问正确的 CORS 头的请求。
-
cors-with-forced-preflight: 每次请求前都会进行预检。
-
no-cors: 针对那些未返回 CORS 头的域发起请求,并且返回 opaque 类型的响应,并不常用。
参照上文,
fetch("http://some-site.com/cors-enabled/some.json", { mode: "cors" });
Response
fetch 函数会返回 Stream 类型的对象,其包含了关于请求以及响应的信息,可以通过如下方式访问元数据:
fetch("./file.json").then((response) => {
  // 返回状态码
  console.log(response.status);
  // 状态描述
  console.log(response.statusText);
  // 101, 204, 205, or 304 is a null body status
  // 200 to 299, inclusive, is an OK status (success)
  // 301, 302, 303, 307, or 308 is a redirect
  console.log(response.headers.get("Content-Type"));
  console.log(response.headers.get("Date"));
});
对于响应体,则需要使用内置的 text 或 json 方式访问:
// 根据响应头决定读取方式
fetch(url).then(function(response) {
  if (response.headers.get('Content-Type') === 'application/json') {
    return response.json();
  }
  return response.text();
});

// 内置流读取函数
.arrayBuffer()
.blob()
.formData()
.json()
.text()
相较于 XHR,fetch 优势即在于能够访问到底层的数据流,并且添加自定义的操作以进行局部响应(避免接受全部内容),或者在 ServiceWorker 中进行流转化:
self.addEventListener("fetch", function (event) {
  event.respondWith(
    fetch("video.unknowncodec").then(function (response) {
      var h264Stream = response.body
        .pipeThrough(codecDecoder)
        .pipeThrough(h264Encoder);

      return new Response(h264Stream, {
        headers: { "Content-type": "video/h264" },
      });
    })
  );
});
response 作为流对象,往往只可以被读取一次,如果需要多次读取,那么应该使用 clone 方法获取复制体;不过这也意味着原始数据需要保存在内存中,直至所有的副本被读取或者内存回收。
fetch(url).then(function (response) {
  return response.json().catch(function () {
    // This does not work:
    return response.text();
  });
  // 修改为
  // return response.clone().json()...
});
跨域请求
跨域只是限制不同域下的数据接收,跨域提交数据有些时候是可以的,但会收到浏览器的报错,此时数据已经提交到服务器,但浏览器拒绝接收服务器的返回,这时就存在跨域问题,你不知道服务器对你的数据到底做了些什么,他可能没收到(网络原因),也可能收到了没处理(数据有误),也可能处理了数据(你不知道返回什么,这点你不能确定)。表单提交之后就跳转到提交的目标 url 上了,所以不存在数据的返回,页面是跳转后的 url 返回的
CORS
本地通信
跨 Tab 或者跨 iframe 间通信
同源通信
- BroadcastChannel
BroadcastChannel 能够用于同源不同页面之间完成通信的功能。它与 window.postMessage 的区别就是,BroadcastChannel 只能用于同源的页面之间进行通信,而 window.postMessage 却可以用于任何的页面之间;BroadcastChannel 可以认为是 window.postMessage 的一个实例,它承担了 window.postMessage 的一个方面的功能。
const channel = new BroadcastChannel("channel-name");

channel.postMessage("some message");
channel.postMessage({ key: "value" });

channel.onmessage = function (e) {
  const message = e.data;
};

channel.close();
- SharedWorker API
Shared Worker 类似于 Web Workers,不过其会被来自同源的不同浏览上下文间共享,因此也可以用作消息的中转站。
// main.js
const worker = new SharedWorker("shared-worker.js");

worker.port.postMessage("some message");

worker.port.onmessage = function (e) {
  const message = e.data;
};

// shared-worker.js
const connections = [];

onconnect = function (e) {
  const port = e.ports[0];
  connections.push(port);
};

onmessage = function (e) {
  connections.forEach(function (connection) {
    if (connection !== port) {
      connection.postMessage(e.data);
    }
  });
};
- Local Storage
localStorage 是常见的持久化同源存储机制,其会在内容变化时触发事件,也就可以用作同源界面的数据通信。
localStorage.setItem("key", "value");

window.onstorage = function (e) {
  const message = e.newValue; // previous value at e.oldValue
};
跨域通信
postMessage
数据存储
本地存储
Cookie
localStorage & sessionStorage
indexdb
文件操作
Blob 是 JavaScript 中的对象,表示不可变的类文件对象,里面可以存储大量的二进制编码格式的数据。Blob 对象的创建方式与其他并无区别,构造函数可接受数据序列与类型描述两个参数:
const debug = { hello: "world" };
let blob = new Blob([JSON.stringify(debug, null, 2)], {
  type: "application/json",
});
// Blob(22) {size: 22, type: "application/json"}

// 也可以转化为类 URL 格式
const url = URL.createObjectURL(blob);
// "blob:https://developer.mozilla.org/88c5b6de-3735-4e02-8937-a16cc3b0e852"

// 设置自定义的样式类
blob = new Blob(["body { background-color: yellow; }"], {
  type: "text/css",
});

link = document.createElement("link");
link.rel = "stylesheet";
//createObjectURL returns a blob URL as a string.
link.href = URL.createObjectURL(blob);
其他的类型转化为 Blob 对象可以参考 covertToBlob.js,将 Base64 编码的字符串或者 DataUrl 转化为 Blob 对象。Blob 包括了 size 与 type,以及常用的用于截取的 slice 方法等属性。Blob 对象能够添加到表单中,作为上传数据使用:
const content = '<a id="a"><b id="b">hey!</b></a>'; // the body of the new file...
const blob = new Blob([content], { type: "text/xml" });

formData.append("webmasterfile", blob);
slice 方法会返回一个新的 Blob 对象,包含了源 Blob 对象中指定范围内的数据。其实就是对这个 blob 中的数据进行切割,我们在对文件进行分片上传的时候需要使用到这个方法,即把一个需要上传的文件进行切割,然后分别进行上传到服务器:
const BYTES_PER_CHUNK = 1024 * 1024; // 每个文件切片大小定为1MB .
const blob = document.getElementById("file").files[0];
const slices = Math.ceil(blob.size / BYTES_PER_CHUNK);
const blobs = [];
Array.from({ length: slices }).forEach(function (item, index) {
  blobs.push(blob.slice(index, index + 1));
});
这里我们使用的 blob 对象实际上是 HTML5 中的 File 对象;HTML5 File API 允许我们对本地文件进行读取、上传等操作,主要包含三个对象:File,FileList 与用于读取数据的 FileReader。File 对象就是 Blob 的分支,或者说子集,表示包含某些元数据的单一文件对象;FileList 即是文件对象的列表。FileReader 能够用于从 Blob 对象中读取数据,包含了一系列读取文件的方法与事件回调,其基本用法如下:
const reader = new FileReader();
reader.addEventListener("loadend", function () {
  // reader.result 包含了 Typed Array 格式的 Blob 内容
});
reader.readAsArrayBuffer(blob);

blob = new Blob(["This is my blob content"], { type: "text/plain" });
read.readAsText(bolb); // 读取为文本

// reader.readAsArrayBuffer   //将读取结果封装成 ArrayBuffer,如果想使用一般需要转换成 Int8Array或DataView
// reader.readAsBinaryString  // 在IE浏览器中不支持改方法
// reader.readAsTex // 该方法有两个参数,其中第二个参数是文本的编码方式,默认值为 UTF-8
// reader.readAsDataURL  // 读取结果为DataURL
// reader.readyState // 上传中的状态
在图片上传中,我们常常需要获取到本地图片的预览,参考 antd/Upload 中的处理:
// 将文件读取为 DataURL
const previewFile = (file: File, callback: Function) => {
  const reader = new FileReader();
  reader.onloadend = () => callback(reader.result);
  reader.readAsDataURL(file);
};

// 设置文件的 DataUrl
previewFile(file.originFileObj, (previewDataUrl: string) => {
  file.thumbUrl = previewDataUrl;
});

// JSX
<img src={file.thumbUrl || file.url} alt={file.name} />;
另一个常用的场景就是获取剪贴板中的图片,并将其预览展示,可以参考 coding-snippets/image-paste:
const cbd = e.clipboardData;
const fr = new FileReader();

for (let i = 0; i < cbd.items.length; i++) {
  const item = cbd.items[i];

  if (item.kind == "file") {
    const blob = item.getAsFile();
    if (blob.size === 0) {
      return;
    }

    previewFile(blob);
  }
}
标准的 Web 标准中提供了 FileReader 对象进行读取操作,不过 Chrome 中提供了 FileWriter 对象,允许我们在浏览器沙盒中创建文件,其基于 requestFileSystem 方法:
// 仅可用于 Chrome 浏览器中
window.requestFileSystem =
  window.requestFileSystem || window.webkitRequestFileSystem;

window.requestFileSystem(type, size, successCallback, opt_errorCallback);
简单的文件创建与写入如下所示:
function onInitFs(fs) {
  fs.root.getFile(
    "log.txt",
    { create: true },
    function (fileEntry) {
      // Create a FileWriter object for our FileEntry (log.txt).
      fileEntry.createWriter(function (fileWriter) {
        fileWriter.onwriteend = function (e) {
          console.log("Write completed.");
        };

        fileWriter.onerror = function (e) {
          console.log("Write failed: " + e.toString());
        };

        // Create a new Blob and write it to log.txt.
        var blob = new Blob(["Lorem Ipsum"], { type: "text/plain" });

        fileWriter.write(blob);
      }, errorHandler);
    },
    errorHandler
  );
}

window.requestFileSystem(window.TEMPORARY, 1024 * 1024, onInitFs, errorHandler);