
Go-CheatSheet
Go CheatSheet | Go 语法速览与实践清单
Go (a.k.a. Golang) is a statically-typed programming language first developed at Google. It is derived from C with additional features such as garbage collection, type safety, dynamic-typing capabilities, additional built-in types, and a large standard library.
可以前往这里下载 Go SDK 安装包,或者使用 brew 等包管理器安装。现在我们也推荐使用 gvm 这样的专用版本管理工具,来方便地更新与切换版本。环境配置完毕后,可以使用 go get 获取依赖,go run 运行程序,go build 来编译项目生成与包名(文件夹名)一致的可执行文件。Golang 1.8 之后支持 dep 依赖管理工具,对于空的项目使用 dep init 初始化依赖配置,其会生成 Gopkg.toml Gopkg.lock vendor/ 这三个文件(夹)。
在这里,我们首先对于 Go 的常用语法有所了解,Go 语言设计的关键字,了解这些关键字有助于命名变量的冲突避免:
break    default      func    interface    select
case     defer        go      map          struct
chan     else         goto    package      switch
const    fallthrough  if      range        type
continue for          import  return       var
包管理与模块机制
Golang 的包管理是一直是为人诟病之处,从 Golang 1.5 引入的 vendor 机制,到准官方工具 dep, 再到 Go 1.11 引入了 Go Modules,其包管理与模块机制一直也在不断地完善。
Package
早期 Go 命令依赖于 GOPATH 环境变量进行代码组织,多项目情况下也可以使用 ln 进行目录映射以方便进行项目管;GOPATH 允许设置多个目录,每个目录都会包含三个子目录:src 用于存放源代码,pkg 用于存放编译后生成的文件,bin 用于存放编译后生成的可执行文件。
Go 并没有相对路径引入,而是以文件夹为单位定义模块;并且规定每个源文件的首部需要进行包声明,可执行文件默认放在 main 包中。如上文所述,GOPATH 环境变量为我们指明了本地工作空间的地址,而每个导入路径都会指明唯一的包。标准库中的包往往是 fmt, net/http 这样的短路径;而对于自定义的包,则必须指明根路径以避免潜在的冲突。如果我们使用了 Github 这样的源码仓库,则需要使用 github.com/user 作为根路径。
// goworkdir/src/project1/utils/auth.go
package utils

func Test1() string {
    return "Test1"
}

// goworkdir/src/project1/controllers/login.go
package controllers

import "project1/utils"

func Test2() string {
    return utils.Test1()
}

// goworkdir/src/project1/main.go
package main

import (
    "fmt"
    "project1/controllers"
)

func main() {
    fmt.Println(controllers.Test2())
}
Go 中还允许针对不同的编译目标平台引入不同的文件:
mypkg_linux.go         // only builds on linux systems
mypkg_windows_amd64.go // only builds on windows 64bit platforms
我们可以使用 dep ensure -add github.com/pkg/errors 添加依赖,运行之后,其会在 toml 文件中添加如下锁:
[[constraint]]
  name = "github.com/pkg/errors"
  version = "0.8.0"
简单的 Go 中 Hello World 代码如下:
package main
import "fmt"
func main() {
    fmt.Println("hello world")
}
Go Modules
Go Modules 将包名与路径分离,可以存放于文件系统上的任何为止,而不用管 GOPATH 路径到底是什么,我们可以创建任意的项目目录:
$ mkdir -p /tmp/scratchpad/hello
$ cd /tmp/scratchpad/hello
然后初始化所需要的模块:
$ go mod init github.com/you/hello

go: creating new go.mod: module github.com/you/hello
然后照常编写 Go 模块代码:
// hello.go
package main

import (
    "fmt"
    "rsc.io/quote"
)

func main() {
    fmt.Println(quote.Hello())
}
在执行 go build 命令之后,即可以在 go.mod 文件中查看模块定义与显式的声明:
$ cat go.mod

module github.com/you/hello

require rsc.io/quote v1.5.2
模块结构
模块是包含了 Go 源文件的目录树,并在根目录中添加了名为 go.mod 的文件,go.mod 包含模块导入名称,声明了要求的依赖项,排除的依赖项和替换的依赖项。
module my/thing

require (
        one/thing v1.3.2
        other/thing v2.5.0 // indirect
        ...
)

exclude (
        bad/thing v0.7.3
)

replace (
        src/thing 1.0.2 => dst/thing v1.1.0
)
需要注意的是,该文件中声明的依赖,并不会在模块的源代码中使用 import 自动导入,还是需要我们人工添加 import 语句来导入的。模块可以包含其他模块,在这种情况下,它们的内容将从父模块中排除。除了 go.mod 文件外,跟目录下还可以存在一个名为 go.sum 的文件,用于保存所有的依赖项的哈希摘要校验之,用于验证缓存的依赖项是否满足模块要求。
外部依赖
模块依赖项会被下载并存储到 GOPATH/src/mod 目录中,直接后果就是废除了模块的组织名称。假设我们正在开发的项目依赖于 github.com/me/lib 且版本号 1.0.0 的模块,对于这种情况,我们会发现在 GOPATH/src/mod 中文件结构如下
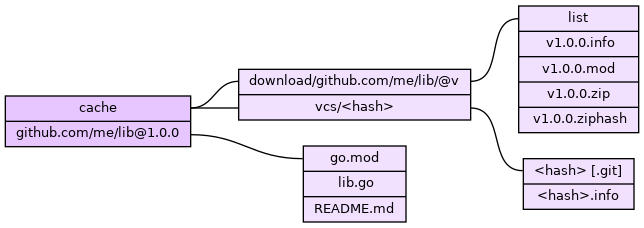
Go 的模块版本号必须以 v 开头,在发布版本时可以通过 Tag 方式来指定不同的版本。我们可以使用 go mod tidy 来移除未被使用的依赖,使用 go mod vendor 可以生成独立的 vendor 目录。
初始化函数
各个包中默认首字母大写的函数作为其他包可见的导出函数,而小写函数则默认外部不可见的私有函数。Go 允许在文件中包含初始化函数,默认使用 _ 引入的包仅调用初始化函数:
import (
        mongo "mywebapp/libs/mongodb/db" // 对引入的模块重命名
        _ "mywebapp/libs/mysql/db" // 使用空白下划线表示仅调用其初始化函数

)
初始化函数会于属性初始化之后被调用:
// sandbox.go
package main

import "fmt"

var _ int64 = s()
func init() {
    fmt.Println("init in sandbox.go")
}
func s() int64 {
    fmt.Println("calling s() in sandbox.go")
    return 1
}
func main() {
    fmt.Println("main")
}

// a.go
package main
import "fmt"

var _ int64 = a()
func init() {
    fmt.Println("init in a.go")
}
func a() int64 {
    fmt.Println("calling a() in a.go")
    return 2
}

/* 输出结果
calling a() in a.go
calling s() in sandbox.go
init in a.go
init in sandbox.go
main
*/
而单个文件中也可以定义多个初始化函数:
package main

import "fmt"

func init() {
    fmt.Println("init 1")
}
func init() {
    fmt.Println("init 2")
}
func main() {
    fmt.Println("main")
}
表达式与控制流
变量声明与赋值
作为强类型静态语言,Go 允许我们在变量之后标识数据类型,也为我们提供了自动类型推导的功能。不过需要注意的是,在函数体外 Go 仅允许使用声明式语句。
// 声明三个变量,皆为 bool 类型
var c, python, java bool

// 声明不同类型的变量,并且赋值
var i bool, j int = true, 2

// 复杂变量声明
var (
	ToBe   bool       = false
	MaxInt uint64     = 1<<64 - 1
	z      complex128 = cmplx.Sqrt(-5 + 12i)
)

// 短声明变量
c, python, java := true, false, "no!"

// 声明常量
const constant = "This is a constant"
在 Go 中,如果我们需要比较两个复杂对象的相似性,可以使用 reflect.DeepEqual 方法:
m1 := map[string]int{
    "a":1,
    "b":2,
}
m2 := map[string]int{
    "a":1,
    "b":2,
}

fmt.Println(reflect.DeepEqual(m1, m2))
条件判断
Go 提供了增强型的 if 语句进行条件判断:
// 基础形式
if x > 0 {
	return x
} else {
	return -x
}

// 条件判断之前添加自定义语句
if a := b + c; a < 42 {
	return a
} else {
	return a - 42
}

// 常用的类型判断
var val interface{}
val = "foo"
if str, ok := val.(string); ok {
	fmt.Println(str)
}
Switch
Go 也支持使用 Switch 语句:
// 基础格式
switch operatingSystem {
    case "darwin":
        fmt.Println("Mac OS Hipster")
        // 默认 break,不需要显式声明
    case "linux":
        fmt.Println("Linux Geek")
    default:
        // Windows, BSD, ...
        fmt.Println("Other")
}

// 类似于 if,可以在条件之前添加自定义语句
switch os := runtime.GOOS; os {
case "darwin": ...
}

// 使用 switch 语句进行类型判断:
switch v := anything.(type) {
  case string:
    fmt.Println(v)
  case int32, int64:
    ...
  default:
    fmt.Println("unknown")
}
Switch 中也支持进行比较:
number := 42
switch {
	case number < 42:
		fmt.Println("Smaller")
	case number == 42:
		fmt.Println("Equal")
	case number > 42:
		fmt.Println("Greater")
}
或者进行多条件匹配:
var char byte = '?'
switch char {
	case ' ', '?', '&', '=', '#', '+', '%':
		fmt.Println("Should escape")
}
Switch 中还支持对于类型的条件判断:
type T struct {
	name string
}

t := T{}

switch (interface{})(t).(type) {
case T:
	fmt.Print("1")
}
循环
Go 支持使用 for 语句进行循环,不存在 while 或者 until:
for i := 1; i < 10; i++ {
}

// while - loop
for ; i < 10;  {
}

// 单条件情况下可以忽略分号
for i < 10  {
}

// ~ while (true)
for {
}
我们也可以使用 range 函数,对于 Arrays 与 Slices 进行遍历:
// loop over an array/a slice
for i, e := range a {
    // i 表示下标,e 表示元素
}

// 仅需要元素
for _, e := range a {
    // e is the element
}

// 或者仅需要下标
for i := range a {
}

// 定时执行
for range time.Tick(time.Second) {
    // do it once a sec
}
因为 Go 没有逗号运算符,并且 ++ 与 – 是语句而非表达式,因此当我们想要去同时处理多个变量时,需要使用并行赋值:
// Reverse a
for i, j := 0, len(a)-1; i < j; i, j = i+1, j-1 {
    a[i], a[j] = a[j], a[i]
}
Function | 函数
定义,参数与返回值
// 简单函数定义
func functionName() {}

// 含参函数定义
func functionName(param1 string, param2 int) {}

// 多个相同类型参数的函数定义
func functionName(param1, param2 int) {}

// 函数表达式定义
add := func(a, b int) int {
	return a + b
}
Go 支持函数的最后一个参数使用 … 设置为不定参数,即可以传入一个或多个参数值:
func adder(args ...int) int {
	total := 0
	for _, v := range args { // Iterates over the arguments whatever the number.
		total += v
	}
	return total
}

adder(1, 2, 3) // 6
adder(9, 9) // 18

nums := []int{10, 20, 30}
adder(nums...) // 60

// 传入任意类型的不定参数
我们也可以使用 Function Stub 作为函数参数传入,以实现回调函数的功能:
func Filter(s []int, fn func(int) bool) []int {
    var p []int // == nil
    for _, v := range s {
        if fn(v) {
            p = append(p, v)
        }
    }
    return p
}
Go 支持多个返回值:
// 返回单个值
func functionName() int {
    return 42
}

// 返回多个值
func returnMulti() (int, string) {
    return 42, "foobar"
}
var x, str = returnMulti()

// 命名返回多个值
func returnMulti2() (n int, s string) {
    n = 42
    s = "foobar"
    // n and s will be returned
    return
}
var x, str = returnMulti2()
虽然 Go 不是函数式语言,但是也可以用其实现柯里函数(Currying Function):
func add(x, y int) int {
    return x+ y
}

func adder(x int) (func(int) int) {
    return func(y int) int {
        return add(x, y)
    }
}

func main() {
	add3 := adder(3)
	fmt.Println(add3(4))    // 7
}
闭包 | Closure
Go 同样支持词法作用域与变量保留,因此我们可以使用来访问函数定义处外层的变量:
func scope() func() int{
    outer_var := 2
    foo := func() int { return outer_var}
    return foo
}
闭包中并不能够直接修改外层变量,而是会自动重定义新的变量值:
func outer() (func() int, int) {
    outer_var := 2
    inner := func() int {
        outer_var += 99
        return outer_var // => 101 (but outer_var is a newly redefined
    }
    return inner, outer_var // => 101, 2 (outer_var is still 2, not mutated by inner!)
}
函数执行
Go 中提供了 defer 关键字,允许将某个语句的执行推迟到函数返回语句之前:
func read(...) (...) {
  f, err := os.Open(file)
  ...
  defer f.Close()
  ...
  return .. // f will be closed
多个 defer 出现的时候,多个 defer 之间按照 LIFO(后进先出)的顺序执行:
package main
import "fmt"
func main(){
    defer func(){
        fmt.Println("1")
    }()
    defer func(){
        fmt.Println("2")
    }()
    defer func(){
        fmt.Println("3")
    }()
}
异常处理
Go 语言中并不存在 try-catch 等异常处理的关键字,对于那些可能返回异常的函数,只需要在函数返回值中添加额外的 Error 类型的返回值:
type error interface {
    Error() string
}
某个可能返回异常的函数调用方式如下:
import (
    "fmt"
    "errors"
)

func main() {
    result, err:= Divide(2,0)

    if err != nil {
            fmt.Println(err)
    }else {
            fmt.Println(result)
    }
}

func Divide(value1 int,value2 int)(int, error) {
    if(value2 == 0){
        return 0, errors.New("value2 mustn't be zero")
    }
    return value1/value2 , nil
}
Panic 与 Recover
Go 还为我们提供了 panic 函数,所谓 panic,即是未获得预期结果,常用于抛出异常结果。譬如当我们获得了某个函数返回的异常,却不知道如何处理或者不需要处理时,可以直接通过 panic 函数中断当前运行,打印出错误信息、Goroutine 追踪信息,并且返回非零的状态码:
_, err := os.Create("/tmp/file")
if err != nil {
	panic(err)
}
当函数 F 调用 panic 时,其执行流程会被终止,而所有的 deferred 函数会被正常的依次执行,然后 F 会返回到调用者。F 此时的行为逻辑与直接调用 panic 函数并无差异,进程会在函数所在 Goroutine 的所有函数执行完毕之后,恢复异常的调用栈。Recover 函数则可以手动地恢复 Panic Goroutine 的执行,正常的执行中 recover 函数会返回 nil;而如果当前 Goroutine 被 panic,recover 函数会捕获传递给 panic 的值,并且恢复正常的执行流。
package main

import "fmt"

func main(){
    defer func(){
        if r := recover();r != nil{
            fmt.Println(r)
        }
    }()
    panic([]int{12312})
}
数据类型与结构
Go 中可以使用 interface{} 来表示任意类型。
类型绑定与初始化
Go 中的 type 关键字能够对某个类型进行重命名:
// IntSlice 并不等价于 []int,但是可以利用类型转换进行转换
type IntSlice []int
a := IntSlice{1, 2}
可以使用 T(v) 或者 obj.(T) 进行类型转换,obj.(T) 仅针对 interface{} 类型起作用:
t := obj.(T) // if obj is not T, error
t, ok := obj.(T) // if obj is not T, ok = false

// 类型转换与判断
str, ok := val.(string);
基本数据类型
interface {} // ~ java Object
bool // true/false
string
int8  int16  int32  int64
int // =int32 on 32-bit, =int64 if 64-bit OS
uint8 uint16 uint32 uint64 uintptr
uint
byte // alias for uint8
rune // alias for int32, represents a Unicode code point
float32 float64
字符串
Go 中支持以反引号定义多行字符串:
// 多行字符串声明
hellomsg := `
 "Hello" in Chinese is 你好 ('Ni Hao')
 "Hello" in Hindi is नमस्ते ('Namaste')
`
fmt 的输出模块为我们提供了方便的格式化字符串输出功能:
fmt.Println("Hello, 你好, नमस्ते, Привет, ᎣᏏᏲ") // basic print, plus newline
p := struct { X, Y int }{ 17, 2 }
fmt.Println( "My point:", p, "x coord=", p.X ) // print structs, ints, etc
s := fmt.Sprintln( "My point:", p, "x coord=", p.X ) // print to string variable

fmt.Printf("%d hex:%x bin:%b fp:%f sci:%e",17,17,17,17.0,17.0) // c-ish format

// Sprintf 能够仅进行字符串格式化,返回格式化后的字符串,而非输出到控制台
s2 := fmt.Sprintf( "%d %f", 17, 17.0 )

// 将其输出到错误流中
fmt.Fprintf(os.Stderr, "an %s\n", "error")
序列类型
Array 与 Slice 都可以用来表示序列数据,二者也有着一定的关联。
Array
其中 Array 用于表示固定长度的,相同类型的序列对象,可以使用如下形式创建:
[N]Type
[N]Type{value1, value2, ..., valueN}

// 由编译器自动计算数目
[...]Type{value1, value2, ..., valueN}
其具体使用方式为:
// 数组声明
var a [10]int

// 赋值
a[3] = 42

// 读取
i := a[3]

// 声明与初始化
var a = [2]int{1, 2}
a := [2]int{1, 2}

// 加 ... 会限制数组长度
a := [...]int{1, 2}

// 声明二维数组
array := [2][3]int{{1, 2, 3}, {4, 5, 6}}
Go 内置了 len 与 cap 函数,用于获取数组的尺寸与容量:
var arr = [3]int{1, 2, 3}
arr := [...]int{1, 2, 3}

len(arr) // 3
cap(arr) // 3
不同于 C/C++ 中的指针(Pointer)或者 Java 中的对象引用(Object Reference),Go 中的 Array 只是值(Value)。这也就意味着,当进行数组拷贝,或者函数调用中的参数传值时,会复制所有的元素副本,而非仅仅传递指针或者引用。显而易见,这种复制的代价会较为昂贵。
Slice
Slice 为我们提供了更为灵活且轻量级地序列类型操作,可以使用如下方式创建 Slice:
// 使用内置函数创建
make([]Type, length, capacity)
make([]Type, length)

// 声明为不定长度数组
[]Type{}
[]Type{value1, value2, ..., valueN}

// 对现有数组进行切片转换
array[:]
array[:2]
array[2:]
array[2:3]

// 不定类型切片声明
a := []interface{}{2, 1, []interface{}{3, []interface{}{4, 5}, 6}, 7, []interface{}{8}}

// 二维不定类型切片
b := [][]interface{}{
		[]interface{}{1, 2},
		[]interface{}{3, 4},
	}
不同于 Array, Slice 可以看做更为灵活的引用类型(Reference Type),它并不真实地存放数组值,而是包含数组指针(ptr),len,cap 三个属性的结构体。换言之,Slice 可以看做对于数组中某个段的描述,包含了指向数组的指针,段长度,以及段的最大潜在长度,其结构如下图所示:

// 创建 len 为 5,cap 为 5 的 Slice
s := make([]byte, 5)

// 对 Slice 进行二次切片,此时 len 为 2,cap 为 3
s = s[2:4]

// 恢复 Slice 的长度
s = s[:cap(s)]
需要注意的是,切片操作并不会真实地复制 Slice 中值,只是会创建新的指向原数组的指针,这就保证了切片操作和操作数组下标有着相同的高效率。不过如果我们修改 Slice 中的值,那么其会真实修改底层数组中的值,也就会体现到原有的数组中:
d := []byte{'r', 'o', 'a', 'd'}
e := d[2:]
// e == []byte{'a', 'd'}
e[1] = 'm'
// e == []byte{'a', 'm'}
// d == []byte{'r', 'o', 'a', 'm'}
Go 提供了内置的 append 函数,来动态为 Slice 添加数据,该函数会返回新的切片对象,包含了原始的 Slice 中值以及新增的值。如果原有的 Slice 的容量不足以存放新增的序列,那么会自动分配新的内存:
// len=0 cap=0 []
var s []int

// len=1 cap=2 [0]
s = append(s, 0)

// len=2 cap=2 [0 1]
s = append(s, 1)

// len=5 cap=8 [0 1 2 3 4]
s = append(s, 2, 3, 4)

// 使用 ... 来自动展开数组并进行合并
a := []string{"John", "Paul"}
b := []string{"George", "Ringo", "Pete"}
a = append(a, b...) // equivalent to "append(a, b[0], b[1], b[2])"
// a == []string{"John", "Paul", "George", "Ringo", "Pete"}
我们也可以使用内置的 copy 函数,进行 Slice 的复制,该函数支持对于不同长度的 Slice 进行复制,其会自动使用最小的元素数目。同时,copy 函数还能够自动处理使用了相同的底层数组之间的 Slice 复制,以避免额外的空间浪费。
func copy(dst, src []T) int

// 申请较大的空间容量
t := make([]byte, len(s), (cap(s)+1)*2)
copy(t, s)
s = t
Map | 映射类型
var m map[string]int
m = make(map[string]int)
m["key"] = 42

// 删除某个键
delete(m, "key")

// 测试该键对应的值是否存在
elem, has_value := m["key"]

// map literal
var m = map[string]Vertex{
    "Bell Labs": {40.68433, -74.39967},
    "Google":    {37.42202, -122.08408},
}
Struct & Interface | 结构体与接口
Struct | 结构体
Go 语言中并不存在类的概念,只有结构体,结构体可以看做属性的集合,同时可以为其定义方法。
// 声明结构体
type Vertex struct {
    // 结构体的属性,同样遵循大写导出,小写私有的原则
    X, Y int
    z bool
}

// 也可以声明匿名/隐式结构体
point := struct {
	X, Y int
}{1, 2}

// 声明空指针
var v *Vertex = new(Vertex)

// 显式声明键
var v = Vertex{X: 1, Y: 2}

// 声明数组
var v = []Vertex{{1,2},{5,2},{5,5}}

// 创建结构体实例
var v = Vertex{1, 2}

// 读取或者设置属性
v.X = 4;
方法的声明也非常简洁,只需要在 func 关键字与函数名之间声明结构体指针即可,该结构体会在不同的方法间进行复制:
func (v Vertex) Abs() float64 {
    return math.Sqrt(v.X*v.X + v.Y*v.Y)
}

// Call method
v.Abs()
对于那些需要修改当前结构体对象的方法,则需要传入指针:
func (v *Vertex) add(n float64) {
    v.X += n
    v.Y += n
}
new 与 make
Pointer | 指针
// p 是 Vertex 类型
p := Vertex{1, 2}

// q 是指向 Vertex 的指针
q := &p

// r 同样是指向 Vertex 对象的指针
r := &Vertex{1, 2}

// 指向 Vertex 结构体对象的指针类型为 *Vertex
var s *Vertex = new(Vertex)
当我们在定义结构体时,可以使用指针或者值作为接受者来定义方法用指针作为接收者,那么变量(或者可以称作对象)本身是按引用传递的,在方法内可以修改对象的数据。使用值接收者,以为这是按值传递的,那么对象在方法内是处于只读状态的。并且指针类型时调用方法会复制 receiver, 每调用一次 TestValue,item 就会被复制一次.实际相当于 TestValue(v),TestPointer(&v)。
type VideoItem struct {
	GroupId  int64
	ItemId   int64
	AggrType int32
}

func (item *VideoItem) TestPointer(GroupId int64) {
	fmt.Printf("TestPointer %p %v\n", item, item)
	item.GroupId = GroupId
}

func (item VideoItem) TestValue(GroupId int64) {
	fmt.Printf("TestPointer %p %v\n", &item, &item)
	item.GroupId = GroupId
}

func main() {
	v := VideoItem{}
	fmt.Printf("TestPointer %p %v\n", &v, &v)

    // 值不变
    v.TestValue(1)

    // v 的 GroupId 被修改为 2
	v.TestPointer(2)

    // 值不变
    (&v).TestValue(3)

    // v 的  GroupId 被修改为 4
	(&v).TestPointer(4)

	fmt.Println(v)
}

/*
TestPointer 0xc420018300 &{0 0 0}
TestPointer 0xc420018360 &{0 0 0}
TestPointer 0xc420018300 &{0 0 0}
TestPointer 0xc4200183c0 &{0 0 0}
TestPointer 0xc420018300 &{0 0 0}
*/
传递普通变量传递值拷贝,不能修改原始值,如果是大对象则内存效率不高。 传递变量的指针,指针为固定大小,效率更高,可以就地修改对象的原始值。 在方法集的使用上,无论接收者是变量还是指针,都能直接正确调用,无需特殊处理,能正确调用所有绑定在该值或指针上的方法,Go 会自动帮我们处理引用与解引用。
Interface | 接口
Go 允许我们通过定义接口的方式来实现多态性:
// 接口声明
type Awesomizer interface {
    Awesomize() string
}

// 结构体并不需要显式实现接口
type Foo struct {}

// 而是通过实现所有接口规定的方法的方式,来实现接口
func (foo Foo) Awesomize() string {
    return "Awesome!"
}
type Shape interface {
   area() float64
}

func getArea(shape Shape) float64 {
   return shape.area()
}

type Circle struct {
   x,y,radius float64
}

type Rectangle struct {
   width, height float64
}

func(circle Circle) area() float64 {
   return math.Pi * circle.radius * circle.radius
}

func(rect Rectangle) area() float64 {
   return rect.width * rect.height
}

func main() {
   circle := Circle{x:0,y:0,radius:5}
   rectangle := Rectangle {width:10, height:5}

   fmt.Printf("Circle area: %f\n",getArea(circle))
   fmt.Printf("Rectangle area: %f\n",getArea(rectangle))
}
//Circle area: 78.539816
//Rectangle area: 50.000000
惯用的思路是先定义接口,再定义实现,最后定义使用的方法:
package animals

type Animal interface {
	Speaks() string
}

// implementation of Animal
type Dog struct{}
func (a Dog) Speaks() string { return "woof" }

/** 在需要的地方直接引用 **/
package circus

import "animals"

func Perform(a animal.Animal) { return a.Speaks() }
Go 也为我们提供了另一种接口的实现方案,我们可以不在具体的实现处定义接口,而是在需要用到该接口的地方,该模式为:
func funcName(a INTERFACETYPE) CONCRETETYPE
定义接口:
package animals

type Dog struct{}
func (a Dog) Speaks() string { return "woof" }

/** 在需要使用实现的地方定义接口 **/
package circus

type Speaker interface {
	Speaks() string
}

func Perform(a Speaker) { return a.Speaks() }
Embedding | 嵌入
Go 语言中并没有子类继承这样的概念,而是通过嵌入(Embedding)的方式来实现类或者接口的组合。
// ReadWriter 的实现需要同时满足 Reader 与 Writer
type ReadWriter interface {
    Reader
    Writer
}

// Server 暴露了所有 Logger 结构体的方法
type Server struct {
    Host string
    Port int
    *log.Logger
}

// 初始化方式并未受影响
server := &Server{"localhost", 80, log.New(...)}

// 却可以直接调用内嵌结构体的方法,等价于 server.Logger.Log(...)
server.Log(...)

// 内嵌结构体的名词即是类型名
var logger *log.Logger = server.Logger
Reflection & Generics | 反射与泛型
Go 中并没有泛型。
Web 编程
HTTP Server
package main

import (
    "fmt"
    "net/http"
)

// define a type for the response
type Hello struct{}

// let that type implement the ServeHTTP method (defined in interface http.Handler)
func (h Hello) ServeHTTP(w http.ResponseWriter, r *http.Request) {
    fmt.Fprint(w, "Hello!")
}

func main() {
    var h Hello
    http.ListenAndServe("localhost:4000", h)
}

// Here's the method signature of http.ServeHTTP:
// type Handler interface {
//     ServeHTTP(w http.ResponseWriter, r *http.Request)
// }
Beego
利用 Beego 官方推荐的 bee 命令行工具,我们可以快速创建 Beego 项目,其目录组织方式如下:
quickstart
├── conf
│   └── app.conf
├── controllers
│   └── default.go
├── main.go
├── models
├── routers
│   └── router.go
├── static
│   ├── css
│   ├── img
│   └── js
├── tests
│   └── default_test.go
└── views
    └── index.tpl
在 main.go 文件中,我们可以启动 Beego 实例,并且调用路由的初始化配置文件:
package main

import (
        _ "quickstart/routers"
        "github.com/astaxie/beego"
)

func main() {
        beego.Run()
}
而在路由的初始化函数中,我们会声明各个路由与控制器之间的映射关系:
package routers

import (
        "quickstart/controllers"
        "github.com/astaxie/beego"
)

func init() {
        beego.Router("/", &controllers.MainController{})
}
也可以手动指定 Beego 项目中的静态资源映射:
beego.SetStaticPath("/down1", "download1")
beego.SetStaticPath("/down2", "download2")
在具体的控制器中,可以设置返回数据,或者关联的模板名:
package controllers

import (
        "github.com/astaxie/beego"
)

type MainController struct {
        beego.Controller
}

func (this *MainController) Get() {
        this.Data["Website"] = "beego.me"
        this.Data["Email"] = "astaxie@gmail.com"
        this.TplNames = "index.tpl" // version 1.6 use this.TplName = "index.tpl"
}
DevPractics | 开发实践
文件读写
import (
    "io/ioutil"
)
...
datFile1, errFile1 := ioutil.ReadFile("file1")
if errFile1 != nil {
	panic(errFile1)
}
...
测试
VSCode 可以为函数自动生成基础测试用例,并且提供了方便的用例执行与调试的功能。
/** 交换函数 */
func swap(x *int, y *int) {
	x, y = y, x
}

/** 自动生成的测试函数 */
func Test_swap(t *testing.T) {
	type args struct {
		x *int
		y *int
	}
	tests := []struct {
		name string
		args args
	}{
		// TODO: Add test cases.
	}
	for _, tt := range tests {
		t.Run(tt.name, func(t *testing.T) {
			swap(tt.args.x, tt.args.y)
		})
	}
}